Senin, 30 Juni 2014

How to feed tomato plants using natural products?

Tomatoes grow in all Sunset Climate Zones as an annual. They need temperatures in the range of 55 to 100 degrees Fahrenheit and 8 hours of sunlight daily. Each tomato plant should produce 10 to 15 pounds of fruit when grown properly. Even though these plants are heavy feeders, they can be fed natural products to help fruit production. Yellowing leaves and stunted growth indicates a tomato plant needs a boost of nutrients.
  1. Spread 3 to 4 inches of well-rotted compost over the tomato planting area. Dig the compost into the top 12 inches of soil with a shovel and break up the dirt clumps to obtain a smooth-textured soil. Adding compost to the soil increases air, water and nutrients available to the roots of the tomato plants, encouraging strong plant growth.
  2. Plant the tomato plants in the amended soil. Spread a 3 to 4-inch layer of organic mulch, such as dried leaves or grass clippings, around the base of the plants. Mulching reduces soil moisture loss, regulates soil temperatures, discourages weed growth and provides a source of slow-release nutrients.
  3. Clean a large container and fill it with water. Take a large cloth bag and fill it with organic materials like seaweed, garden plant debris and kitchen scraps. Tie the bag shut, attach it to a broom handle or a long stick and place the bag in the water with the stick across the top of the container; this allows you to retrieve the bag without reaching into the water you are using to create organic tea.
  4. Check the organic tea every couple of days to see if it has turned a dark brown color. Once finished, remove the bag and empty the contents into the compost pile. Dilute the organic tea by mixing 1 cup of organic tea with enough water to make it look like weak tea. Drench the root zone of the tomato plants with the organic tea when the first small tomato has appeared.

Tomato plant care using coffee grounds

Use fresh coffee grounds in the garden, not fermented or rotten ones.Coffee has a myriad of uses besides just being a beverage. Many people use it for mulching and gardening as it contains minerals and nutrients that are beneficial to soil and plants. Tomatoes are one vegetable plant that does very well with used coffee grounds. Coffee grounds provide acid and nitrogen, nutrients that fertilize and condition the soil, providing ideal conditions for growing tomato plants.

Before tossing coffee grounds in the garbage, think twice. High in nitrogen, they can have a second life as a natural fertilizer and pest deterrent and are ideal for use in growing tomatoes. Non-coffee drinkers can also fertilize with grounds, because many coffee shops give away used grounds for free to anyone who asks. Depending on the intended result, coffee grounds can be scattered around the base of tomato plants or used in compost for them.

Using coffee grounds
Begin by saving used coffee grounds. Sprinkle the coffee grounds on top of the soil surrounding the plant. Water the grounds daily to maintain proper moisture and to encourage the nutrients in the coffee grounds to equally distribute in the soil. Reapply the coffee grounds when you have a difficult time noticing their presence on top of the soil.

Fertilizer
Purchase a 5-gallon bucket from the local hardware or gardening store. Place ½ pound of ground coffee in the bottom of the bucket. Boil a medium sized pot of water and add to the ground coffee. Let it steep for 5 minutes and then fill the remaining space of the bucket with water from the outdoor hose. Place the coffee solution in a watering can and apply to your tomato plants on a daily basis until you achieve the desired result.

Coffee as a natural insecticide
Coffee grounds also act as a natural insecticide on tomato plants, according to information from Scribd.com. Use this method especially if growing organic tomato plants, as this removes the need for a synthetic insecticide. Prepare coffee in a French press as double strength. Add 6 tbsp. of ground coffee to a 16-ounce French press and fill with boiling water. Let steep for 4 minutes and then stir with a spoon. Let the coffee cool to room temperature before using on a plant. Use this extra strength coffee on your tomato plants by slowly pouring the coffee, including the grounds, over the leaves and fruit of the tomato.

Coffee grounds and tomato growth
Using coffee grounds to grow healthy tomatoes is a smart idea for several reasons. Coffee grounds are a strong source of nitrogen, which is vital to the development of healthy roots and aids in the development of plant tissue and the production of chlorophyll. Coffee grounds are also an easy means of enriching soil with organic matter, which improves aeration, drainage and water retention.

Composting
Mixing coffee grounds with wood ash, shredded leaves and lime creates a rich compost, one high in nitrogen that's easy for tomatoes to access. Using grounds to make compost is also a way of lessening their acidity, because in their raw, untreated form, coffee grounds may make the soil too acidic for plants to thrive.
No Matches Found. Please try your search again.

Protection
A bag of used coffee grounds serves double duty as an all-natural fertilizer and slug and snail repellent. The caffeine in coffee grounds is lethal to snails and slugs, which absorb it when crawling over the grounds using their soft, fleshy foot. To use coffee grounds for this purpose, simply pour them around tomato plants, encircling them completely to create a poisonous barrier for unwanted guests.

Other benefits
Coffee grounds also attract beneficial creatures to garden beds. Earthworms love coffee grounds and serve many purposes in the garden, turning organic matter into plant food and increasing the amount of oxygen and water in the soil. Coffee grounds also fight late blight, a fungal disease that covers tomato plants in lesions before destroying the fruits. The disease is typically controlled with fungicides, but coffee grounds are a nontoxic, natural alternative.

Minggu, 29 Juni 2014

The best fertilizers to increase fruits on tomato vines

Tomatoes are America's most popular garden vegetables. They are easily cultivated in the warm months of summer and produce a healthy crop of fruit in small home garden spaces. Tomatoes need at least 6 to 8 hours of daily sun to flourish. You can support the optimum health and fruit production of your tomato plants by growing them in fertile, well-drained soil and by fertilizing them with organic or synthetic agents that offer the nutrients they crave.

Fertilizers can be a critical part of any successful gardening project. In the case of growing food plants such as tomatoes, careful selection and addition of fertilizer to the soil in which you are growing tomatoes can yield larger tomatoes as well as more substantial harvests. Luckily, with some careful consideration, you can choose the right fertilizer and know how to best incorporate it into your soil.

Test your soil
Good tomatoes grow in good soil. They develop the best root systems in deep, organically rich soil that remains consistently moist without becoming boggy. Tomatoes prefer a slightly acidic soil environment with a soil pH of 6.5 to 6.8. Before planting tomatoes, test your soil using a complete kit from a local garden center or service available in your area. Select a report that details primary nutrients -- nitrogen, phosphorus and potassium, as well as secondary plant nutrients including calcium and magnesium. Select one that also includes an assessment of organic matter content and soil texture.

Improve your soil
Adjust acidic soils with lime products and alkaline ones with sulfur supplements, according to your soil report. Dry, sandy soils and dense clay types benefit from the incorporation of organic materials such as finished compost, aged manure and chopped pine bark. These amendments facilitate better soil moisture balance, act as pH buffers and offer essential primary and secondary plant nutrients to tomato roots. Before planting, apply a 3- to 4-inch layer of these materials to your planned garden area. Work or till this in to a depth of 12 to 18 inches, along with your native soil.

Elemental nutrition
Tomatoes, like all vegetable crops, require certain levels of easily accessible nutrition. Scholarly studies have shown that tomatoes taste better when they receive extra potassium and phosphorus while growing. You will get higher yields of disease-free fruits when easily available calcium and magnesium are present to help prevent blossom-end rot, a common bane of tomato growers. If these nutrients are imbalanced, according to your soil report, you can supplement your soil with organic or synthetic fertilizers that provide them.

Fertilizer choices
Natural plant nutrient sources you can use include meals of bone, blood, alfalfa and fish. Specialty organic products, designed specifically for tomatoes are also available. These contain balanced levels of nitrogen, phosphorus and potassium as well as important secondary nutrients like calcium and magnesium. They also enrich the soil with humic matter as they break down over time. Synthetic fertilizers with a low nitrogen, high phosphorus and high potassium balance, particularly 8-32-16 or 6-24-24, are recommended for productive tomato plants.

Fertilizer ratings
To understand how to choose a fertilizer for tomatoes or for any other plant, it is necessary to first understand how fertilizers are differentiated from each other. Any fertilizer you purchase will have three numbers printed conspicuously on the bag; these numbers are known as the NPK rating, because they describe the concentration, by weight, of nitrogen (N), phosphorus (P) and potassium (K). For instance, if a fertilizer is labeled as 5-10-15, it contains 5 percent nitrogen, 10 percent phosphorus and 15 percent potassium by weight, with other ingredients making up the remaining 70 percent of bag weight.

Fertilizer selection
To a substantial extent, the choice of what type of fertilizer is dependent on the unique nutritional needs of the soil in which the tomatoes are growing. Have your soil tested by a local university extension office and see what nutrients your soil is lacking the most. In general, however, tomatoes respond well to fertilizers with a low concentration of nitrogen and higher concentrations of phosphorus and potassium, such as 8-32-16 or 6-24-24. Avoid using ammonia fertilizers such as urea or ammonium nitrate for your tomato plants.

Application tips
A fertilizer fitting this description should be worked into soil just before planting time. Use around 1 lb. of fertilizer per 100 square feet of garden space, unless you are only able to find a 5-10-5 or 5-10-10 fertilizer, in which case you should increase the amount used to 2 lbs. per 100 square feet to provide soil with enough nitrogen content.

Other considerations
The above guidelines describe how to prepare your soil for successful tomato plants, but to fully maximize your fruit yield, additional fertilizer applications are necessary. A solution consisting of 2 tbsp. of 10-52-17 or 15-30-15 fertilizer in one gallon of water should be added to the planting hole when tomatoes are transplanted to outside soil. Finally, side-dress the tomato plants with calcium nitrate at a rate of 3.5 lbs. per 100 square feet to ensure that plant nutrients are not diverted from fruit production into leaf production.

Sabtu, 28 Juni 2014

Planting Pecan Trees with the Groasis Waterboxx

Pecans are one of the few truly all American foods.  Pecan, so named in the Algonquin Indian language because it was a nut that was so hard it required a stone to crack, is native to North America.  Settlers ate wild pecans, and today ~90% of all pecans are grown in the U.S.  In the author's opinion, pecan pie, not apple pie, should be considered the quintessential American desert (as apples are originally from central Asia).

Pecan trees can grow in USDA zones 5-9, but generally do better in the southern states.  Pecan trees generally grow between 70-100 feet tall, but have grown taller.  They have a moderate growth rate once established, but are very slow to establish without help due to their root structure.

For those seeking to plant pecans mainly as a landscape tree, as always the Arbor Day Foundation is an excellent source of bare root trees.  For those looking to plant pecan trees for nut production, however, grafted trees are strongly recommended.  Grafted trees start nut production earlier and enable more reliable nut production.

New Mexico State University provides excellent information about buying grafted pecan trees.  They recommend root stock 3-4 years old and scion wood 1-2 years old, with a diameter (caliper) of 5/8 - 1 inch.

Pecan trees can be very difficult to establish, especially in the dry Southwest states.  Pecan trees have a true tap root initially, meaning they have one central root that grows straight down.  This is similar to many other nut trees and allows the trees to access deep soil capillary water during periods of drought.  However, it also makes the pecan trees very difficult to establish.  The roots need to be kept almost constantly wet until they establish lateral roots, and this can entail a huge water bill, many times the initial cost of the tree, not to mention the cost of the labor to install irrigation or move hoses between the bases of trees at least once weekly.  Is there a solution that eliminates the need for irrigation of the newly planted pecan?  Yes - and it is called the Groasis Waterboxx.

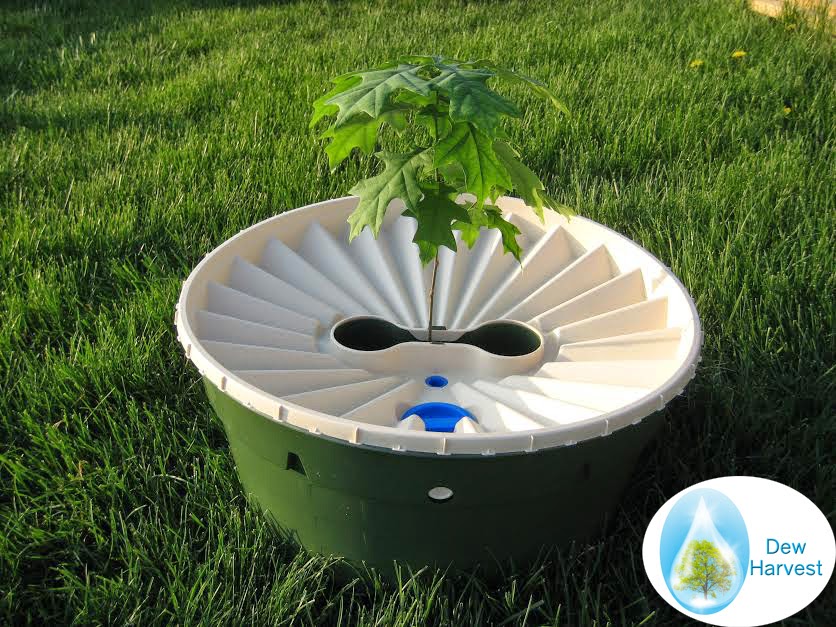
The Groasis Waterboxx is a self refilling water battery, and plant incubator which is placed around the newly planted pecan (or any other tree).  It is filled with 4 gallons of water, and the soil beneath the Waterboxx is saturated with up to 10 gallons of water.  The Waterboxx has a wick which allows water to be slowly released to the growing tap root of the pecan.  The Waterboxx is refilled from dew and rain.  The Waterboxx, although 10 inches high, can be completely refilled with 4 inches of rain.  With proper set up, the Waterboxx achieves water homeostasis, meaning it will not run dry even without refilling.  This is because it is able to fill with condensation most nights and utilize and store rarer rains.

The Waterboxx also prevents the soil beneath it from drying out (its UV resistant plastic is impermeable to water).  This both sustains the tap root of the pecan and induces it to grow to deep capillary water quickly.  The Waterboxx can be left around the base of the pecan tree until the caliper (diameter) of the trunk reaches almost 3 inches.  The mechanism of the Waterboxx is explained clearly below.

Of note the Waterboxx has been used for many other trees, including red oakGiant Sequoiapear and other fruit trees.  It can also be used for annual garden plants like pumpkins.

Be the first in your area to start growing pecans with the Groasis Waterboxx.  Buy the Groasis Waterboxx here (from Dew Harvest).  Pecan trees grown for nut production can be purchased from Stark Brothers Nursery. We would love to hear your comments below - to leave one, please click on "Comments".

For More Information:

http://extension.arizona.edu/sites/extension.arizona.edu/files/pubs/az1400.pdf

Jumat, 27 Juni 2014

Does too much fertilizer cause yellow leaves on a tomato plant?

Tomatoes are one of the few garden vegetables that can land their caretakers in a world of despair when problems erupt -- for all their trouble, it's a wonder anyone grows them. When tomatoes develop yellow leaves, it's unlikely to be caused by too much fertilizer, but could be due to other environmental problems or diseases.

Fertilizer is a useful product for plants such as tomatoes. The plants use the fertilizer as food to grow large and healthy. But, any gardener who has ever thought, "if a little bit is good, a lot will be better" in regards to fertilizer, soon finds out the hard way that the opposite is true. Too much fertilizer can burn the roots of plants, and can cause wilting, yellowing and even death.

Fertilizing tomatoes
A home soil test kit will give you valuable information about your tomato patch. Tomatoes thrive with medium fertility and show problems when fertility is too high or too low. Usually, they don't require any feeding at planting time, unlike many vegetables. Successful tomato producers may wait to feed tomato plants until fruits are about the size of table tennis balls. At this point, side-dress tomatoes with a small amount of nitrogen fertilizer every four to six weeks until the final harvest.

Signs of too much fertilizer

Over-fertilizing tomatoes early in their lives results in plants that are tall and spindly, with lots of deep green foliage, but few flowers. Tomatoes can't simply use the ideal amount of nitrogen they need to thrive. Instead, excess nitrogen in a tomato plant tells the plant to produce more leaves and stems at the expense of blossoms and fruits. Sometimes, excess nitrogen can be leached from the root area of tomato plants by repeated, deep waterings.

Causes of yellowing leaves
Common causes of yellow leaves on tomatoes include cool soil, age-related death of the lower leaves and a myriad of nutritional deficiencies including nitrogen, boron, potassium, iron and magnesium. Leaves may also yellow when affected by fusarium wilt, bacterial wilt or verticillium wilt. These disease are the result of fungal or bacterial pathogens multiplying rapidly in vascular tissues, causing the plant to die from lack of nutrients. Root knot nematodes can kill plants in a similar fashion, but the roots will bear distinctive swollen knots. Wilts and nematodes are difficult or impossible to treat once plants are severely affected.

Fertilizer burn
The damage done by over fertilizing plants is known as fertilizer burn. This is because plants that are given too much fertilizer have a burned appearance, with foliage that turns brown and crispy. Fertilizer burn occurs when the chemicals in fertilizer draw water out of the plant. As a result, the plant dries out. This process is known as a hygroscopic process. Salt in fertilizers are the frequent cause of the fertilizer burn.

Symptoms
Over fertilized tomato plants first show signs of damage in their leaves. As water withdraws from the leaves, they appear limp and begin to yellow. As the symptoms progress, the yellow leaves turn brown and become crispy. The best way to check for fertilizer burn around a tomato is to take a sample of the soil from around the plant and submit it for analysis to a soil laboratory. The soil laboratory will inform you if there is a high level of nutrients in the soil.

Problems from lack of fertilizer
Despite the dangers of fertilizer burn, most tomatoes are heavy feeders. Without fertilizer, tomatoes may suffer from blossom end rot, a condition that occurs when there is not enough calcium in the soil. Blossom end rot appears on tomatoes first as a slightly brown, water-soaked lesion on the blossom end of the tomato. The lesion eventually enlarges and turns black and leathery.

Soil solarization
Although the disease and pest causes of yellow leaves on a tomato are difficult to cure once the plant is already showing symptoms, you can use soil solarization to destroy these organisms before you plant your next tomato crop. After the troubled tomatoes have died or are removed, till the garden well and smooth the soil with a rake. Apply a 1 mil clear plastic tarp over the prepared and watered soil and leave it there for six weeks. This heats the soil to high enough temperatures to destroy many nematodes and soil-borne fungi and bacteria before the upcoming growing season.

Is it OK to give liquid fertilizer to tomato plants in pots on a hot day?

Tomatoes (Lycopersicon esculentum) like it hot -- but not too hot. The plants don't flourish until the daytime soil temperature is between 70 and 80 degrees Fahrenheit. But growth slows and fruit won't set above 90 F. Fertilizing in the heat can force more leafy growth than the roots can support. As well, water-soluble fertilizer applied to the potting mix, or in the water -- which container tomatoes need a lot of in the heat -- can burn the leaves since it moves quickly from roots to leaves as the plant tries to cool itself through transpiration. To avoid these problems, don't fertilize a potted tomato when its soil temperature is above 85 F (30 C).

Cool containers
When your tomatoes live in pots, the temperature in the root zone can be higher than the ground, and even the air temperature. Water potted tomatoes deeply whenever the top 1/2 inch of soil is dry -- with no water-soluble fertilizer mixed in -- to help the plant moderate its own temperature. Mulch, a light-colored pot -- or wrapping the pot in a light-colored or reflective material -- and a pot with heavy, insulating walls can help a potted tomato's soil stay cool so water-soluble fertilizer is effective. Once the temperature is back below 85 F, apply 1 tablespoon of a 5-10-5 fertilizer per gallon of water every 10 days while fruit is setting.

What is water-soluble fertilizer for tomato plants?

Water-soluble fertilizers are formulas that are dissolved in water and applied to plants at the base or foliage throughout the growing season. They’re ideal for tomato plants, which have low nitrogen requirements, because they’re fast acting, giving your plants the nutrients they need almost immediately. Water-soluble fertilizers can also be applied more frequently than granular fertilizers.

Producing bumper tomato crop may be a well-guarded secret, but many gardeners agree it begins with water-soluble fertilizer. Water-soluble fertilizer is mixed with water and applied directly to the plants throughout the growing season.

Selecting the right formula
Using a fertilizer that is high in nitrogen will give you a lush, green plant, but not much fruit. Tomato plants require a low nitrogen, high phosphorus, and medium to high potassium content. A water-soluble fertilizer with nitrogen, phosphorous, potassium ratio of 8-32-16 or 6-24-24 is often ideal. Always check the label when selecting a water-soluble fertilizer. Some formulas intended for use with tomatoes will contain traces of other elements, which can change the ratio slightly. Avoid using any fertilizers containing urea or ammonium nitrate for tomato fertilization.

Application
A base application of water-soluble fertilizer provides your tomato plant food as you water it. Follow the mixing instructions on the fertilizer label and then apply it to the soil at the plant’s base with a watering can. The nutrients are released with the water. A foliar application can also be used when your tomato needs trace elements such as iron immediately. Mix the fertilizer according to the label directions, and then apply it directly to the leaves instead of the soil. Whichever way you apply the fertilizer, keep in mind young plants only require about a cup of water-soluble fertilizer weekly. This rate is increased as the plant matures. Established tomato plants can be fed with up to a gallon of water-soluble fertilizer at each application.

Timing
The timing of application depends on the water-soluble formula you use. In general, most formulas require application every seven to 14 days, but you can mix the fertilizer at half or quarter strength and apply it more frequently. This may be necessary for new or transplanted tomato plants, which may require one to three applications of water-soluble fertilizer at the base of the plant to avoid transplant shock. When used as a starter solution, water-soluble fertilizer should have a high phosphorous content, but a low nitrogen and potassium content. Water-soluble fertilizers applied every two to four weeks during the summer help ensure nitrogen stress doesn’t affect your tomato plants. When grown in soils that are low in organic matter, your tomato plants will have little to no nitrogen around midsummer. If the foliage is yellowing, this is a sign that the plants need nitrogen.

Mixing precautions
Read the label instructions before mixing any water-soluble fertilizer, and always follow the manufacturer’s recommendations. If you mix the solution so that the concentration of fertilizer is too high, the nutrients will be highly concentrated and this can damage your tomato plant. If you mix the fertilizer in a tank prior to application, use all of the solution before you mix a fresh batch. Never try to mix more into an existing solution because you may increase the fertilizer’s concentration. When using a dry formula, do not apply it to your plants until the crystals or powder have fully dissolved in the water. Check the solution periodically to ensure that settling has not occurred. Settling of undissolved fertilizer can result in an uneven application, and this can lead to stunted growth or plant death.

Considerations


Formula
Fertilizer high in nitrogen produces lush green foliage with few tomatoes and should be avoided, unless a soil test determines that nitrogen is needed. According to the University of Missouri, tomatoes require fertilizer low in nitrogen, high in phosphorus and medium to high in potassium. A formula of 8-32-16 or 6-24-24 is ideal. However, formulas for water-soluble fertilizer designed for tomatoes may include other trace elements and the ratio may differ.

Foliar feeding

Water-soluble fertilizer designed for tomatoes is available under several brand names in a garden supply store. These are designed to be mixed with water (follow the instructions on the specific brand you purchase) and applied to the tomato plants, wetting the foliage. The foliage absorbs nutrients directly through the surface of the leaves giving the plant a quick burst of nutrients. Excess fertilizer drains into the soil providing nutrients to the roots.

Application
Typically applied with a foliar feeder attachment to the hose, the amount of dry mixture is measured and added to the feeder attachment. As water is forced through the feeder, the appropriate amount of fertilizer is mixed with the water, creating liquid fertilizer for watering the garden. Water-soluble fertilizer can also be mixed in a bucket and applied by hand or with a sprinkling can. Begin by providing a cup of water-soluble fertilizer to young seedlings and gradually increase the amount as the plant matures. Mature tomato plants may require up to a gallon of water-soluble fertilizer with each application.

Timing
Timing of application depends on the specific formula you purchase, but typically ranges from every seven to 14 days. Check the container for the manufacturer's recommendations. Some gardeners prefer to mix the formula to one-half or one-quarter strength and apply it more frequently. For newly planted tomato plants, or those grown in containers on the deck or patio, this may be a good option -- but do not exceed the recommended amount. This is one case where more is not better and may harm sensitive roots or damage foliage.

What nutrients affect tomato plants?

A summertime favorite, tomatoes' sweet juiciness tastes best when ripe right off the plant. Home gardeners often include this fruit in their vegetable patch or in patio containers. Tomatoes are fairly easy to grow given enough light and nutrients. They are heavy feeders and do well with additional fertilizer and organic rich soil. All plants need the same macro- and micro-nutrients but the amounts preferred by different species vary considerably.

Basic plant nutrition
Tomatoes need the basic macro-nutrients nitrogen, phosphorus and potassium for good growth. Nitrogen is a component of chlorophyll which helps in the performance of photosynthesis. It improves green leafy and stem growth. Phosphorus helps in the production of plant sugars and encourages budding and fruit production. Potassium enhances plant health and promotes the formation of a good root system. Tomatoes also need secondary nutrients such as calcium, magnesium and sulfur, which are usually found in soil.

Soil pH and structure
Without the proper pH, many important nutrients cannot be absorbed by the plant. Macro-nutrients are less available to plants with low pH. Low pH also enhances the production of microbes which break down nitrogen and sulfur. The structure of the soil affects the movement of water and the delivery of plant minerals. Structure also can limit how many minerals are held in soil for a tomato to use. Well-amended soil with the addition of compost adds food for the tomato roots and increases tilth to allow for adequate drainage.

Tomato fertilizer components
Tomato food is specially formulated for different stages of growth. Starter fertilizer will have a ratio of 2:1:2 which means two parts nitrogen, one part phosphorus and two parts potassium. As the plant begins to grow and bud it will need a slightly different formula. It will have one part nitrogen, two to three parts phosphorus and one part potassium. On a fertilizer label these amounts will appear as 10-25-10 or a similar ratio.

What nutrients give to tomatoes
The starter fertilizer has a small amount of nitrogen because soil amended with compost supplies some nitrogen initially. Additional nitrogen will be necessary to help the plant's core structure grow. The potassium is needed in higher amounts to spur the production of carbohydrates and develop the roots. As the plant matures and nears the flowering stage, the phosphorus becomes more important as it encourages flower bloom and fruit set. Phosphorus becomes the most needed mineral for the plant to form large flavorful fruits.

What nutrients should be added during the transplant of a tomato?

Often referred to as the most popular vegetables to grow, tomatoes (Solanum lycopersicum) can add some color to your garden. Whether you start them indoors from seed about six weeks before transplanting, or use store-bought transplants once night temperatures are above 55 degrees Fahrenheit, these heavy feeders rely on you to thrive. This means properly prepping the soil before transplanting and providing the nutrients the young plants need. When done right, the tomatoes will be harvest-ready in no time.

Tomatoes (Solanum lycopersicum) are one of the most commonly grown vegetable garden plants due to their variety of functions in the kitchen. Whether you're growing large slicing tomatoes for burgers and salads or growing sauce tomatoes for an Italian feast, fertilizer requirements are the same, but there are a few other factors that lead to healthy harvests.

Ways


Soil test
A soil test can determine the availability of nutrients in your garden's soil, which is critical to the survival and growth of vegetables. Perform the test early in the planning process, because any amendments you make can take about two years to have an effect. Use a commercial soil testing kit or consult your local cooperative extension service about soil testing. A soil pH between 6.0 and 6.8 is ideal for tomatoes. According to the test results, till limestone into the top 7 inches of soil to raise it, or incorporate sulfur to lower it.

Organic matter
Tomatoes aren't picky about the type of soil they grow in as long as it's fertile and drains well. In coastal areas, gardens tend to have loamy soil that's sometimes of a clay or sandy texture. To prevent clay soils from draining slowly, and sandy soils from draining too fast, work a 2-inch layer of organic matter, such as compost or grass clippings, into the top 6 to 8 inches of soil. This improves the soil structure and enhances its nutrient- and water-holding capacity while also promoting aeration.

Fertilizing
When fertilizing, avoid using a high-nitrogen fertilizer, because this triggers more foliage growth than fruit growth. To fertilize at transplanting time, dig a hole 6 to 8 inches deep and wide enough to fit the transplant. Then place 1 1/2 tablespoon of a 5-10-10 fertilizer in the hole and backfill it with 3 inches of soil. Then plant the transplant on top of this. Over time, the plant roots will grow toward the fertilizer and absorb nutrients from it.

Side-dressing
If you've provided your tomato transplants with ideal growing conditions, side-dressing them is another fertilizing option. After transplanting, once the tomatoes have grown to the size of a golf ball, dig a 1 inch deep, circular trench in a 6 inch diameter around the plant stem. Spread 1 1/2 tablespoon of a 5-10-10 fertilizer in the trench and cover it with 2 inches of soil. Then water the soil to bring the nutrients to the plant roots. Wait three weeks before repeating this process.

Nutrients


N-P-K ratio
All fertilizers have a three-digit number printed somewhere on the package. This number is known as the N-P-K ratio and tells you what percentage of nitrogen, phosphorus and potassium is in the fertilizer. These three nutrients are the most commonly deficient in soils and the three that plants need the most, including tomatoes. While each of these nutrients has a long list of benefits to plants, a basic breakdown is: nitrogen is responsible for strong, green growth; phosphorus aids in bud, bloom and fruit production; and potassium is pivotal in water uptake.

Best ratio?
If you choose to forgo a soil test -- although it's highly recommended for accuracy -- apply a complete fertilizer that is high in phosphorus and low in nitrogen. Look for an N-P-K ratio of 8-32-16 or 6-24-24 for optimum results. Apply this type of fertilizer at a rate of 1 pound per 100 square feet. These ratios are sometimes harder to come by in nurseries and garden centers; if you can't find these ratios, choose a fertilizer with 5-10-5 or 5-10-10, which are much more common. Apply these fertilizers at a rate of 2 cups per 100 square feet.

Tips for choosing
Nurseries and garden centers often have rows upon rows of different types of fertilizers, including organic and synthetic, granular and liquid. Some fertilizers are specifically marketed to different applications and chances are you'll see one designed specifically for tomatoes. Even if the fertilizer is marketed for tomatoes, still look at the ratio. Other fertilizers to look at during your search are those designed for flowers or vegetable gardens, sometimes called "Bud and Bloom," "Vegetable Garden Fertilizer" or something similar. These often have the high levels of phosphorus needed by tomatoes because this nutrient helps produce bigger, healthier buds, blooms and fruit.

Other growing tips
Tomatoes grow best in alkaline soil with a pH around 6.5, although slightly above or below this won't be detrimental if other conditions are met. They also require full sun and consistent moisture. Add organic material into the top 8 inches of soil to improve drainage. Consistent moisture is pivotal for tomatoes: those that don't receive consistent moisture, such as during a drought or from watering too much during different parts of the growing season, may develop blossom-end rot or other problems.

Fertilizers that are needed to grow tomatoes in a greenhouse

Tomato plants grown in greenhouses have the same nutrient requirements as garden-grown tomato plants. The amount and types of fertilizers needed will depend on the make-up of the soil. Because of this, testing the soil before adding fertilizers is essential. Fertilizers and amendments are added before planting, with additional fertilizers applied throughout the growing cycle. Liquid, granular, powder or another type of fertilizer can be used. If you use a commercially produced "complete" fertilizer, look for one formulated specifically for greenhouse tomato growing. Complete greenhouse fertilizers are usually low in nitrogen and high in potassium with moderate phosphorus and additional nutrients needed for tomatoes.
 
Tomato have their own unique nutritional needs compared to other vegetables or fruit crops. In greenhouses, tomatoes are grown in both ground beds, containers filled with soil, and soil-less closed hydroponic cultures and artificial media. Whatever system you use, the nutrient requirements for tomato varieties are still relatively the same, though the delivery systems may differ.
 
Tomatoes are heavy feeders. Their flower and fruit production requires high amounts of nitrogen, phosphorous and potassium -- the three major nutrients available in garden soil. Whether the vegetable is produced indoors or out, nutrient supplements are necessary to encourage high yields. Fertilizers are added as side-dressings throughout the growing season and can be applied in granules or through a mist system. The amount of fertilizers and the methods of distribution are best determined by the type of plant and its growing conditions.

Nutrients Needed to Grow Tomatoes in a Greenhouse


Indoor growing
Growing tomatoes indoors requires irrigation systems, sterile growing mediums, aeration techniques and temperature controls. One of the advantages of growing tomatoes indoors is the ability to control every aspect of the plant's environment. Such control allows a grower to produce high yield crops at any time of year. Irrigation systems often recycle water and, since most tomato fertilizers are distributed via irrigation water, the fertilizer content must be monitored to ensure that there is not a nutrient build-up or the reverse.

Irrigation systems
Drip irrigation and overhead spray systems are the dominant forms of irrigation used for tomato greenhouse crops. Home gardeners with small greenhouses may hand-water their tomatoes in a manner similar to that used on outdoor plants. The benefits of drip irrigation, however, are that the system can be set to a timer, and the fertilizer and water are evenly distributed at timed intervals. Place drip irrigation emitters near a plant's base. Overhead watering systems may contribute to foliar diseases, especially if overhead foliage isn't provided with adequate aeration.

Nutrients
Tomatoes require the major nutrients -- nitrogen, potassium and phosphorous -- as well as high amounts of calcium and magnesium. Calcium and magnesium supplements must be used alongside general fertilizers. Calcium nitrate, in concentrated form, cannot be included within a concentrated general fertilizer because of incompatible chemical reactions. Tomato growers rig their drip irrigation systems with two separate emitters and drip lines -- one for the distribution of general fertilizer and the other with the calcium nitrate mix.

Considerations
Many companies produce liquid fertilizers suited for indoor growing. Fertilizer formulas are displayed on the outside of containers. The first number in the formula indicates the amount of nitrogen available in the solution. The second number indicates the amount of phosphorous, and the third is the amount of potassium. The numbers are in a ratio. A common formula suited for tomato growing is a 15-5-15 fertilizer. This fertilizer, along with calcium nitrate supplements, will provide your indoor tomatoes with the nutrients they need to grow.


Soil Testing


A soil rich in organic matter is best for helping the tomatoes absorb and utilize nutrients. Mix in compost until you get the mixture of soil you will use for the plants. Take soil samples for testing either by a university extension service or with a home test kit. The soil test will tell you the pH of the soil, as well as whether the soil is low or high in phosphorus, nitrogen and potassium, and other nutrients, depending on the test. If pH is high, amending with peat moss or sulfur will lower it. If pH is low, adding lime will make the soil less acidic. Leaf tissue analysis through the growth cycles will tell you how much of the nutrients are being absorbed by the plants.


Nitrogen


Nitrogen is important for the growth of the leaves and stems of the tomato plant. On fertilizer labels, the nitrogen content is indicated by the first number in the N-P-K ratio. Fertilizers including the word "nitrate," such as ammonium nitrate, are good sources of nitrogen. A nitrogen deficiency is indicated by light green or yellowish leaves and pale flowers. However, too much nitrogen in the soil will result in large stems and lush leaf growth, but few fruit.


Phosphorus


Phosphorus content is the second number listed in the N-P-K ratio on the fertilizer label. Sources of phosphorus will often have "phosphate" in the name, such as monopotassium phosphate. Phosphorus is important for the growth of plant roots and aids in the formation of blooms and fruit set. Insufficient phosphorus is indicated by a purplish hue in stems and thin growth. It is not usually found in toxic amounts in the soil.


Potassium, calcium and magnesium


Potassium is the third number in the N-P-K ratio. Potassium helps the fruit form correctly and ripen well. If there is not enough potassium, the fruit can develop poorly. Magnesium deficiency is common in greenhouse tomatoes and is indicated by yellow leaf veins. Calcium deficiency can result in blossom end rot. Calcium, magnesium and potassium should be applied in equal amounts so they do not block the absorption of the other minerals if there is too much of one in the soil.
 

More information


Nutrient balance
The most important nutrient to balance properly is nitrogen. Too much nitrogen stimulates lush early foliage but produces plants that are small with soft growth, small flower clusters, poor bloom and fruit set. An 8-32-15 or 6-24-24 tomato-specific fertilizer works well because of the low level of nitrogen in these blends. Calcium nitrate is an excellent nitrogen delivery compound because it also delivers calcium, which promotes strong cell walls and disease resistance. Potassium and phosphorus also promote strong, healthy, disease- and pest-resistant plants and a bumper crop of fruit. Tomato plants normally absorb micronutrients from the soil's clay and organic fractions, but, in soil-less systems, these micro-nutrients must be provided by nutrient solutions.

Fertilizers
Commercial fertilizers for greenhouses can be obtained through horticultural supply vendors who tailor fertilizers for specific crops and for soil and soil-less systems. Different fertilizers are necessary at different stages of growth for tomato plants, particularly in the fruit production stage. Ripening tomatoes absorb potassium from other plants if insufficient amounts are found in the soil. This can cause plant stress, weakened stems, poor leaf development and crop damage. The biggest greenhouse tomato problem is too much nitrogen and too little potassium and calcium. Tomato-specific fertilizers address this problem pro-actively.

Container soil systems
Container tomato plants in greenhouses should be 18 to 24 inches apart. If you use fans to stir the air, promote pollination and dry foliage, you can space them slightly closer together. A liquid combination tomato-specific fertilizer applied according to manufacturer's directions is all you really need. Watch for symptoms of stress in leaves and flowers, test the soil and apply potassium, phosphorous or calcium as needed. Be careful not to overdo the nitrogen.

Ground bed soil systems
In open-soil greenhouses, space the plants 24 to 36 inches apart in rows 4 to 5 feet apart. If you use a combination fertilizer, apply a 0-20-20 fertilizer at 1,000 to 2,000 lbs. per acre after harvest and before the fall crop. Apply 650 to 100 lbs. an acre of 0-20-20 before the spring crop. If you test your soil and find it low in phosphate, you can apply 300 to 500 lbs. of 46 percent triple phosphate per acre. For low potassium levels, apply 300 to 400 lbs. of potassium sulfate per acre. Add calcium nitrate for a rare nitrogen deficiency. Calcium nitrate also provides needed calcium. Avoid any nitrogen fertilizers with ammonium in them for tomatoes. Apply 3.5 lbs. of calcium nitrate per 100 feet of row, stirring the top inch of soil.

Closed-system hydroponic
Hydroponic systems grow plants in troughs or tubes. The plants are anchored in gravel, sand or artificial soil-less mixes, or even without anchoring media in a nutrient film. Such systems require pumps to recirculate nutrient media at 1.5 to 2 quarts per minute. The grower must monitor pH levels and chemical balances in the nutrient solution. It must be balanced to be lower in nitrogen and higher in potassium and phosphorus than for typical vegetable crops. Commercial nutrient mixes for hydroponic tomatoes include micronutrients normally found in the soil. To prevent buildup of toxic substances exuded by root systems, change the nutrient solution every two to three weeks -- more often during peak growth periods -- and include charcoal filters in the system.

Artificial media
Bag culture soil-less systems use artificial media like rockwool in 3 to 4 cubic-foot bags. Plant two rows of tomatoes per bag spaced 16 inches apart in rows 6 feet apart. A drip irrigation system distributes the nutrient solution, adjusting the amount depending on the temperatures in the greenhouse. Nutrient solution should keep the media moist but not soggy. Collect the excess to provide drainage and prevent fertilizer salts buildup.

Kamis, 26 Juni 2014

How much fertilizer to use when transplanting tomato plants?

Transplanting tomatoes into a nutrient-rich garden bed helps start them off right so they produce at their best and remain healthy for the entire season. Tomatoes require three main nutrients to grow well: nitrogen, phosphorus and potassium. Amending the soil with the right fertilizer before you plant the tomatoes encourages healthy root establishment, lush foliage growth, and strong flowering and fruit set.

Soil amendments
Tomatoes have specific soil needs to grow well. The plants require a soil pH between 6.0 and 6.5. If vegetables have grown well in the bed previously, the soil likely falls within this range, but a soil test can determine the exact pH and provide guidelines for adjusting it. Ground limestone amendments raise pH, while sulfur lowers pH. Apply these amendments in the amount recommended by the test, preferably at least three months before planting the tomatoes. Working a 2-inch layer of compost into the top 8 inches of soil immediately before transplanting also improves nutrition and soil quality.

Slow-release fertilizer
A slow-release fertilizer, or granular fertilizer, releases nutrients slowly so it can feed the new transplants for up to two months before you need to add more fertilizer. Balanced fertilizers, or those with a nutrient ratio of 8-8-8 or 10-10-10, supply equal amounts of nitrogen, phosphorus and potassium, along with trace minerals the plants need. Work 1/2 cup of fertilizer into the bed for each tomato you are planting. Incorporate the fertilizer with the top 6 inches of soil before transplanting so the nutrients are worked into the root zone area of the garden bed.

Starter fertilizer
Although starter fertilization isn't necessary if you use a slow-release fertilizer before transplanting, the starter solution can encourage healthy initial growth until the tomato roots are established enough to begin drawing nutrients out of the soil. Dissolve 1/2 pound of an 8-8-8 slow-release fertilizer in 5 gallons of warm water. Water each tomato plant with 1 cup of the solution immediately after transplanting it in the garden. You can also use a purchased starter formula made for tomatoes or vegetables.

Maintenance fertilization
If the tomatoes are properly fertilized when you transplant them outdoors, they won't require any more fertilizer until they begin developing their first fruits. Apply 2 tablespoons of the slow-release 8-8-8 fertilizer for each tomato plant. Work the fertilizer into the top 2 or 3 inches of soil, about six inches away from the plant stem, then water thoroughly after application. Repeating this application every four to six weeks keeps the plants at peak production through the remainder of the growing season.

What to feed tomatoes for really fast growth?

Since the 1800s, tomatoes have made regular appearances on American dinner plates as well as in home gardens. Garden favorites, tomato plants (Lycopersicon spp.) are fast growing and produce high yields of fruits. In order to support their rapid growth and development, tomato plants need a steady supply of food, which they glean from soil nutrients and well-timed applications of fertilizer throughout the growing season.

Fertilizer use
Heavy feeders such as tomato plants can deplete garden soil of its nutrient reserves quickly. Therefore, before planting, have garden soil tested to determine its current nutrient levels. When a specific nutrient is found to be deficient in the soil, use fertilizer to restore the missing element. Knowledge of the soil's composition is also important so that fertilizer feedings can be applied in the correct amount for fast tomato growth and optimal development.

Complete fertilizer
Depending on soil composition, a complete fertilizer containing the three macronutrients – nitrogen, phosphorus and potassium – in ratios of 5-10-10, 6-12-18 or 10-10-10 provide the nutrients required for fast tomato development. Sufficient nitrogen is necessary because it plays a key role in the rapid growth of the tomato vines and should be applied in regular biweekly or monthly intervals, depending on soil nutrient levels, throughout the growing season, as long as new fruits are being set. Good reserves of phosphorus also are needed for fast-growing tomatoes because that nutrient is responsible for well-developed root systems, which are essential for planting feeding. The third macronutrient, potassium, builds strong stems and wards off diseases, ensuring healthy growth of young tomato plants.

Organic options
Organic gardeners use aged manure, bone meal and fish emulsion to provide soil nutrients to maximize tomato plant growth; determining the correct balance, however, can be more difficult than when using a commercial complete fertilizer. Manure is a good source of nitrogen and potassium, and blood and bone meal can be used to boost levels of nitrogen and phosphorus in soil. Ash, oyster shell flour, seaweed, phosphate rock and compost also can be used to provide added nutrients to promote healthy and fast-growing tomato plants.

Micronutrients
In addition to macronutrients, micronutrients such as magnesium are essential for fast-growing tomato plants. If magnesium levels are deficient, the plants can suffer from stunted growth because that nutrient helps young plants properly ingest nitrogen and phosphorus, which are critical to healthy plant development. If a garden has a low magnesium level, use dolomite lime or a foliar spray composed of water and Epsom salt to increase feeding supplies in the soil.

Improper feeding
Improper feeding of tomato plants can cause problems. For example, too much nitrogen results in tall tomato plants with many leaves but few tomatoes, whereas insufficient nitrogen produces few fruits as well as slow-growing plants. Overfeeding also can cause leaf burning or plant death. So always apply fertilizers according to their package instructions.

Selasa, 24 Juni 2014

Never Plant Bradford Pear Trees!!!

We are going to stray a little from the beaten path today and discuss a tree that I see planted everywhere - the Bradford Pear tree (Pyrus calleryana)

This tree is a disaster, and the fact that it is still planted anywhere is a travesty.  Let us examine the ways in which this tree is unworthy of planting.


First, it is invasive.  The Bradford Pear (actually known as Callery Pear elsewhere) was originally imported from China.  It is extremely fast growing, and of course this is one of the reasons for its popularity.  A single domesticated Bradford Pear cannot produce fertile offspring, but because these trees are planted so much in the suburbs, two trees within pollinating distance from each other can produce fertile seeds.  These seeds become easily established and take over bare fields.  The Bradford Pear is listed as invasive in Tennessee, Illinois, Alabama, Georgia, and South Carolina.  


Second, it smells.  The Bradford Pear smell is frequently described as that of rotting fish, rotting flesh, chlorine, and other more unpleasant things.  When planted en masse this smell is quite noticeable.  Few other flowering trees have unpleasant odors, most being pleasing.


Third, Bradford Pears only live about 25 years.  This is shorter lived than many shrubs, and most home owners don't want to replace their main landscape tree with something new (and smaller) in just 25 years.  


Finally, the Bradford Pear is extremely prone to breaking in any inclement weather.  We have seen half of a Bradford Pear split off in a gentle rain (perhaps the raindrops were too heavy?) with no wind.  Wind, of course, will also break many branches.  The reason for this is the sharp (acute) angle the branch forms with the trunk of the tree.  As the Bradford Pear is almost always planted for its looks, a large segment missing from the tree after a few years is hardly ideal.

This Bradford Pear almost completely collapsed in a moderate rain

So what trees should be planted in place of the Bradford Pear?  Well, there is no simple answer, but we do have several suggestions.

The Yoshino Cherry, also imported from Asia, is a beautiful, pleasantly fragrant tree with a similar maximum height.  It grows in zones 5-8, and has a medium growth rate.  It also has a rounded canopy, but not quite to the extent of the Bradford Pear.  

For a fast growing but strong and long-lived shade tree, we recommend the Northern Red Oak.  This tree will grow in zones 3-8 and is much faster growing than most oaks (on par with silver maples, another terrible tree to plant).  It has a red fall color similar to the Bradford Pear.  While the Bradford Pear is famously weak-limbed and short lived, the Red Oak can live up to 500 years, adding beauty and value to your property.  


Won't planting different trees lead to slower growth?  Not necessarily.  When most homeowners purchase trees, they buy large, containerized trees from the local big box retailer.  They assume that since these trees are large now (at least in terms of a canopy) they will grow fast and remain larger.  This is not the case.  Roots and leaves determine the speed of growth of the tree, and when there is a mismatch between the two (like with trees bought in a container), these trees languish for years with barely any growth (if they survive).  A much better option is to buy small, bare root trees, purchased and shipped to you from ArborDay or another nursery like Stark Brothers.  Arbor Day is not for profit and trees there are especially affordable with a $15 membership.

When these smaller, bare root trees are planted with the Groasis Waterboxx, you never have to water them.  Not only does this conserve water, but the Waterboxx can be removed once the tree outgrows it (usually 1-2 years) and reused multiple times.  The Waterboxx planted tree has deeper roots than a store bought tree (see why on our website), and will be able to access deeper soil water held in capillaries. This deeper root structure supports the tree in time of drought.  Be the first in your area to start growing healthy shade trees with the Groasis Waterboxx.   Buy the Waterboxx here. We would love to hear your comments below - to leave one, please click on "Comments".
A seed grown oak tree planted with the Waterboxx

Minggu, 22 Juni 2014

Variety: "1534" El Salvador Review

Specifications:


Skin Color: Red
Flesh Color: Red, Pink
Fruit Shape: Elongated
Fruit Size: Small
Leaf Type: Regular leafed
Tomato Plant Height: 5 feet, 6 feet
Best Uses: Paste

General Plant Information


Plant Habit: Vine
Life cycle: Perennial
Sun Requirements: Full Sun, Full Sun to Partial Shade
Minimum cold hardiness: Zone 11 +4.4 °C (40 °F) to +7.2 °C (45 °F)
Fruit: Showy, Edible to mammals, Edible to birds
Flower Color: Yellow
Flower Size: Under 1"
Uses: Vegetable, Suitable as Annual
Toxicity: Leaves and roots are poisonous
Propagation: Other methods: Cuttings: Stem
Miscellaneous: Deer Resistant, Rabbit Resistant

Is fish oil a good fertilizer for tomato plants?

Commercial fish fertilizer isn't fish oil at all; it's called fish emulsion and is a mild, liquid fertilizer made from fish byproducts and waste that provide nitrogen, enzymes and other essential nutrients for plant growth. The chocolate-brown liquid emits a strong odor, but it strongly benefits both tomato (Solanum lycopersicum) seedlings and transplants. When fertilizer is applied to a tomato plant at the right time with the correct ratio of liquid concentrate to water, growers can achieve greater yields and better-tasting fruit.

Fish oil fertilizer, also called fish emulsion, has been used for centuries to promote vegetable growth. Many native Americans placed fish remains in the trenches used to plant maize.

Tomato transplants
One technique that is used during the transplanting process is to first flood a planting hole with the diluted fish fertilizer solution; then, the tomato plant's root ball is inserted and covered with soil. This technique assures that young and vulnerable roots receive immediate moisture and nutrients. Fish emulsion can be applied right after transplanting as well by using a watering can at ground level around the base of the plant. The liquid should not be splashed on the foliage.

Starting from seeds
Most fish emulsion recipes call for 1 to 3 tablespoons of concentrated liquid fertilizer diluted in 1 gallon of water. However, when you are caring for delicate seedlings, the solution should be diluted even more. Too much concentrated fertilizer might "burn" or kill a young plant. When high levels of fertilizer are applied, concentrated salts damage roots leading to decreased water intake.

Choosing the right fertilizer
A consistent supply of nitrogen helps tomatoes maintain healthy, green leaves. Yellowed leaves often indicate nitrogen deficiency. Fish emulsion contains high levels of nitrogen. The trace minerals and additional nutrients vary from brand to brand. Growers with an organic philosophy might steer toward products made from wild-caught ocean fish rather than farm-raised fish. Others might see geography as a selling point, preferring brands that boast North Atlantic or Alaskan fish ingredients.

Application
Fish emulsion should be applied in cool weather, preferably in the early morning or evening. Avoid applying it in the midday heat or to any heat-stressed plants. If fertilizer is applied at the wrong time -- or if too much of the concentrate is applied at once -- it might prevent tomato plants from forming fruit. A sure sign of too much nitrogen fertilizer in tomato plants is lush and healthy plants with few flowers and fruit.

Actions
Fish emulsion works by delivering needed nutrients that encourage vine and fruit growth. It is an excellent source of nitrogen, and a good source of phosphorus. Fish emulsion increases yield and thwarts disease.

Mixing
Commercial brands of fish emulsion are available in concentrated form. Mix with distilled or rainwater: 1 tbsp. of emulsion per gallon of water.

Root delivery
When you first transfer tomato plants to the garden, add diluted fish emulsion to the first watering at the roots to strengthen the plant.

Foliar delivery
Spray diluted fish oil fertilizer on tomato plant leaves to help the plant absorb the nitrogen quickly. Spraying the blossoms also may increase fruit yield.

Experiment
Test how fish emulsion works by spraying half your tomato plants with the fertilizer, while leaving half untreated. Compare the number and size of the fruits, as well as health of the plants.

When to fertilize tomatoes and what to use?

Once upon a time, people thought tomatoes were toxic plants. Today, they're the most widely grown vegetable in American backyard gardens. Generally grown from started seedlings that are transplanted outside once the temperature reaches an average of 60 degrees Fahrenheit, these plants require lots of fertilization to ensure plant health and optimal fruit production. For the best results, time your fertilizer applications for when the tomato plants need them most.

At planting: compost
Tomatoes thrive best in well-drained dirt. At the time of planting, gardeners must add organic matter such as compost or rotted manure by mixing 3 inches of the soil amendment into the top 9 inches of dirt. This feeds the new tomato plants with micronutrients while enhancing drainage and soil structure.

At planting: 8-8-8 fertilizer
New tomato plants thrive best when given a balanced fertilizer at the beginning, which boosts the plant's ability to take root quickly. The plants react best to an 8-8-8 balanced garden fertilizer at a rate of approximately 1/2 cup of fertilizer per tomato plant.

At planting: mulch
A couple of inches of mulch will help feed the tomato plants while also reducing the risk of disease and weeds. Mulching ingredients include weed-free straw, wood chips and sheets of newspaper. As the mulch decomposes, it adds nutrients to the dirt that benefit the tomato plants. Mulch also helps keep the tomato plants' roots cool and enhances soil moisture retention.

At fruiting: ammonium sulfate
In side-dressing, a gardener applies a midseason fertilizer to help boost tomato health right when the plant starts growing fruit and needs that extra nutritional support. When the first tomato fruits measure a couple inches in size, gardeners sprinkle a tablespoon of 21-0-0 ammonium sulfate fertilizer in a circle around the tomato plant. For the best results, this should be repeated twice after the initial fertilization in three-week increments for a total of three post-fruiting applications.

Natural fertilizer for tomato plants

Nothing tops the great flavor of a vine-ripened tomato picked from your own vegetable garden. Giving your tomato plants the fertilizer they need is one of the most important factors in ensuring they produce flavorful, healthy fruit. You can accomplish this by choosing from several nutrient-packed, safe and effective natural fertilizers.

Tomato growers have many options when it comes to fertilizing their tomato plants. Chemical fertilizers are fast acting but can burn tender plants and leach nitrogen and salts into the environment. As a result, many gardeners are seeking natural ways to fertilize their tomatoes. Fortunately, natural fertilizer can be found in many forms. While natural fertilizers are not as fast acting as chemical fertilizers, they can be well worth the effort.

Definition of natural fertilizer
According to the Colorado State University Extension Service, natural or organic fertilizers are derived from plant or animal matter and must contain at least minimum percentages of nitrogen, phosphate and potash. General-purpose organic fertilizers are readily available at gardening centers and through the Internet in granular, powder and liquid formulas.

Types of natural fertilizers
The following is a partial list of some common types of natural or organic fertilizers:

Cottonseed Meal: High in nitrogen. Look for products labeled pesticide-free.

Bat Guano: Depending on the processing method, bat guano (bat feces) is high in either nitrogen or phosphorous.

Fish-Based Products: Available as fish emulsion, enzymatically digested fish liquid and fish meal.

Seaweed-Based Products: Available in kelp meal, kelp powder and liquid kelp. All types contain micronutrients and are often used in conjunction with fish emulsions.

Homemade fertilizers

In addition to purchasing natural fertilizers, you can also use common household items to fertilize your tomatoes. Creating your own compost pile is an excellent way to recycle organic materials such as leaves, grass clippings and vegetable peelings into a nutrient-rich soil amendment. Some organic gardeners add crushed eggshells or hair (from shedding pets or hairbrushes) to the holes before planting their tomatoes. Eggshells provide calcium, which can help prevent blossom-end rot (dark, sunken spots at the blossom end of the fruit). Hair is composed of keratin and releases nitrogen gradually as it decomposes.

Soil amendment
Tomatoes prefer soil that is rich in organic matter. Organic matter such as compost or rotted manure enhances soil drainage and provides some natural fertilization. Because organic matter must decompose before it begins releasing nutrients, you should work it into the soil several months in advance of planting.

Fertilizing tomatoes
Depending on the amount of organic matter in the soil, tomatoes generally require medium amounts of additional fertilizer. The Texas Gardener recommends starting tomato transplants by working 2 tbsp. each cottonseed meal and fish meal into the bottom of the hole before planting. Then use a diluted solution of seaweed and fish emulsion to water the roots and spray foliage about once per week. Once the first blossoms appear, work in 1/2 cup of cottonseed meal or a commercially available organic fertilizer such as 8-2-4 in a circle around the roots and water in thoroughly.

Requirements
Tomatoes are the number one choice of America's home gardeners, according to Organic Gardening. Although there are many different varieties to choose from, all have the same basic needs -- lots of sunshine, fertile soil, regular watering, good weed control and excellent nutrition. Although tomato plants need occasional fertilizing, you can avoid synthetic formulas by opting for natural, organic choices. Start feeding your plants at the time of planting, followed by additional applications two or three weeks apart while your plants are growing and producing.

Compost
Compost is basically pure organic matter packed with essential nutrients. Compost adds all the basic nutrients your plants need, along with macronutrients and micronutrients that are usually missing from synthetic fertilizers. Compost releases its components gradually during the growing season, providing long-lasting nutrition. Compost not only feeds your plants, it also neutralizes the soil, helps soil retain water and nutrients, and adds beneficial microorganisms to your garden. Work a handful of compost into the soil at the bottom of each hole as you plant your tomato seedlings and add a side dressing of compost to each plant several times during the growing season.

Organic cottonseed meal
Cottonseed meal is also a good choice as a natural tomato fertilizer that can be mixed into your soil at the time of planting. It contains nitrogen, phosphorus and potassium in about a 6-2-1 ratio; it's nitrogen supports leafy growth early in the young tomato plants' growth cycle. Nutrients in cottonseed meal are released slowly and last about four months. Cottonseed meal contains other important elements, including calcium, magnesium, sulfur and copper, and also provides trace elements such as manganese, molybdenum and zinc. When purchasing cottonseed meal, choose only products labeled as Certified Organic, since nonorganic meal may contain pesticide residues and is restricted by the California Department of Food and Agriculture Organic Materials List.

Fish emulsion
Fish emulsion is another natural fertilizer that can give your tomato plants an extra boost, both at planting and during the entire season. It contains nitrogen, phosphorus and potassium, with additional minerals that include calcium, magnesium, sulfur and other trace minerals. Most products are available as a concentrated liquid, produced by blending fish parts -- including bones -- and then subjecting the emulsion to heat to destroy any unhealthy bacteria. Unlike cottonseed meal and compost, the nutrients in fish emulsion are available to your plants immediately. Dilute the emulsion in water according to the package directions and apply to your plants as a foliar spray every few weeks. You can also give your seedlings a boost at planting by adding fish emulsion to your watering can and drenching the root zone of each plant after it is planted.

Tomato plant fertilizer requirements

The most common vegetable grown in American gardens, the tomato (Solanum lycopersicum) needs nutrient-rich soil for healthy development throughout the growing season. These medium to heavy “feeders” require regular boosts of nutrients to ensure steady growth of stems and branches, leaves and blossoms, as well as healthy fruit. To provide proper nutrition for growing tomatoes, gardeners need to adequately prepare soil before planting, add fertilizer during the growing season and recognize signs of nutrient deficiency.

Tomato Fertilizer Requirements thumbnail
If your tomato plants receive four basic nutrients, they will thrive and produce maximal tomatoes. You can make sure your plants receive the correct amounts of nutrients through organic matter rich soil, through compost or through commercial fertilizers. Fertilize tomato plants just after planting them, when the flowers bloom, when the tomatoes reach the size of a small ball and after first harvest.

Prepping the soil
Although tomatoes can grow in many kinds of soil, soil that is rich in organic matter like peat moss, compost or well-rotted manure will result in healthy productive plants. If growing in a garden space for the first time, a soil test is recommended and can be easily arranged through local county extension offices. Soil test results will indicate nutrient deficiencies, which can be corrected in early spring before planting. Lime can be added to soil to lessen the chance of nutrient imbalances and to bring soil pH within the 6.2 to 6.8 range, which tomatoes prefer. A basic 8-8-8 commercial fertilizer---containing the three macronutrients nitrogen, potassium and phosphorus---or organic alternatives such as aged manure, sulfur and oyster shell lime can also be added to the soil in preparation of planting.

At planting
In addition to the early spring soil prep, tomatoes should also receive a light dose of fertilizer when planted. This will help to ensure sufficient nutrients for the young plants during the early stages of stem and branch development. If using a commercial fertilizer, recommendations for the ratio of the three macronutrients vary, depending on individual soil composition, but a balanced (8-8-8) or 5-10-10 or 5-10-5 mix is most often preferred. Always make sure to follow product instructions carefully during fertilizer application, because overuse of a starter fertilizer can burn a tomato plant's delicate root system. If following organic gardening practice, a mix of kelp meal, bone meal and organic compost added to the planting hole will provide young tomato plants the essential nutrients for early growth.

Side-dressing
The fertilizers added before and at planting will likely not provide sufficient nutrients for the complete growing season. Therefore, at least two additional fertilizer applications, called side-dressings, are recommended during a tomato plant's growth period. The first side-dressing is added soon after tomato fruit have set and are about one-third their final size. A standard 10-10-10 or 5-10-10 commercial fertilizer can be used, or organic alternatives include bone meal, dried manure or cottonseed meal. The fertilizer should be added to the top 1 inch of soil and applied 4 to 6 inches from the tomato plant stem to prevent fertilizer burn. Additional side-dressings can be added once the first ripe tomato is picked or every 3 weeks throughout the growing season, depending on the garden soil composition.

Signs of fertilizer problems
If tomato plants have grown tall with lush green foliage but few actual tomatoes, it is likely the soil has been over-fertilized with a nitrogen-rich product. As a result, ammonium sulfate, urea and fresh manure should be avoided. Ammonia fertilizers can also contribute to blossom-end rot. A calcium-rich side-dressing, like gypsum, can help correct this problem.

Nutrients requirements


Nitrogen
Nitrogen is good for the stem, leaves and stalk of your tomato plants. Don't feed the plants too much nitrogen, however, because the green parts of your plant will thrive but the tomatoes will be very small. If your plant's lower leaves turn yellow or the plant's growth is stunted, it likely isn't getting enough nitrogen. Nitrogen sources include compost, fully rotted manure and commercial fertilizer.

Potassium
Potassium helps tomato plants reach their full potential in growth and hardiness. It also helps make them disease resistant. Stunted growth, undersized plants, few tomatoes or yellow spots on the leaves are all signals of potassium deficiency. Potassium sources are wood ashes, compost and commercial fertilizer.

Phosphorus
The nutrient phosphorus helps aid in the production of the fruit, or the flowers, seeds and tomatoes. Phosphorus also promotes plant growth and health by helping it develop a strong root system and prevent disease. Stunted growth and leaves that turn purple on the undersides are signs of phosphorus deficiency. Feed your tomato plants phosphorus through chicken manure, bone meal, phosphate rock and commercial fertilizer.

Calcium
Your tomato plant won't develop without calcium. This nutrient also helps prevent a common tomato problem--rotting from the roots up. Tomato plants that get enough water should not have calcium deficiencies. Sources of calcium are clean chicken egg shells, bone meal and ground limestone. It is not contained in most commercial fertilizers, but probably is in fertilizers specifically made for tomatoes.

How to fertilize tomato plants?

Tomatoes need quite a big food supply over the season -- they're what we call "heavy feeders." This is no surprise when you look at all the work they're doing: extending the stem, putting out more branches, leaves and blossoms; developing, nurturing and ripening all those fruits! To do all this work they need a steady diet of water and nutrients.

All About Side-Dressing
In most gardens, it's a good idea to side-dress tomatoes. That simply means placing fertilizer around the plants to give them extra nourishment through the season. One or two side-dressings is fine for most gardens.

Many kinds of fertilizers can give tomatoes the extra nutrients they need. Some gardeners prefer to use a complete fertilizer (such as 5-10-10 or 10-10-10). Organic fertilizers such as bone meal, dried manure or cottonseed meal are also good. Just remember that most organic fertilizers don't contain balanced amounts of the three major nutrients - nitrogen, phosphorus and potassium. For example, manure tends to be low in phosphorus so you could add bone meal at the same time to provide a more complete diet.

Stay away from high-nitrogen fertilizers such as urea, ammonium sulfate or fresh manure because it's easy to use too much. When you overfertilize, you get tall, dark green plants with few tomatoes.

When To Side-Dress
Start side-dressing when the first tomatoes have just formed - when they're about the size of golf balls. Make repeat side-dressings every three weeks after that. About a pound (two cups) of 5-10-10 should be enough for all the plants in a 30-foot row (about 20 plants). This works out to about 1-1/2 tablespoons per plant spread in a one-inch-deep circular furrow five to six inches away from the stem, usually right under the drip line of the plant. Be careful not to get any of this fertilizer on the leaves or stem because it will burn them. Cover the fertilizer with one to two inches of soil. The next rain or watering will start carrying the nutrients down into the root zone of the plants.

Selasa, 17 Juni 2014

How often to fertilize tomato plants?

Tomatoes are easy to grow and work well in yards with large garden areas or in containers on small patios or balconies. To get the biggest tomato yield, start fertilizing before you plant and periodically during the growing cycle. Then, get your kitchen ready for homemade marinara sauce and juicy tomatoes topping your sandwiches. Fertilizing the tomato plants at the correct time helps yield the largest harvest. Tomatoes are low-calorie, rich in vitamins C and A and provide lycopene that may be helpful in preventing certain cancers. Tomatoes remain productive from midsummer until fall frost if they are supplied with the nutrients they need to grow healthy and produce fruits. While special tomato fertilizers are on the market, they are rarely necessary. A general-purpose fertilizer applied regularly in the proper amounts is all that's needed to feed your tomato plants.

Initial fertilization
Tomato plants grow quite well if they are planted in fertilized soil, so turn some slow-release fertilizer into the holes you dig for your tomatoes. Dig down about 6 inches and mix the fertilizer with the soil at the bottom and sides of the hole as well as the soil you plan to use to backfill the hole around the plant's root ball. Most young tomato plants should be placed in holes about 3 inches deep, but the fertilizer and soil mixture should be about 3 inches deep under the final hole.

Subsequent fertilizations
Tomato plants need a second fertilizer treatment just after the tomatoes begin to form. As soon as you see a few defined tomatoes about the size of marbles, add another round of fertilizer. Spray the ground around the plant with a water-soluble fertilizer or turn quick-release fertilizer into the soil around the base of the plant. As the tomatoes grow, fertilize the plants every seven to 10 days until the tomatoes are ready to pick.
No Matches Found. Please try your search again.

Soil types
Tomatoes are fairly hardy and grow in many soil types. However, not all soil holds the fertilizer well. For dense soils with large amounts of clay, stick to 10 days between fertilizations after the tomatoes appear. Sandy soils tend to let nutrients leach away, meaning you must fertilize more often, at least every seven days.

When to fertilize?
Fertilize the tomato plant about one or two weeks before the first fruit ripens. Repeat the fertilization two weeks after you pick the first fruit and then again one month later.

Proper amount of fertilizer
Test the soil before fertilizing. This tells you which nutrients the soil is lacking. Tomatoes prefer a soil with a pH of 6.5 to 7. Work a timed-release fertilizer into the top 6 inches of the soil before planting the tomatoes. Once the proper level is obtained, treat the tomatoes with a maintenance fertilizer at 1 lb. per 100 square feet.

Types of fertilizer
Tomatoes grow best with a balanced fertilizer with equal amounts of phosphorus, nitrogen and potassium. For instance, too much nitrogen results in a leafy plant with little fruit. Avoid the use of lawn fertilizers. Use a fertilizer product that is formulated for tomatoes or a complete garden fertilizer when preparing the soil. Use a water-soluble fertilizer once the plant begins to produce fruit.

Growing needs
Plant your tomatoes in areas with full sunlight. Areas away from trees and buildings offer the highest yields. A well-drained soil is important to prevent blossom rot or root rot. Tomato plants require a consistently moist soil. Stick your finger into the top 2 inches of soil. If dirt sticks to your finger it is moist enough. Mulch such as straw, pine needles, grass clippings, compost, shredded bark and leaf mold help conserve the moisture in the soil.

Soil testing
Each garden bed provides different nutrients and soil quality. When possible, perform a soil test to verify the nutrient quality in your garden. Soil test kits are available at most garden centers and require of taking a soil sample from the garden. The kit tests the soil pH, which should be between 5.8 and 6.5 for tomatoes. Kits may also test the amount of certain nutrients, such as phosphorous, already present in the soil. Use the information from the kit to determine what fertilizers and amendments are needed prior to planting your tomatoes.

Amendments
Most beds need agricultural lime added to bring the soil pH into the optimum range. Add the lime at the rate recommended on the soil test. If you didn't perform a test, apply 3/4 cup of lime to the bed for each tomato seedling you are planting. Also add 1/2 cup of 8-8-8 analysis fertilizer for each plant. The numbers indicate the percentages of nitrogen, phosphorus and potassium in the fertilizer. Compost helps improve the quality of the soil by adding organic matter and nutrients to the bed. Work in a 2- to 4-inch layer of compost before you plant. In heavy clay soils or in sandy beds, a thick compost layer helps ensure proper water drainage and moisture retention.

Starter fertilizer
Apply a starter fertilizer after planting the seedlings. A starter solution gives the plants quick access to the nutrients they need to begin forming healthy roots and establishing in the bed. Dissolve 1 lb. of 8-8-8 fertilizer in a gallon of water. Water each plant with one cup of the solution at planting. Commercial starter fertilizers are also available. Mix and apply these as detailed on the label.

Mid-season fertilizer
Begin mid-season fertilization once the fruits begin to form on the tomato plants. Reapply the fertilizer every four to six weeks until the end of the growing season in fall to ensure the plants remain productive. Use 2 tbsp. of 8-8-8 fertilizer per plant. Do not apply the fertilizer so it touches the tomato's stem or roots, as direct contact with undissolved fertilizer can burn plants. Instead, side dress the plants with the fertilizer. Work the fertilizer into the soil about 6-inches away from the plant stems. In row plantings, apply the fertilizer between the rows.

Considerations
Tomatoes need low-nitrogen fertilizers, such as a 8-32-16 or 6-24-24. These should be applied at a rate of about 1 pound per 100 square feet. If you are only planting one or two plants, mix a couple of tablespoons of fertilizer into the soil around each plant during the applications.

Jumat, 13 Juni 2014

Mycorrhizae - Helpful Fungi for the Growing Plant

Fungi are organisms that rely on other living things to get their nutrients. Most people are familiar with fungi of two types - mushrooms which rely on dead or dying organic matter (like mulch or compost) and yeast used in cooking.  Most people are vaguely aware that fungi can be helpful (making alcohol or leavening bread).  Few people, however, how vital fungi can be to the roots of a growing plant.

Mycorrhizae, from myco - fungus and rhiza - root, are fungus that associate with the roots of a growing plant.  These fungi almost always have a mutually beneficial (symbiotic) relationship with the plants near them.  The fungus derive carbohydrates (sugars) from the roots of the plant, that has been produced by the plants leaves through photosynthesis.  The plant in exchange gains a huge water and nutrient absorption system with the mycorrhizae.  The mycorrhizae also may help with absorption of phosphorus, a nutrient absolutely essential to the development of the energy containing molecule (ATP) in plants.In fact, mycorrhizae can expand the water collecting ability of the plant several hundred times.  For this reason, plants with mycorrhizae are more drought resistant.

 In extremely poor soils where few plants survive, mycorrhizae sometimes need to be added.  In most soils, however, there are already sufficient spores to establish relationships with the roots of your plant.  Bill Gates, in his philanthropic ventures to feed the world, recently endorsed mycorrhizae.

The Waterboxx was designed to be used with mycorrhizae.  Since the Waterboxx allows planting of trees and other plants in extremely dry soil, the mycorrhizae can further increase water absorption by the plant.  If planting in soil that currently doesn't support much plant life, you may want to consider purchasing high quality mycorrhizae.

Be the first in your area to begin growing plants with the Groasis Waterboxx.  The Waterboxx can be purchased in the United States from Dew Harvest. We would love to hear your comments below - to leave one, please click on "Comments".

Sources:

http://mycorrhizae.com/

http://en.wikipedia.org/wiki/Mycorrhiza

http://aggie-horticulture.tamu.edu/faculty/davies/research/mycorrhizae.html

http://www.pbs.org/wgbh/nova/next/nature/more-food-with-microbes/#b06g17f20b14

Kamis, 12 Juni 2014

Planting Drought Resistant Deciduous (Broadleaf) Trees

We see far too many trees damaged or dying because of drought.  As tree lovers, this pains us greatly. Not only will these trees need to be removed and another planted, but several more years will be required for the tree to become large enough to provide significant shade or wildlife value.

When planting a tree in an area where drought is possible (most of the continental U.S. has experienced drought  over the last 5 years), two things are important.  First, the tree being planted must be carefully chosen.  Trees that are not well suited to an area are unlikely to survive.  Secondly, the tree needs to be planted correctly.

First, we have listed several trees that are well suited to drought conditions.  Trees are also sensitive to minimum temperatures, so USDA zones (see map here) are also included   Below our tree recommendations we discuss how to plant trees for maximum drought tolerance.

Drought Resistant Trees

The Thornless Honeylocust (Gleditsia triacanthos) is an amazing tree.  This tree is drought tolerant, salt tolerant, pollution tolerant, and fast growing.  You may have seen this tree without knowing, as it produces long, curved, leathery seed pods (that can be slightly annoying).  This tree grows essentially in the entire continental U.S., and grows well in parking lots and along streets (even if salt is sometimes used there).  Honeylocust is of value to wildlife, but also lets grass grow beneath.  For commercial properties owners in dry areas, these trees will survive drought, significant salt as well as pollution.  As these trees have deep taproots, they will grow very well with the Waterboxx and also will be less likely to buckle surrounding asphalt and concrete. The tree grows from zones 3-9, can grow 30-70 feet tall, and 50 feet wide.

Thornless Honeylocust is an excellent all around tree.  It is drought tolerant, has deep roots which don't buckle sidewalks or even brick streets (as seen here), and is easily established with the Waterboxx. 

The seed pod of the Thornless Honeylocust, just before maturity.  These can help you recognize these common trees.  The pods can be eaten by cattle.
The Common Hackberry (Celtis occidentalis) is another ornamental tree that grows throughout most of the continental U.S.  The trees are stated to need a minimum of 14 inches of rain annually, but the deep roots established with the Waterboxx may lessen that somewhat. The Hackberry produces small berries which attract many bird species (be forewarned if parking cars beneath it), and are also eaten by many mammals.  The Hackberry can reach 60 feet in height and spread and is well suited to urban conditions as well.  It grows in zones 3-9.

The Japanese Zelkova (Zelkova serrata) is a a beautiful street tree with excellent fall foliage.  It is resistant to Dutch elm disease, has excellent timber, and is pollution tolerant.  Although not native to the United States, it grows well here in zones 5-8.  It is drought tolerant once established and reaches 80 feet in height and spread.   The roots do tend to be shallow but this will be somewhat corrected with the Waterboxx.  Of note, the bark naturally peels and reveals a beautiful orange coloration beneath.

A beautiful, full sized Japanese zelkova tree, growing in the Orto Botanico in Florence, Italy.  

The Honey Mesquite (Prosopis glandulosa) grows well in the far south of the United States, and is best known for producing firewood using in barbecue.  It is extremely drought tolerant, but does have thorns so it is not a great sidewalk tree.  These trees grow about 35 feet high, and are very difficult to establish without watering.  Luckily, the Waterboxx will take care of that.

A long lived broad leaf option is the bur oak (Quercus marcocarpa).  This tree can survive for several centuries but is somewhat slow growing.  Its acorns and wide canopy are of course of significant value to wildlife.  The bur oak has a strong and deep tap root.  Tap roots have been measured 4.5 feet deep after only one growing season, even without the Waterboxx.   This tap root is likely the reason for the bur oak's drought tolerance.  This tree is a pioneer tree, meaning it is the first tree species to become established on the Great Plains prairie.  This tree can grow in zones 3-8.  It is very important if planting this tree to find a bare root specimen with an intact taproot.  Of note, if planting this tree from seed (a satisfying experience as oaks grow ~1 foot their first spring) be sure to follow the advice here to avoid planting a hollowed out seed.  You can buy this tree here.

Burr oak, Quercus marcocarpa, in the Indiana University Arboretum.  This tree, although slow growing provides excellent shade while being drought tolerant.
Another tree that is renowned for its beautiful canopy, the maidenhair tree (Ginkgo biloba), is also very long lived.  It grows 50 to 80 feet tall with a 30-40 foot spread.  This tree is dioecious (meaning the tree is either male or female, not both like most trees) and the female tree produces seeds which can smell rancid, so it is very important to only plant male specimens.   This tree is a living fossil, imported from China and having no living relatives.  This tree is also remarkably hardy, some even surviving the Hiroshima atomic blast.  It is also, of course, moderately drought tolerant once established (and luckily you will have the Groasis Waterboxx to establish the tree).  This tree grows in Zones 3-8.  These trees are a little pricier than most of the other trees mentioned here, but can be bought here.

A very well established Ginkgo tree in Bloomington, IN.  

How To Increase Drought Resistance Through Proper Planting

The manner in which trees are usually bought and planted tends to encourage drought sensitivity, not resistance, and makes the tree more likely to die during drought.  For the best drought resistance, trees should be bought bare root, not potted.  Potted trees (usually purchased from big box stores) have very poorly formed roots, and usually after planting these roots spread sideways.  This means that during drought (when the upper few inches of soil dries out) these roots will as well.

The most drought tolerant trees are bare root (never potted) when planted.  The best place to buy these trees is from the Arbor Day Foundation, which ships only bare root trees (very affordably too, usually one tenth the price of potted trees).  These trees may not look impressive at first, but bare root trees have much faster growth when established and soon surpass almost all store bought potted trees.  They also don't need staking as the root structure keeps them upright.

Secondly, we recommend a device called the Groasis Waterboxx PlantCocoon.  This device, available here, both stores and collects dew and rainwater.  It slowly releases this water to the roots of a growing tree.  This allows (and actually causes) the tree to grow deeper roots, making it more resistant to drought.  The Waterboxx never needs to be refilled after planting, and can be reused up to ten times.

Regardless of what tree you plant and how you plant it, remember the old proverb:  "The best time to plant a tree is twenty years ago.  The second best time is today."