Rabu, 18 Maret 2015

Tomato fruit cracking


Tomatoes can crack in two different ways, as a horizontal circle, concentric cracking, or as a straight line split from the stem end to the bottom of the fruit, called radial cracking. Some varieties are more likely to crack than others, but all tomatoes will crack when overly ripe. Other contributing factors to cracked tomatoes include fluctuating moisture or temperature levels which cause uneven growth.

Temperature

Large fluctuations in air temperature can lead to a start-stop growing process, and the tomatoes experience periods of rapid growth after a sudden temperature increase. This type of cracking usually results in a scar or brown, roughened surface. Do not transplant your tomatoes outdoors until the temperature has steadied. In temperatures above 85 degrees Fahrenheit, tomatoes are more prone to cracking. Do not over-prune your plants as the leaves will provide necessary shade for your fruits.

Water
Irregular moisture will also lead to cracked fruit. Low moisture levels cause slower fruit growth, and an increase in moisture, causes the inside of the fruit to grow more quickly than the skin can manage, resulting in a crack or split. Maintaining even moisture levels is the way to prevent for this type of cracking, which is characterized by deep scars and splits. Tomatoes require 2 inches of water per week, either by rainfall or irrigation.

Mulching
To help maintain even soil moisture, mulch your tomato plants after transplant. Placing a 2 inch layer of mulch around the base of your plants will provide a steady supply of extra nutrients to the plants for the duration of the growing season as well as helping maintain steadier soil moisture levels. Mulch will also reduce of weed growth, leaving more water and soil nutrients for your tomato plants.

Growing Area
While you cannot control outdoor air temperatures, planting your tomatoes in an area that receives a minimum of 6 hours of full sunlight each day will ensure adequate light and a steady supply of warmth in case of fluctuating temperatures. Planting your tomatoes in well-draining soil or in raised garden beds will help prevent water-logged soils. If you do not have a space with suitable growing conditions, consider a container garden. Container tomato plants can be moved to ensure steady sunlight and to protect them from inclement weather, and the soil moisture levels can also be kept steadier.

Why a tomato plant cracks and what to do about it?


Tomato cracks are a problem associated with growing conditions. Dry weather that gives way to excessive watering or a rainy period can lead to cracking.

Here’s what happens when a tomato cracks:
  • Tomato plants get too much water too fast.
  • A tomato’s interior grows quickly as it absorbs the extra water from rain or disproportionate watering, but it expands too fast.
  • The tomato skin can’t stretch to accommodate the extra fluid.
  • Cracking alleviates pressure.

What do tomato cracks look like?


Cracks usually affect the stem end of the tomato (the entry point of water into the fruit). There are two types of cracks: concentric andradial.


Concentric cracks

Radial cracks


Concentric cracks: circles that span a section or the entire circumference of the tomato around the stem end of the fruit

Radial cracks: straight lines that extend outward and downward from the stem node

When do tomato affect fruit?

  • during warm, wet weather
  • during wet weather that follows a dry period
  • after excessive watering that follows a dry period

Can I eat cracked tomatoes?


Yes. Pick a cracked tomato as soon as possible to avoid infection.
When preparing a cracked tomato, simply cut out affected parts.
Cracked tomatoes don’t keep as long as unaffected ones.

How do you prevent cracks?

  • Plant crack-resistant tomato varieties that have elastic skin, including Daybreak, Early Girl, Earl of Edgecombe, Heinz 1350, Jet Star, Juliet, Mountain Delight, Mountain Pride, and Valley Girl.
  • Mulch plants (wait until they’re established – about 3-5 weeks after planting) to help retain moisture in the soil.
  • Keep water supply even throughout the season. While you can’t control the weather conditions, you can make sure that plants are on a regular watering schedule. Tomato plants need 1-3” water a week (including rain.) During dry spells, water tomatoes deeply so that subsequent rain won’t shock skins and lead to unnecessary cracking – use a drip hose or other irrigation system. Ask a neighbor or friend to water your tomatoes while you’re on vacation.
  • Apply balanced fertilizer. When blossoms and fruit develop, tomatoes need more phosphorus and potassium. Excessive nitrogen can cause plants to grow too quickly, leading to cracking.
  • Don’t over-fertilize. Excess nutrients can cause a growth spurt. Tomatoes can have a hard time compensating and may crack.

Special tips

  • Beefsteak varieties are more prone to cracking.
  • If tomato plants dry out, water them just enough to keep them alive. Too much water at one time sets up conditions for tomato cracking. Once your plants have recovered from their dry spell, slowly re-establish a regular watering schedule.

Tomato sunburn and other heat problems

Tomatoes are an easy-to-grow, annual plant. With proper cultural care, this heavy-feeding crop produces tender green leaves and juicy fruits. However, under certain stresses, you may notice yellow to brown spots on your tomato leaves, an indication of burning. Identifying burned spots on tomato leaves, as well as the cause is the key to implementing the proper remedy.

Sunburn
Tomatoes are a sun-loving plant, requiring between 6 and 8 hours of full, direct sunlight per day. However, loss of vigor and problems with pests and diseases have the potential to make your plants sensitive to burning from the sun. This is particularly the case if your plant has experienced defoliation as the result of attack from insect pests or diseases, as leaf loss leads to sunburn on new growth. Sunburned tomato plants develop light to white patches on the upper portions of the leaves. Keeping your tomato plants vigorous with proper cultural care and practices is the best way to avoid pests, diseases and sun-scorched leaves. Additionally, young tomato seedlings are also in danger of sunburn upon transplant. Avoid seedling sunburn by allowing your young plants to slowly adjust to their environment. Provide some filtered shade for your seedlings during the hottest part of the day for the first three to four days after transplanting seedlings outdoors.

Do tomato plants need sun all day?


Tomatoes are a warm-weather crop that require full sun, which means six or more hours of sun per day. Tomatoes benefit from exposure to as much sun as they can possibly get. This means site selection for your tomato plants is key. Before planting your tomatoes, observe the garden throughout the course of the day. As the sun moves across the sky, some areas will be in shade while others are not. Gardens surrounded by trees or structures may not get enough sun exposure to properly grow tomato plants.

Although tomatoes require a great deal of sun, new transplants will need to be hardened off before they can be exposed to full sun in the garden. Leave your transplants outside for a few hours each day in the morning, and increase the number of hours each day over the course of one week. Plant your transplants after this hardening off period. Check soil moisture daily during the hardening off period, as the small containers that transplants are grown in will not hold much water, and a great deal of that will be lost to evaporation.

Fruits exposed to direct sunlight, either as the result of loss of leaves or simply because of their placement on the plant, are vulnerable to sunburn. Fruits on the western side of a plant may be particularly susceptible to this because of the intensity of the afternoon sun. Sunburn on a tomato will take the form of a white or light-colored soft spot on the tomato's skin on the side of the fruit that faces skyward. Protecting your plants from defoliating insects like hornworms will protect the tomatoes from sunburn. Check your plants regularly for these large, green pests. Pick off any hornworms you see and drown them in a bucket, or cut them in half.

What if tomato plants get too much sun?


Healthy garden tomatoes require between six and eight hours of sunlight daily to grow and produce well. Intense sunlight, especially in hot weather or on plants already experiencing stress, can cause some problems. Staying attentive to the signs of sun and heat stress and treating the problem promptly can keep your tomatoes productive.

Water stress
Too much sun may cause the soil to lose water quickly through evaporation, even if temperatures aren't too high. The plant foliage begins to wilt and fruit may stop forming or drop from the plant. Water stress can also lead to blossom-end rot, where the bottoms of the tomato fruits become discolored and sunken. Applying a 2-inch layer of straw mulch can help slow down evaporation and prevent water stress. Regular irrigation that keeps the top 6 inches of soil moist also helps prevent water problems. Water deeply and apply 1 to 2 inches of water at each irrigation. Tomatoes usually only need watering once or twice a week.

Sunscald

Some tomato varieties are more prone to sunscald than others. Those that produce lots of fruits but sparse foliage don't have the necessary leaves to shade the fruit from intense sunlight. Sunscalded fruits develop discolored areas, usually on the top where they are most exposed. The sunscalded spots become tough, then eventually begin to rot. Avoid pruning out too much foliage if your garden receives intense sunlight. Providing some afternoon shade can also protect the fruits from sunscald.

Heat damage
Extreme heat combined with intense sunlight can cause blossom drop. Tomato plants usually shed their flowers without fruiting when temperatures rise above 95 degrees Fahrenheit. Fruits still on the plant usually stop ripening, although they will resume once temperatures cool. Mulching and watering properly won't stop blossom drop, although it will allow the plants to resume flowering and production immediately once temperatures drop below 95 degrees.

Plant protection
Tomatoes don't need fertilizer when they are suffering from sun or heat damage. The fertilizer forces new growth, which further stresses an already stressed plant. Erecting sun protection near the tomato bed can prevent sunscald and other sun and heat problems. A simple shade made by stretching thin white fabric between two stakes still allows sunlight through but protects the tomatoes from the most intense light.

Selasa, 17 Maret 2015

Tomato plants damage by frost

In coastal areas that fall into U.S. Department of Agriculture zones 8, 9 and 10, frost damage is not as common because of the warm winter temperatures. Once spring planting begins, threat of frost has usually passed. Still, cold weather can damage new plants and cause the decline of mature plants. Protecting tomatoes from winter's chill will extend the life of the plant and increase crop production.

Symptoms of cold damage
Wilting is only one of many signs of damage from cold or frost. Newly transplanted tomatoes may have olive green and yellowing leaves, with a purplish underside. Leaves on more established tomato plants will turn black and wilt. These blackened leaves may be pinched off, but leaves that are still green will recover when warmer temperatures return.

Protecting tomatoes from frost
Frost damage is only a threat at the beginning of the growing season, and at the end. If you planted tomatoes very early in the spring, or if you wish to extend the growing season of your tomato plant into the fall, you can prevent frost damage with tools like blankets and specialized covers. Although household blankets are a common tool used to protect plants, blankets may exacerbate the problem by trapping cool air beneath them if they become wet. Specialized garden covers do not have this effect. Some covers are designed specifically to absorb heat during the day and will radiate heat at night after the sun has gone down. In addition, some specialized garden covers can be left draped over a plant for many days at a time. Checking nightly forecasts will tell you when these covers should be used.

Sheltered locations prevent damage
If you're a gardener who knows that you would like to grow your tomato plants later into the growing season, container gardening may be appropriate for you. Containers allow you to move tomatoes to safety on cold nights. If you prefer to grow your tomatoes in the ground, you can plant your tomatoes near a wall with a southern exposure. Southern exposures receive the most daylight while the sun is out, and at night the wall will radiate heat back into the air near the plant.

When to plant
To avoid the possibility of frost damage at the time of planting, tomato seedlings are best planted when soil temperatures reach 60 degrees Fahrenheit, notes the University of Missouri Extension. You can measure the temperature of your soil with a soil thermometer, available at nurseries and home and garden centers.

Does frost kill a tomato plant


Even though indeterminate tomatoes are technically perennials, they are grown as annuals because of their extreme aversion to cold. Not only do tomatoes stop producing as temperatures sink, they are killed completely by hard frosts and freezes.

Tomatoes' natural climate
Tomatoes were originally bred from subtropical plants originating in an area covering parts of Peru and Ecuador and spread northward to Mexico before Columbus set foot in the Western hemisphere. In these areas, tomatoes grew abundantly, bolstered by the steamy, but frost-free temperatures that frequently fell within their optimal temperature range. Tomatoes spread to Europe, where they were at first feared, then later adored for their sweet fruits. Unfortunately, these plants are still adapted to those climates where they originated, making long periods of cool temperatures -- below 55 degrees Fahrenheit -- often as damaging as frosts. Tomato plants grow and produce best between 60 and 85 degrees Fahrenheit.

How frost kills
Frost generally occurs on still nights when the ambient temperature drops near or below freezing. Exposed plant tissues are damaged when water vapor in the air condenses on plant surfaces, then freezes. Condensation forms because plant tissues are initially warmer than the surrounding air, though they cool quickly in the night. Often these events happen quickly in the coldest part of the night, creating frost only briefly. Unfortunately for tomatoes, even a brief stint of freezing is enough to end the growing season.

Protecting tomatoes from light frost
If a light frost is predicted, you may be able to protect your tomatoes from the chill injury or freeze damage it can cause. Depending on the size of your plants, you can use a variety of covers to insulate your plants from the colder air outside, from large cardboard boxes for smaller patio tomatoes to large, clear plastic tents for larger garden varieties. Remove the cover in the morning to prevent accidental overheating.

Ripening tomatoes indoors
When frost threatens, some gardeners uproot their plants and bring them indoors to ripen the fruit that remains on the vine. This will only work with fully formed fruits that are just barely beginning to turn red, so if you decide to hang your tomatoes upside down in the basement, pick off any underdeveloped fruits. Your tomato plant will die, but the vine creates a handy place to store fruit as it finishes ripening.

Protecting tomatoes from freezing and frost


Cold temperatures can damage or destroy your tomato plants. Protecting tomatoes from frost and freezing is important to having healthy crop – both at the beginning of the season and at the end.

The most important step to protecting tomatoes
The best step you can take to protect tomato plants from frost is to pay attention to the weather forecast. When you hear a frost or freeze warning, take appropriate steps to protect your plants.

What’s the difference between a freeze and a frost?
A freeze occurs when the temperature dips below 32ºF (0ºC). Usually a freeze affects an entire region and may last several days.

Temperatures associated with a freeze are lower than temperatures associated with a frost.

Surprisingly, tomatoes can survive a light freeze if it is not accompanied by frost, provided temperatures don’t dip below 28-30º F.

A frost, on the other hand, is localized. Low temperatures may or may not reach freezing, but moisture must be in the picture for frost to develop.

A frost typically falls overnight but during the following day, temperatures warm.

How does frost develop?
  • Frost requires clear skies and calm winds in order to accumulate.
  • Heat radiates from the soil, leading surfaces to get colder.
  • Moisture comes into contact with soil and plant surfaces.
  • Moisture crystallizes on the tomato plant, destroying the plant cells when it melts. When damage is severe, the plant dies.
What is “black frost”?
In very dry, cold weather, it’s temperatures (not frost) that can damage plants. Cold temps darken leaves and stems. That’s why the condition is called “black frost.”

What to know about protecting tomatoes in a frost
  • Frost can occur when temperatures are as high as 40ºF. Moisture, rather than temperature, is the determining factor.
  • Low-lying areas, where cold air settles, are more susceptible to frost. If your tomato patch is in a low area, pay special attention as temperature dip into the 40s.
  • Tomatoes cannot withstand frost. When a frost warning is forecast for your area, choose from various types of frost protection to safeguard young plants in the spring and mature plants in the fall. Tunnel row covers, floating row covers, water barriers, individual plant covers – even sheets, blankets, and plastic – can help save tomato plants from frost injury.

Rabu, 11 Maret 2015

Preparing the land for tomato plants

Available in a variety of shapes and sizes, tomato plants are compact, with distinct heights depending on the cultivar. While there are several types of tomato plants available for the home garden, all varieties have a short harvest period, as well as specific planting needs. Soil is a main factor in planting nearly all types of tomatoes. Here are some tips for preparing soil to produce healthy tomatoes.
  1. Choose a soil for planting your tomatoes that is well drained, deep and loamy (rich with sand, silt and clay).
  2. Test the soil's acidity. Tomatoes favor a more acidic soil with a pH of 6.2 to 6.8. Use a pH soil testing kit, available at home improvement and garden stores, to test the pH levels of the soil.
  3. Choose an area where the soil receives at least 6 hours of direct sunlight.
  4. Work the soil to prepare it for planting. Using a trowel or shovel, move the soil while it is dry. Working with wet soil will make it difficult to move and aerate, and it will stick to your tools. If soil pH conditions aren't ideal for growing tomato plants, add fertilizer to prepare your soil for planting.
  5. Supplement the soil. Apply peat moss, compost or manure to the soil to improve its quality. Mix in small amounts of any or each of these components as you dig and mix your soil prior to planting. The richer the soil, the better the growing conditions.
  6. Choose an area where the soil is deep. Tomato plants require being set deeply in the soil, up to their first leaves.
  7. Purchase a fertilizer with a 5-10-5 ratio of nitrogen, phosphorous and potassium.
  8. Prepare the fertilizer. Dissolve 2 tbsp. (30 ml) of fertilizer into 1 gallon (3.8 liters) of water. Apply 1 cup (240 ml) of the solution to the base of each tomato plant. For larger areas, apply 2 lbs. (907 g) of fertilizer per 100 square feet.

After preparing the soil,

Till the soil to a fine grain. Do not do any other work on the soil; instead focus on the way the tomatoes are grown in that soil.

Sow the tomatoes in simple rows. Plant about 8-10 plants in total for a small, manageable garden.
  • Leave about 2 feet (0.6 m) between each seedling, and the rows 2 feet (0.6 m) apart. This helps the fruit and ground to stay cool.
  • Plant 2 seeds in each hole. Wean out the weaker one at about 4 inches (10.2 cm) of growth.
Fertilize later. Don't over prepare the soil. The seedlings are very sensitive to new conditions when transplanting (or from seed). They can not only die, but can be slowed way down and the yield can be poor. Instead, use chicken poop (such as "Chickity Doo Doo"). It comes in pellet form and doesn't take much knowledge to use. Use about 1 cup per plant spread out on the surface. Watering will leach the nutrients into the soil for you. Do not cultivate.

Use grass clippings. Spread them around in your garden. The more the merrier, to about 2–3 inches (5.1–7.6 cm) height. Not only does this keep the weeds down but it also keeps the soil cool and moist. So less watering!
  • It also provides more organic material (compost fertilizer) for the next growing season.
Water about once a week in the morning only. Do not water at night, as this creates dangerous conditions for your plants as insects love wet dark environments and rot and other diseases such as mold, verticillium rot, etc. are easily avoided by watering during the morning.
  • Also, watering during high noon isn't great because most of the water will evaporate before the plants are able to absorb.
Keep the tomatoes at your own height. This standard exists for two reasons. First, it is hard enough to maintain the tomatoes, so there is no reason to go reaching as well. You can make them shorter; just make sure to stop them when they reach desired growth. Second, tomatoes don't care about fruiting that much. Most breeds like to just grow and grow. Causing the plant to vine out will focus most of the nutrients on greenery rather than on fruit production. So keep them small and you will have higher yields and much faster.

Trim. Hold up three fingers. Now cut the middle one. That's how it's done.

Tomato plants damage by wind

Wind can severely damage many vegetable crops, especially tomatoes. Plants exposed to wind for long period have thicker leaves with brown lesions and a more extensively developed vascular system. In tomatoes, yield and fruit quality are reduced significantly. Tomato plants exposed to a 1,340 cm/ sec (30 mph) wind at a sand-flux rate of 25 g/cm width per min had narrower stems reduced cambial activity, and a peripheral endodermis with casparian strips 4 days after treatment. In exposed plants, leaf thickness, leaf midrib thickness, palasade cell-length, and the no. of stomates per mm2 were double those in control plants. Wind and sandblast damage also affected photosynthesis and respiration rates.

If you live in a downtown area, or on a high floor, your balcony may be pretty windy. In urban areas, wind is funneled in between buildings and can really rip through balconies and the plants growing there. Wind poses several problems to vegetable container gardens. First, it can damage the plant by ripping off leaves, or breaking branches. It can also tear off flowers before they can be pollinated. No pollination, no fruit/vegetables. Wind can also be cold, a bad thing if you’re trying to grow warm season vegetables like tomatoes or eggplant. Finally, wind dries plants and soil out.

Protection
There are a couple of options for protecting plants from being whipped around in the wind. You can try one or the other, or use them in conjunction with each other for the best results. The first thing to try is to create a windbreak. Anything solid that you can put in between your vegetable garden and the direction the wind comes from will help. For example, you can purchase pieces of clear plexiglass and drill holes in the corners so that you can use zip ties to affix the plexiglass to your balcony railings. Of course this will only block the wind that comes through the railings. You can also use plants as windbreaks. Use a planter box to plant a dense hedge along the edge of your balcony.

The second thing to try will help protect young seedlings. Wrap clear plastic around the outside of a sturdy tomato cage. Poke a few small holes in the plastic to allow for air flow. Allowing some air to get through will help prevent diseases from taking hold and will also help strengthen the stems of the plant without breaking them.

Use a piece of black plastic (try cutting up a trash bag) to cover the surface of your pot. Use white plastic if you live in the desert. Fill the pot all the way to the rim with soil, and mix in slow release fertilizer. Secure the plastic over the soil with a large rubberband so that the plastic is taut. Use a sharp knife to cut an ‘X’ in the middle of the plastic that is just large enough to dig a hole and plant your seedling.

If the plastic mulch look doesn’t suit your tastes, use an inch of gravel, marbles, or tumbled glass to cover the soil after you’ve planted the seedling. If this is the route you choose, be sure to only fill the pot with soil to two inches below the lip of the pot so that you’ll have room for the gravel. Don’t use wood chips, they’ll just blow away and make a mess.

If your area gets chilly winds, wait to put out your warm season vegetables for as long as possible. Tomato plants will not grow very well (or at all) in temperatures below 60 degrees. Eggplants can be even more sensitive to cold weather. You can also look for varieties of vegetables bred for their cold hardiness. For tomatoes, that often means a tomato with the word “early” in it’s name, or a name that connotes cold temperature, like “polar” or “arctic.” These varieties produce fruit in a relatively short period of time, allowing you to put them out when things have warmed up, and still have time to produce fruit before fall.

Selasa, 10 Maret 2015

All about watering tomato plants

Also see: Tomato irrigation problems

Water is important to all plants, but too much or too little can hurt the quality of fruit. Tomatoes need sufficient amounts of water throughout the growing season to thrive and produce fruit. Water tomatoes deeply once a week, soaking about 6 to 8 inches of the soil. To retain moisture and keep weeds down, apply a layer of mulch, such as straw or composted leaves, during hot summer months to help retain soil moisture.

How often should tomato plants be watered?


Vegetables, including tomatoes, need to mature quickly and the watering schedule should be as consistent as possible. Too little water will stress them out and can set them back beyond recovery. Tomatoes as well as beans, beets, radishes and cucumbers either experience a substantial drop in quality or just stop growing altogether if they don't get enough water. Plants that are consistently over-watered, on the other hand, often appear weak and spindly and are more prone to disease.

Watering schedule
Germinating seeds should be in slightly moist soil, but never wet. Seedlings do fine if the top 1/4 inch of the soil is dry, as long as the soil below that is moist. As the plant matures, deep water the base of the plant until the water begins to pool. Never allow the plant to sit in standing water for more than a minute or two. As the growing season winds down, so should the amount of water. Because tomatoes like a warm, moist environment, a thick layer of mulch will help to hold in moisture, as well as prevent and slow the spread of disease and weeds.
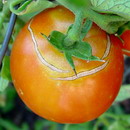
Too much water
Like all garden vegetables, tomatoes create a steady exchange of oxygen and carbon dioxide. Too much water prevents this exchange, causing your plants to drown. Periods of drought followed by heavy rain followed by another drought, causes cracks and splitting in the tomatoes. Once the tomatoes begin to ripen, they shouldn't be over-watered as it puts the fruit at risk for cracking. Cherry tomatoes are particularly prone to splitting after too much water, particularly if they have just gone through a dry spell. If you expect a heavy rain, pick all the ripe tomatoes before they split.

Too little water
If you are seeing blossom-end rot, it's usually because your tomatoes haven't been watered or it hasn't rained; essentially a sudden drop in the soil's moisture level. The soil should never dry out completely during the growing season. A good way to test the moisture level is by sticking your finger all the way into the soil, you may not feel moisture at the base of your finger, but you should always feel moisture at the tip.

Companion planting
When planning a vegetable garden, it's so important to use companion planting to make sure all of the plants get what they need regarding water, fertilizer, sun and soil. Tomatoes can be planted with asparagus, basil, broccoli, carrots, cauliflower, mustard, onions, parsley, rosemary and sage. All of these plants need similar amounts of water, sun and space.

How much should you water tomato plants every day?


Tomato plants thrive in full sun in humus-rich, well-drained soil with a pH between 6.0 and 6.8. Although tomato plants can tolerate slightly dry soil, they perform best when the soil remains evenly moist, as uneven watering can cause blossom-end rot and cat-facing in tomatoes. Knowing exactly how much water they need can be a challenge, but by following simple guidelines you can provide your tomato plants with the right amount of water.

Seedlings
Determine the amount of water your seedlings require by following their lead. Initially, they may require as little as 1/4 cup of water, but as they grow larger, their water needs increase. Watering them until water runs freely through the bottom of the pot and checking them throughout the day give you a good indication of the amount of water they need. Typically, if the soil dries in less than 24 hours, your tomato plants require either more water or transplanting to a larger pot.

Tomatoes in containers
Full-grown tomatoes grown in containers often require daily watering. The exact amount needed may range from a quart to a gallon or more, depending on the rate of growth, weather conditions and the pot size. As a rule, watering your tomatoes until water runs freely through the bottom of the pot and again when the soil feels dry to the touch 1 inch below the surface provides them with the water they need to thrive.

Tomatoes in the soil
Because tomatoes grown in the soil can send their roots deep into the soil when the surface soil dries, they often require less frequent watering than tomatoes grown in containers. However, deep watering to moisten the soil to the root level once or twice a week is preferred to daily light watering. Wetting the surface of the soil without saturating the soil at the root level encourages tomato plants to form roots near the surface of the soil, compromising the support system of the plant. As a rule, tomato plants require 1 to 2 inches of water a week.

Considerations
Weather conditions, plant size and growth rate, and the soil the tomato plant is grown in all affect the amount of water your tomato plant needs. Your plants require more water during hot, dry spells and periods of active growth than they do during wet weather or when the plants are young. How well the soil drains and its water-holding capacity also affect the amount of water they need. Observing your tomato plants throughout the day gives you important clues to their watering needs. Healthy tomato plants that wilt excessively or soil that feels dry to the touch indicate that more water is needed.

How much water does a tomato plant need a day?


The key to keeping tomato plants healthy and hydrated is to maintain an even and consistent soil moisture level. This means your plants should never dry out or live in sopping wet, swampy conditions. Evenly moist soil is your goal. The daily amount of water it takes to keep the soil around your tomato plants evenly moist depends on a variety of factors, such as the temperature and where you plant the tomatoes. If you keep your soil moist most of the time, you'll be providing the correct amount of hydration.

Seedlings
Tomato seeds and seedlings need to be kept moist, but never wet, at all times. Because they're typically placed in small seed-starting containers or seedling trays, you'll need to check their moisture levels more than once daily to ensure they haven't dried out. Small seedlings can be misted several times a day with a spray bottle. The amount of water will vary depending on temperature, container size, air flow and humidity. Keep the soil moisture levels as even and consistent as possible. If you notice the soil is too moist, increase air flow in the area, and hold off on watering again until the soil is on the drier side of moist, but not completely dried out.

Container plants
Container plants have different watering needs than garden tomatoes. The containers tend to heat up more quickly. This increased soil temperatures causes water to evaporate at a fast rate. The containers also can't hold as much water as the soil surrounding tomatoes planted in the ground. You'll likely need to water these plants more than once per day. Start with a morning watering, then check on your containers throughout the day to see if you need to add afternoon and evening waterings.

Garden plants
Tomatoes in gardens have an advantage over container plants -- they can spread their roots out far and deep in search of water. Even so, the same rule of thumb about even soil moisture applies. Tomato plants need about 1 to 1 1/2 inches of water each week to fruit, according to Ohio State University. There's no need to measure, so long as you maintain an even soil moisture. At the beginning of the growing season, this may mean watering in the morning until the soil is thoroughly damp and remains damp all day. As temperatures rise, you'll likely need to water your plants in the morning, then again in the evening to maintain consistently moist soil.

Tips

To help retain soil moisture, add a few inches of organic mulch to the top of your soil. The mulch will help slow down water evaporation. Watering in the morning and evening also helps prevent evaporation. Remove weeds as they crop up so they don't steal water away from your tomatoes. If you have access to a drip irrigation system, you'll have an easier time keeping your soil consistently moist, but installing one isn't a necessity.

Can you water your tomato plant right after you plant it?

Proper watering technique is one of the most important components of growing tomatoes. Watering too much or too little can lead to poor plant health and diminished yield. During planting, it is important to give the plants plenty of water to help them establish roots in the new soil.

Planting tomatoes in the ground
When planting tomatoes directly into the ground, it is best to plant while the soil is moist but not soggy. This allows the initial watering to drain more easily through the soil. Directly after planting, water the area around the base of the plant until it begins to puddle on the surface, then allow the standing water to soak into the soil. Water once more, again, allowing to puddle slightly before draining through. This will ensure the plant has enough water while it sends its roots in the new soil.

Planting tomatoes in pots
Tomatoes grow well in containers and you should care for them in a similar way as when you plant them directly into the soil. After planting, soak the soil surrounding the plant thoroughly until the water begins to run out the bottom of the container. This means the water has drained all the way through the soil.

Future water care

In general, tomato plants thrive when watered deeply and infrequently. Supply 1 to 2 inches of water per week, whether through rain or supplemental watering. Each time you water, soak the soil thoroughly to allow water to reach the roots deep in the soil. Potted tomato plants require more frequent watering than those in beds because the soil loses moisture more quickly.

Water-related problems
Incorrect watering is a main cause of disease in tomato plants. Light, frequent watering will lead to weak root systems and poor plant health. Inconsistent water, whether to little or too much, can cause blossom-end rot, a disease which causes large dark spots on the bottoms of the tomatoes. Mulching the area around tomato plants can help to maintain a more even level of soil moisture.

How much water does a tomato plant need in its life time?


Tomatoes thrive on routine, including a regular watering schedule. Provide at least 1 inch of water per week throughout the life cycle of the plant, increasing to 1.5 inches during the hottest months. When properly cared for, these annuals are capable of producing 10 to 15 pounds of tasty, nutritious fruit that matures in 65 to 100 days, depending on variety. An inch equals 1/2 gallon of water per square foot or 30 gallons for a 60 square-foot plot.

Moisture musts
Thoroughly soak soil to a depth of 5 to 8 inches to encourage strong roots and calcium circulation. It's better to use a drip hose or water individual plants at the base than to use spray attachments that wet the leaves. Morning is ideal for watering, especially if you're using a sprinkler, because foliage has time to dry before nightfall. Dark, damp conditions invite bacterial and fungal diseases.

Adjusting amounts
Plants flourish in daytime temperatures of about 75 degrees Fahrenheit and nighttime temperatures of about 68 degrees. They're thirstier during peak production. Drought and heat waves may also warrant additional water. Dig down a few inches or lift the container. If the soil feels crumbly and light, plants are low on water. Tomatoes are sensitive to shifts in moisture. Blossom-end rot and growth cracks may result from sudden decreases or surges, such as going from dry weather to heavy rain.

Rabu, 04 Maret 2015

Problems with temperature for tomato plants

A suitable tomato plant can be found to grow in almost any climate and environment. The warmest growing temp for tomatoes and the lowest temperature to grow tomatoes are the eternal conundrum for the home gardener. Tomato temperature tolerance varies depending upon the cultivar, of which as mentioned, there are many.

Tomato plants and temperature


Most tomatoes are warm season plants and should only be planted after the danger of frost has passed. Tomato temperature tolerance for extreme heat or cold snaps is of extreme importance to the development of blossoms and subsequent fruit set.

Blossom drop will occur in the spring if daytime temperatures are warm but night temps drop below 55 degrees F. (13 C.). In the summer when temperatures soar over 90 degrees F. (32 C.) with nights over 76 degrees F. (24 C.), again, the tomato plant will suffer damage to immature fruit or loss of flowers.

Additionally, when nights become too warm, the pollen grains of the tomato flower begin to burst, thwarting pollination, hence no fruit set. This is doubly true when the air is saturated with relative humidity.

The growing temp for tomato seedlings should be maintained at constant temps of between 58-60 degrees F. (14-16 C.), whether starting in the greenhouse or indoors, and then not transplanted until the last frost has passed.

Cold hardy tomatoes


There are specific tomato varietals bred for cold hardiness which will tolerate conditions at or below 55 degrees F. (13 C.). The best choices for colder climates are short to mid-season tomatoes. These tomatoes set fruit not only in cooler temps, but also reach maturity in the shortest number of days; around 52-70 days. One of the most popular is called Early Girl, but there are many different cold hardy varieties to choose from. Know more about growing in cold.

Some examples of hybrid tomatoes for cool climates are:
  • Celebrity
  • Golden Nugget
  • Husky Gold
  • Orange Pixie
  • Oregon Spring
  • Siletz
Heirlooms varieties include:
  • Bush Beefsteak
  • Galina
  • Glacier
  • Gregori’s Altai
  • Grushovka
  • Kimberly
  • Legend
  • Manitoba
  • New Yorker
These are just to name a few. A little research should turn up a dizzying list to choose from.

Heat tolerant tomato varieties


Just as there are those of us who live in cooler climates, there are also those who live where temperature conditions run to the more extreme heat index. There are tomato varieties bred for those conditions as well.

Some examples of hybrids which are heat tolerant are:
  • Bella Rosa
  • Big Beef
  • Florida
  • Fourth of July
  • Grape
  • Heat Wave
  • Homestead
  • Manalucie
  • Mountain Crest
  • Porter
  • Sanibel
  • Solar Fire
  • Spitfire
  • Sunbeam
  • Sun Leaper
  • Sun Chaser
  • Sunmaster
  • Super Fantastic
  • Sweet 100
Heirlooms include:
  • Arkansas Traveler
  • Costoluto Genovese
  • Green Zebra
  • Quarter Century
  • Sioux
  • Super Sioux
  • Tomato Frost Protection
Besides planting cold hardy tomato varieties, some tomato frost protection may be provided by using plastic “mulches” or covering which will trap the heat to keep the fruit warm if temps drop below 55 degrees F (13 C.). Dark plastic coverings will raise the temps by 5-10 degrees while clear warm the tomatoes by up to 20 degrees. This may be just enough to save the tomato crop. See the full variety list for more seasons and varieties.

Tips for pruning a tomato plant

As a tomato plant grows, the sugar it produces prompts it to produce new branches, leaves, flowers and eventually, fruit. You may think that a bigger tomato plant is a better one, since it will provide you with more fruit. Indeterminate tomato plants, however, may grow large enough to cover a 4-by-4-foot area if you don't prune them. Such a plant makes it difficult to harvest fruit and is a magnet for disease. Pruning your tomato plants regularly will keep them tidy, manageable and disease-free.

Identifying suckers
When gardeners speak of pruning their tomato plants, they're typically referring to suckers. Suckers are the stems that grow between a plant's main stem and a side stem. These stems jut out at a 45-degree angle and are best removed when just starting to grow. If allowed to grow, suckers eventually develop into a new stem that can reach several feet in length. Suckers produce very little fruit, and what fruit they do make tends to be of low quality and they rob the plant of energy it needs to make large, healthy fruit.

Determinate or indeterminate
Indeterminate and determinate plants grow very differently, so they're also pruned differently. Determinate plants grow to a set size and produce a set number of stems and fruit. They don't usually need pruning and vigorous pruning will actually harm your harvest. If you must prune determinate tomato plants, only remove diseased leaves or those that touch the ground. Indeterminate plants will continue growing throughout the season until killed by frost or disease. They can produce an unlimited number of tomatoes until then. They'll also keep producing stems, although these stems generally only weaken the plant, so they must be pruned.

Removing suckers
It's best to remove suckers below a plant's first set of fruit for a strong main stem, although you can eliminate them anywhere you don't want a side stem to grow. When you see a young sucker, remove it using either simple pruning or Missouri pruning. For simple pruning, grasp the base of the sucker between your thumb and forefinger and wiggle it until it snaps off. Don't use a knife to do this, as it can cause the spread of disease. Missouri pruning is best for suckers that have grown more than a few inches long. To prune this way, snap off the tip of the sucker, including the first two or three leaves. This won't shock the plant as much as if you removed the entire sucker.

Other pruning
If you notice diseased stems or leaves on your plant, always remove them immediately to stop the disease from spreading. Remove broken or dead plant material as you find it. Cut off leaves that are touching the soil to reduce the chance of disease or pest infestation. As the end of the growing season draws near, you'll to perform a bit more pruning. About four weeks before your first frost date, start removing any new flower clusters that appear to allow the plant to put its energy into ripening the remaining fruit. Continue pruning suckers as normal during this time.

Other considerations
Never prune your tomato plants when it's raining or they're wet, as they are more prone to disease when wet. Avoid pruning in the middle of the day to lessen stress for the plant; prune in the morning or early evening. Don't prune too many leaves, especially if you live in a hot area; some leaves are necessary to shade fruit and prevent sun scald. If you plant to support the plant with a trellis or cage, install it before you begin pruning. Support methods vary on your plant and the type of growth you want to accomplish.

Benefits of pruning


Pruning your tomato plants (Solanum lycopersicum) generally improves the health of the plants and the quality of the fruit they produce, but not every type of tomato plant benefits from pruning. Determinate plants, for example, don't need much pruning to thrive. Combining pruning with stakes or tomato cages encourages your tomato plants to grow in an upright form that reduces the risk of disease and increases the longevity of the fruit they produce.

Disease resistance
Properly pruning your tomato plants improves their form and eliminates conditions that can promote the growth of fungal and bacterial disease. Unpruned tomato plants tend to form numerous vines that follow the ground, producing dense growth that can prevent leaves from drying. Unsupported branching vines are quickly weighed down and come in contact with the ground. Vines that are weighed down on the ground are more vulnerable to soil-borne diseases and tend to produce more side shoots, resulting in denser foliage.

Fruit quality
Limiting your tomato plants to two or three stems thins out the leaves of the plant, ensuring that all of the leaves have ample access to sunlight. Shaded leaves can yellow and drop from the plant, causing it to expend nutrients regrowing leaves instead of producing fruit. Limiting the number of growing stems on the plant through pruning also helps concentrate your tomato plant's nutrients on producing fruit. Properly pruned tomato plants typically begin producing fruit two to three weeks earlier than unpruned tomatoes and provide larger fruit.

Increased vigor
Pruning back side shoots on your tomato plants improves the structural strength of your plants. Each shoot that forms becomes increasingly weaker as the sugar the plant uses for food is spread among more stems. These weaker shoots make the plant more susceptible to injury from pests. Side shoots that form below the first cluster of flowers on the main stem reduce the vigor of the main stem of your tomato plant. Pruning these shoots when they begin to form improves the overall health and fruit production of your tomato plant.

Considerations
Indeterminate tomato plants benefit the most from pruning. This type of tomato plant grows continually throughout the year and requires regular pruning to prevent it from developing a broad branching growth habit that restricts the size of its fruit and promotes disease. The best time to prune side shoots is when they are roughly 4 inches long. Avoid using a knife to remove shoots since this can leave an open wound that leaves your plant vulnerable to infection. The best way to prune side shoots is to pinch them off with your fingers early in the day when the stems are firm.

More tips and advice on pruning tomato plants


How to prune indeterminate tomato plants?
How to prune tomato plants in containers?
How to pinch of the suckers on tomato plants?
How to prune a tomato vine?
Can indeterminate tomatoes be pruned to reduce size?
Tips for pruning tomato plants
How to prune cherry tomato plants?

Problems with pollinating tomato plants

Click for larger imageLeafy growth on a tomato plant without flowers or fruit is usually caused by adverse environmental conditions, but diseases, such as, viral diseases can also affect flowering and fruit set. Tomato plants fail to produce fruit when pollination does not occur.

Symptoms and diagnosis
Tomatoes have both male and female parts in the same flower but sometimes pollination fails to occur. The result is that the plants may appear to be healthy, growing well, and flowering, but many or all of the blossoms drop from the plant failing to form fruit.

Plants grown outdoors are generally self-pollinating as long as there is a breeze or other mechanism for moving pollen from anthers to pistil.

Life cycle
Weather conditions are key factors in successful pollination. Daytime temperatures over 90 degrees F. and/or nighttime temperatures below 55 degrees F. will diminish pollination in tomatoes. High humidity creates sticky pollen which does not transfer well.

Integrated Management Strategies
  1. Follow planting guidelines for your time zone. Tomatoes planted too early or too late are more likely to have pollination problems. Early and late varieties may be more fruitful if weather is an issue.
  2. Hormone sprays. Use of a blossom set hormone may increase fruit production if the cause is cool, cloudy weather, but not if the temperatures are too high.
  3. Provide good culture. Minimize stress on your plants with proper spacing, watering, and pest management.
  4. Fertilize properly. Avoid excess nitrogen which will promote foliage growth at the expense of blossom formation.
  5. Pollinate by hand.
Tomatoes, pollination, honeybees, and the like may not always go hand in hand. While tomato flowers are typically wind pollinated, and occasionally through bees, the lack of air movement or low insect numbers can inhibit the natural pollination process. In these situations, you may need to hand pollinate tomatoes to ensure pollination takes place so your tomato plants bear fruit. Let’s look at how to pollinate tomato plants.

Can a tomato plant pollinate by itself?
Many plants are self-fertilizing, or self-pollinating. Edible plants like fruit and vegetables with self-pollinating flowers are also referred to as self-fruitful. In other words, you can plant just one variety of the plant and still get a crop from it.

Tomatoes are self-pollinating, as flowers are equipped with both male and female parts. One tomato plant is capable of producing a crop of fruit on its own, without the need of planting another one.

Nonetheless, nature doesn't always cooperate. While wind normally moves the pollen around for these plants, when there is none or when other factors, such as high temperatures and excessive moisture or humidity occur, poor pollination may result.

Tomatoes, Pollination, Honeybees
Honeybees and bumble bees can be sufficient substitutes for moving pollen on tomato plants. While planting a myriad of bright-colored plants in and around the garden can entice these helpful pollinators, some people prefer to maintain nearby hives. This practice is dependent on your personal needs and preferences.

How to pollinate tomato plants by hand?
Another option is to pollinate tomatoes by hand. Not only is this easy but it can be quite effective. Pollen is normally shed from morning to afternoon, with midday the most optimal time to pollinate. Warm, sunny days with low humidity are ideal conditions for hand pollinating.

However, even if conditions are less than ideal, it never hurts to try anyway. Oftentimes, you can simply shake the plant(s) gently to distribute the pollen.

However, you may achieve better results by giving the vine a little vibrating instead. While you can purchase commercial pollinators or electric vibrator devices to hand pollinate tomatoes, a simple battery-operated toothbrush is really all you need. The vibrations cause the flowers to release pollen.

Techniques for hand pollinating vary, so use whatever method works best for you. Some people simply place the vibrating device (toothbrush) just behind the open flowers and gently blow on or shake the plant to distribute the pollen. Others prefer to collect the pollen in a small container and use a cotton swab to carefully rub the pollen directly onto the end of the flower stigma. Hand pollination is usually practiced every 2-3 days to ensure pollination occurs. Upon successful pollination, the flowers will wilt and begin fruiting.

Blotchy ripening of tomato fruits

When it comes to blotchy ripening in tomato, be familiar with how to recognize it, factors that contribute to its development and steps that can be taken to limit its occurrence. Blotchy ripening is characterized by one or more conditions specific to the external and/or internal color of individual tomato fruit. Idealized versions of individual mature tomato fruit are uniformly red over their entire surface and nearly so throughout their interior flesh. Fruit exhibiting blotchy ripening, however, are not. Instead, defected fruit are mostly red on the outside but marked with areas that remain green, yellow, gray or a much paler red than the remainder of the fruit. Blemished areas may be restricted primarily to the half of the fruit nearest the stem. Internally, the flesh, especially vasculature, of fruit exhibiting ‘blotchy ripening’ may be brown in color or broken down.


Symptoms associated with blotchy ripening are not unique to it. These symptoms can be traced to physiological, disease or insect feeding causes. The symptoms can also vary in intensity and frequency; i.e., with regard to the proportions of individual fruit and entire crops or pickings that are affected and to what extent (e.g., of discoloration). Regardless, it is important to note that fruit are said to exhibit blotchy ripening only when they are also in the mid-late stages of ripening as determined by changes in firmness and other variables and when insect (e.g., whitefly) and disease (e.g., TMV) are ruled out as causal agents. These two criteria separate truly ‘blotchy’ ripened fruit from firm, immature fruit in the early stages of ripening (which can be mottled in color inside and out) and fruit damaged by the action of pathogens and/or insects. Blotchy ripening is a physiological ripening disorder.

Blotchy ripening has been discussed as a potentially significant marketable yield issue in research and extension publications for at least 76 years. Many agree that blotchy ripening occurs more often in greenhouse- and high tunnel-grown crops but open field plantings can also be affected.

What’s behind the disorder? Why do certain fruit ripen unevenly? What can tomato growers do to limit the disorder in their crops?

Immature tomato fruit are green and photosynthetic. In fact, early in their development, tomato fruit can produce a significant portion of the sugars found in them through photosynthesis. Later however, the set of pigments found in fruit of most hybrids shifts and red becomes the dominant color.

This shift is pre-programmed but influenced by conditions surrounding the fruit and within the plant and soil. The first and one of the most reliable steps in minimizing blotchy ripening is selecting varieties known to display it very infrequently – i.e., among few crops year to year and among few fruit within a season.

A variety’s genes may predispose it to physiological disorders like blotchy ripening but this weakness can be minimized or masked with luck and proper management. The causes of physiological disorders can be difficult or take a long time to determine because blotchy ripening and other disorders are difficult to induce experimentally. That said, many years of research and experience have revealed that blotchy ripening is most prevalent when air temperatures during mid-late stages of fruit ripening are extreme (e.g., below 60 deg F and/or above 90 deg F) or highly variable, when humidity levels remain high, and/or when these conditions prevail and light levels are low. Unfortunately, these are exactly the types of conditions common on some farms in the region recently, especially those containing high tunnels. In general, skies have been intermittently cloudy and sunny, temperatures have risen and fallen sharply over short time periods (often reaching below 60 deg F in unheated areas), and rain has been abundant, leading to prolonged periods of high humidity, especially in minimally ventilated high tunnels. These conditions, in combination with varieties susceptible to blotchy ripening, are causing some marketable yield losses.

Nothing can be done to change the weather. Going forward, in addition to careful variety selection, growers are encouraged to minimize temperature extremes and fluctuations as much as possible. As conditions allow, high tunnels should be ventilated so that the interior humidity levels are no higher than ambient, outdoor conditions. Field or high tunnel, though, growers are particularly encouraged to examine their soil fertility and moisture management plans carefully since plant nutrient and water status also influence the occurrence of blotchy ripening.

Severe cases of blotchy ripening are most often associated with factors that limit the supply of potassium to maturing fruit. These factors include: waterlogged and/or compacted soils, below-optimal potassium application rates, above-optimal nitrogen application rates, excessive application of potassium competitors, excessively large or dense canopies, and the environmental conditions mentioned previously. Potassium supplies may be restricted for different reasons; so, in evaluating and modifying your irrigation and nutrient management plans, do not over-compensate.

Supplying too much water on dark days when transpiration is minimal is by far the most common error. Some speculate that an excessive fruit load may also raise the probability that blotchy ripening will be a problem in some pickings.

Selasa, 03 Maret 2015

Tomato irrigation problems

When you understand what tomatoes use water for, then it setting up a schedule for watering tomato plants makes sense. One of the most crucial parts of their care is knowing how much water do tomato plants need. Let’s take a look at how to properly water tomatoes.

Tomatoes are fast-growing, heavy-producing plants. They make a lot of food (sugars) in order to grow blossoms, develop fruit, and put out more branches. It takes a considerable amount of water to convert sunlight into energy for a tomato’s many branches and blossoms.

Here’s a quick review from high school biology class about what happens with water in a tomato plant. You can see why water is incredibly important to growing healthy tomatoes.
  • plants absorb water through their roots
  • water finds it way up the plant to the leaves
  • some water is used in the leaves to make food (sugars) for the plant. This process is called photosynthesis, and it’s responsible for converting sunlight into energy for your tomato.
  • some water is released through the leaves to cool them. This process is called transpiration. It’s based on the same principle as perspiration in people.
As a gardener, watering is one factor that you can control!

It’s simple when you know when, where and how to water them.
  • WHEN
Water regularly. Consistent watering produces stronger plants and larger fruit. In the height of summer, water 2-3 times a week. (Rainfall counts.) Later when temperatures cool, scale back to once a week.
  • WHERE 
Water at the soil line.You’ll help build your tomato’s root system. Avoid overhead watering, which spreads diseases.
  • HOW
Water slowly. Let water sink into the ground to help plants develop strong root systems. When the soil surrounding your tomato plant is moistened 6-8” deep, you’ll know you’ve done your job well.

Tomato problems that arise with improper watering

  • blossom-end rot: calcium imbalance caused by irregular watering: over watering followed by under-watering means calcium can’t be absorbed consistently into tomato
  • cracks, splits in fruit: irregular watering, over watering after drought: leads tomato skins to expand, contract, and split
  • small fruit, stunted growth, reduced production: irregular watering, under-watering: to stay cool, plants limit the exchange of oxygen and carbon dioxide through leaves, which slows growth
  • susceptibility to tomato fungus: overhead watering or watering at night, which allows fungi to rest on the leaves
  • tomato root rot, root loss: overwatering: soggy soil prevents roots from getting oxygen, light watering, sprinkling: roots reach to the surface in search of water

Minggu, 01 Maret 2015

Over-watered tomato plants

Adequate irrigation is crucial to the survival of a tomato plant, but it can be difficult for the novice gardener to know when enough is enough. Even an experienced gardener can soak a tomato plant when Mother Nature is providing adequate irrigation on her own. Overwatering can wash away essential nutrients and oxygen your tomato plants require to thrive. Symptoms include puddles of water around the plant, yellowing leaves, leaf burn and crown or root rot.

Tomatoes, those kings of the summer vegetable garden, thrive during the hot, dry periods when supplemental irrigation is a must. Yet too much water results in poorly producing plants, disease or early death. Balancing the water needs of the plants requires keeping a sharp eye out for the first signs of tomato distress from too much irrigation.

Leaf problems
Several leaf conditions occur from over-watering. Leaf roll results in older leaves on the tomato plant rolling upward while becoming brittle. High soil moisture in conjunction with direct sunlight causes this condition, which is counteracted by providing some afternoon shade to the plant and reducing moisture levels in the soil. Young and old leaves alike may also turn yellow or drop from the plant prematurely because of overwatering.

Root rot
Although technically caused by a fungal infection, root rot occurs almost exclusively in overly wet soils. This is because the fungi require a wet environment to thrive. The upper portion of the plant may begin to die, usually seen first as dropped leaves and blossoms as well as slowed growth. The lower portion of the stem typically feels soft and mushy as root rot progresses. Reduce watering to prevent the rot from becoming worse. In less severe cases, the tomato plant may bounce back.

Fruit problems
Tomatoes that crack, either at the blossom or stem end, are a result of improper watering. The condition is called cat facing and results in ugly fruits that may not reach their full size. Generally, high soil moisture and high temperatures during a period of fast growth result in the condition. Reduce watering to eliminate the problem on the next round of fruit set by the plant. Puffy fruits with hollow insides also result from too much soil moisture in conjunction with high nitrogen levels in the soil. Overly hot or cool temperatures can also result in hollow tomatoes.

Blossom end rot
Blossom end rot also occurs on the fruit, but it is caused by both underwatering and overwatering. Dark, wet-looking spots develop on the blossom end of the fruit. These spots then become nearly black and may develop into open lesions or rotten spots. Periods of overly dry soil followed by a period of over-watering is the primary cause, in conjunction with a calcium deficiency in the soil. Use mulches to maintain steady soil moisture and don't allow the soil to dry out completely between waterings.

Watering tips
Proper watering depends on the amount of rainfall versus irrigation and the quality of the soil. Planting in well-drained soil that doesn't develop puddles during rainy weather helps minimize over-watering issues, but this soil may require more frequent irrigation during dry periods. Tomatoes require between 1 and 2 inches of moisture weekly. Generally, if the top inch of soil feels moist, the plants don't need water.Stick a twig into the soil. If it comes out dry, water the plants. If it comes out with soil clumps sticking to it, the soil may be too wet and needs to dry some before the next watering. Applying mulch over the soil helps maintain constant soil moisture, which prevents issues like catfacing and blossom end rot.

How to repair?
  1. Cut away any yellowed and rotted leaves and stems. A rotted stem will feel mushy to the touch. These stems will not recover and are taking away moisture and nutrients the viable stems and leaves require to recover.
  2. Turn off any automatic sprinkler or soaker hose. If there’s rain in the forecast, gently cover the tomato plants with clear plastic sheeting. Weigh down the plastic sheeting with heavy objects such as large rocks. Arrange the cover so air still reaches the plants.
  3. Allow the soil to dry out until it’s moist to the touch, not completely dry. The best way to tell if your tomato plant requires more water is to stick your finger into the soil. If the soil is moist at a depth of 2 to 3 inches, you don’t need to water it just yet.
  4. Continue to monitor the soil; when it’s dry at a level of 2 to 3 inches, remove the plastic sheeting and water the plant to a depth of 2 to 3 inches. As the weeks pass, continue to monitor the soil and the plant’s appearance. If Mother Nature is providing enough rain to keep the soil moist to a depth of 2 to 3-inches, do not provide any supplemental irrigation. If the plant’s stems and leaves continue to rot and yellow, it cannot be salvaged and must be removed and disposed of immediately.

My tomato plants are withering & the lower leaves are dying

Many home gardeners enjoy growing tomato plants, which flourish without much maintenance if planted in sunny locations with plenty of water. However, tomatoes tend to succumb to several types of fungal infections. Many of these first appear on the lower, or oldest, leaves of the plant, where the sun doesn't always hit to dry them quickly after watering or a rain shower.

Fungal infections
Fungal infections are the most likely culprits if your tomato plants have lower leaves that are beginning to wilt and die. The fungus typically flourishes in the moist heat of summer, just as the tomato plants are starting to fruit. Possible fungal infections include Fusarium wilt, early blight, late blight or Septoria leaf spot. Although these each present with different symptoms, all tend to affect the lower leaves first.

Fungi symptoms
Look closely at the wilting leaves for signs of fungal infection. With Fusarium wilt, the leaf veins turn lighter than the rest of the leaves, called vein clearing. Entire stems of leaves begin to yellow and wilt quickly, often along one side of the plant. Early leaf blight appears as dark spots of concentric circles that grow and multiply, causing leaves to wilt. In late blight infections, the leaves develop light green spots along the edges that grow inward and turn dark, causing the leaves to wilt from the outside in. You might see white, downy fungus growth on the leaves' undersides. Septoria leaf spot causes gray or tan spots with dark edges to appear on the leaves. Infected leaves turn yellow and die.

What to do?
When your tomatoes become infected with a fungus, there's no way to cure them. Remove the infected plants immediately to stop the spread to healthy plants and don't plant in infected soil the next year, if possible. In smaller gardens where there's not room to rotate the tomato plants each year, treat the soil with a fungicide such as mancozeb or benomyl. To help keep the fungus from spreading, treat uninfected plants nearby by mixing the fungicide according to the manufacturer's directions and spraying the plant leaves and the soil underneath the plants. For benomyl, for example, mix 1/2 ounce with 5 gallons of water for the spray. Mix 1 to 3 ounces of mancozeb with 5 gallons of water. The best type of fungicide for your problem might vary, so check the label carefully to ensure the fungicide you choose works with the fungus you suspect.

How to prevent infections?
The best way to address fungal infections is to prevent them. Space your plants at least 24 inches apart to allow proper airflow around the leaves. Water the plants from the base when possible, using either a drip irrigation system or a watering can. If you water using regular sprinklers that wet the entire plant, water in the morning so the plants can dry out before nightfall. Choosing the right type of tomato can also prevent infections; many are resistant to certain fungal infections. Resistance is shown on the seedling labels with letter codes such as "F" for Fusarium wilt.

How to keep indoor tomato plants from getting leggy?

Growing tomato plants indoors lets you savor their juicy, scrumptious fruit year-round, or simply get a jumpstart on the outdoor growing season by starting seedlings inside for transplanting when the weather warms up. No matter your ultimate goal, insufficient lighting results in leggy tomato plants.
  • Place your tomato plants in a south-facing bay window, if possible. Tomato plants grown indoors need at least 12 hours of natural sunlight a day. A bay window provides light from the most directions and is ideal for indoor growing.
  • Supplement natural sunlight with full-spectrum fluorescent lights if you do not have a south-facing window with at least 12 hours of sunlight. Providing more light per watt of electricity while emitting less heat, fluorescent lights are the most cost-effective and efficient lights for gardening indoors, according to the National Gardening Association. Provide 25 to 30 watts of light per square foot of full-grown tomato plants and 15 to 20 watts per square foot of seedlings. Place the lights 6 inches above plants or 2 to 3 inches above seedlings, and leave them on at least 16 hours a day.
  • Reflect the maximum amount of light by placing your tomato plants in a white or light-colored room.

How to raise tomatoes from seed to seedlings?

Thousands of tomato (Solanum lycopersicum) varieties exist, and they can be categorized in several ways -- maturity class, fruit size, fruit color, use, and determinate or indeterminate. No matter the type, tomatoes need a sunny location and well-drained soil. Seed planting begins indoors 10 to 14 days before the last expected frost date. Starting seeds indoors then transplanting seedlings is one of the best methods for growing healthy tomatoes, because tomatoes require warm temperatures to grow and a controlled environment can be created indoors. Most varieties of tomatoes flourish in U.S. Department of Agriculture plant hardiness zones 2 to 10.
  1. Fill a seed tray with clean, light potting soil. Sow a seed 1/4 inch deep in each cell of the tray. Put the tray in a room about 70 to 80 degrees Fahrenheit, and keep the soil evenly moist until germination.
  2. Move seedlings to an area that has six to eight hours of sunshine per day or cool white fluorescent tubes 2 to 3 inches above them, lit for 14 to 16 hours per day. Keep the room temperature between 65 to 75 degrees Fahrenheit. Water consistently to keep the soil evenly moist, and feed the seedlings half strength soluble complete fertilizer every 10 to 15 days.
  3. Prepare the garden bed when soil temperatures are above 60F and transplants have five to seven mature leaves, about six to eight weeks after planting. Spread 4 inches of well-composted organic mulch over the garden bed, and till it into the top 6 inches of soil with a garden fork or rototiller. Apply 4 to 6 cups of an all-purpose fertilizer such as 10-10-10 per 100 square feet, and mix it into the top 6 inches of the soil.
  4. Harden off the seedlings 10 days before transplanting by gradually exposing them to an increasing number of hours of outdoor light and temperatures, until they can handle six hours of outdoor conditions daily.
  5. Water the seedlings thoroughly a few hours and wait a few hours. Dig a hole that is about 2 inches deeper than the depth of the seedlings in the trays. Remove a seedling from the tray, handling it by the soil mass. Put the seedling in the hole.
  6. Fill the hole with soil and tamp it down firmly to make a slight depression around the seedling. Space seedlings 24 to 36 inches apart and rows 4 to 5 feet apart, depending on the variety. Water the seedlings thoroughly.
  7. Give the seedlings 1 to 2 inches of water per week. Side dress the seedlings with 1/2 tablespoon of nitrogen per plant four to eight weeks after transplanting.
Tips: Wooden stakes or wire cages may be installed for indeterminate tomatoes. A 3- to 4-inch layer of mulch such as compost will help maintain moisture and discourage weeds.

Tomato propagation with indoor soil

Propagating tomatoes is useful for growing a late-season crop, overwintering a favorite variety and indoor winter growing. Faster than growing from seed, propagation also results in a plant with the same qualities of the mother plant, which is particularly important when growing hybrid varieties. The proliferation of heirloom tomatoes benefits greatly from propagation, keeping those beloved but rare varieties producing for future generations. The use of indoor soil in propagation prevents pest problems, and provides a sterile growing environment for roots and consistent moisture control.
  1. Remove a 6-inch cutting from a healthy stem of an existing tomato plant. Gently prune off all but the top two leaves. Look for a stem close to the ground; these will produce roots the fastest.
  2. Place the stem in a vase with water up to 1 inch below the lowest leaf. White roots will appear in about one week. If the water becomes murky or slimy, replace with fresh water.
  3. When the roots are about 1/2 inch long, the stem can be placed in indoor potting soil. Use a pencil to create a hole in the center of a 4-inch plant pot. Insert the tomato stem in the hole, and firm the soil around it. Water well after planting, and keep the soil consistently moist for the first two weeks.
  4. Place the planter in a sunny window. Give it 1/2 cup of water when the soil is dry 1 inch below the surface. The plant is ready to transplant outdoors when it is 6 inches tall, or can be left indoors and replanted into larger containers as needed.
Plants should be given time to adapt before moving them outdoors full time. When they are 6 inches tall, move them outside for one hour the first day, two hours the second, adding one hour each day until the plant is outside all day. Remove all leaves but the top two, dig an 8- to 10-inch hole, and place the plant in the hole, covering all but the top two leaves. Water well.

Feed fruit-producing indoor tomato plants with 10-10-10 fertilizer once per month. Overwintering plants should not be fertilized until planted outside.

    Strengthen a growing tomato plant to prepare it for the home garden

    When you strengthen a growing tomato plant before setting outside in the garden, you have a much greater chance for healthy results.

    Studies at Cornell University, the University of Georgia, and the University of Torino (Italy) show what tomato growers have known for years: motion helps tomatoes grow stronger, thicker stems. The studies used mechanical brushing to test and measure results.

    Motion helps promote cell division and raised chlorophyll levels. Brushing plants helps them grow stronger, stockier (though shorter), and more able to withstand transplanting into the garden.

    You can help strengthen a growing tomato plant by making it move! There are two ways you can give your tomatoes a workout: brush them and blow air on them.

    Brushing tomato plants

    • Begin brushing seedlings when they are 2-3 inches high. Pass your hand lightly over the seedlings several times a day.

    • When seedlings are 4 inches tall, push them a little harder. Grasp stems and bend them back and forth, being careful not to disturb their roots

    Blowing on tomato plants


    Get your tomatoes to move in the breeze. Aim a slow-blowing fan towards your seedlings 2 or 3 times a day, starting with 5 minutes at a time.
    • Gradually increase breezes to 30 minutes a session.

    A special note: wash your hands


    Wash your hands before you brush them across tomato seedlings, especially if you’re a smoker. It is possible to transfer the tobacco mosaic virus through touch. Wash your hands after brushing, too. Some people are mildly allergic to tomato leaves and you may be one of them.

    Re-potting tomato seedlings to a bigger container

    A strong tomato plant gets that way from a strong root system. Re-potting tomato seedlings gives roots room to grow.

    Your tomatoes will have the best chance possible to develop a healthy root system when you re-pot them at least once (sometimes two or three times) before setting them in the garden.

    Frequently asked questions...


    Q. When should I re-pot my tomato seedlings?
    A. When your seedlings have 2 sets of leaves and the second set is at least ½” long.

    The first set of leaves, called cotyledon (cot-uhl-EE-din) leaves (also referred to as false leaves or seed leaves) look like wings. They provide food for your new plant while it figures out how to grow some roots and work photosynthesis to its advantage.

    The second set of leaves is often called “true leaves.” Be kind to them – they make chlorophyll. Soon, they’ll get the hang of food production. Then they’ll have full responsibility for feeding the plant, and the cotyledon leaves will shrivel up and say sayonara. When the first set of true leaves are about ½” long, you can re-pot.

    Q. What size container should I use for re-potting my tomato seedlings?
    A. A 4-6" container or transplant pot. You can always re-pot again to a bigger container if your seedlings get extra large or become root-bound. Make sure your containers have holes in the bottom for good drainage!

    Q. What kind of potting mix should I use?
    A. A good commercial or all-purpose potting mixture. Most potting mixes have a small amount of fertilizer which can be helpful to seedlings. Moisten the soil before repotting and make sure it’s not too tightly compacted when filling new containers.

    Q. Should I thin my seedlings before transplanting?
    A. Plant one seedling per transplant pot when re-potting. That may mean thinning extras. Use fork tines to separate tiny seedlings. If you’re careful, you may be able to repot both plants. You can also thin seedlings by snipping stems with a manicure scissors or using a tweezers to pull small plants, leaving the strongest and best-looking plants for re-potting.

    Q. Can you give me some tips on the best way to do the actual re-potting?
    A. Try these steps!
    • Prepare your new containers by filling them 1/3 to 1/2 with moistened soil.
    • With a spoon or your fingers, create a small hole in the center of the container about the size of the cell in which your seedling sprouted.
    • Water the seedlings that are about to be transplanted.Use a spoon to carefully separate the seedling’s soil from the edges of the original pot. You can also loosen the roots from the container walls by squeezing and releasing the sides of the container.
    • Scoop the entire soil plus root into the new pot. The spoon supports the weight of the seedling and soil from the bottom. Try to keep as many roots as possible intact.
    • A big no-no: never grab the seedling by the stem or leaves to transplant it.
    • Bury as much of the stem as possible, allowing leaves to bush out at bottom.
    • Add moistened soil around the bottom set of leaves. Gently press soil around newly-potted plant.
    Q. Should I fertilize re-potted tomato seedlings?
    A. Sure, but don’t overdo it or you’ll burn the roots and lose the plants. Choose one of these feeding methods:
    • Use a ¼ strength solution
    • Fertilize with 1 teaspoon Miracle Gro Tomatoes per gallon of water or a mild fertilizer that’s high in phosphorus, which is known to boost root growth
    Q. How important is good lighting?
    A. Very. Give your re-potted seedlings 12-16 hours of light a day so they grow strong and healthy. Insufficient light can lead to leggy or stunted tomatoes – not a recipe for a robust start.

    Q. How do I know if my tomato seedling needs to be potted a second time?
    A. When it gets too big for the pot or gets root-bound, it’s time to move up to a bigger container. Make sure your pot is no bigger than one gallon.

    Learn what tomato seedlings need after they germinate

    When tomato seedlings pop through the soil, the whole game changes. It’s a lot like what happens when you bring a new baby home from the hospital. Your new sprouts require lots of TLC.

    There are 4 secrets to grow tomatoes successfully:
    • Light
    • Water
    • Air
    • Nutrients

    1. Light: let there be lots of it!


    Bright light is super-important for healthy tomato seedlings! As soon as they sprout, they’ll reach up for sunbeams (or fluorescent beams). Seedlings need 12-18 hours of light each day. Do yourself a favor and give it to them. Otherwise they will become leggy and weak very quickly, which will set back production in your garden.

    4 best ways to let there be light

    1. Heated greenhouse. If your greenhouse is situated where it gets maximum exposure to sunlight, use it! Caution: out of sight is not out of mind. Your greenhouse may not be as accessible as your living room or kitchen, but make sure you check on your tomato seedlings every day. They can’t navigate this stage of development alone.

    2. Cold frame. The best ones face south. Make sure yours has a tight-fitting lid so that heat stored up during the day from the sun will keep seedlings warm during cool nights. When the forecast is for below 20°F overnight, place an outdoor electric light inside the cold frame (one 60-watt bulb for every 12 cubic feet should be enough). During days when temperatures rise to 50° F and higher, prop open the cold frame lid. You’ll prevent baked tomato plants.

    3. Fluorescent lights are among the most affordable and popular light source for seedlings. Mount lights with cords or link-type chains so you can adjust light height as seedlings grow. Keep lights 3-6” from tomato tops. Yep, that means you’ll have to check your seedlings daily and move lights up and down occasionally. Lights should remain on 12-16 hours a day. Turn lights off at night. (Seedlings need sleep, too.)

    4. Sunny window. This is the most challenging lighting scenario for young tomatoes. Most home windows simply don’t have enough light for seedlings, especially in late winter and early spring. Choose a window facing south. Rotate tomato seedlings daily to prevent stem bending.

    2. Water


    Hydration in the tomato nursery can be tricky.

    Water do’s and don’ts
    • Do water your tomato seedlings enough so that you don’t let soil dry out or seedlings wilt.
    • Do water from the bottom. (Remember … you poked holes in your containers, right?)
    • Don’t over-water. Too much of a liquid diet fills in the air pockets in soil. When the roots can’t absorb all that water fast enough, they suffocate. Over-watering = drowning!

    3. Air

    • Take off plastic or clear covers from seedling containers to let seedlings breathe. Circulation will help prevent nasty diseases and fungi from spreading.
    • Keep room temperature consistent, about 70°F. If your tomato seedlings are near a window, watch for drafts. Cold air mixed with over-wet soil is a deadly combo for seedlings. They’ll dampen off or develop nasty fungi faster than you can say “transplant time.”

    4. Nutrients


    The jury is still out among tomato gardeners about how much to fertilize seedlings at this point in their young lives. One side says plants are still feasting on the nutrients provided by their seeds. The other side says, “Give them some extra food! They need a strong start.”

    On the other hand, mature tomato plants are like teenagers: you just can’t feed them enough. (Read more about fertilizing tomato plants in the garden and fertilizing tomatoes in containers.) Your seedlings aren’t quite at that point yet. It’s up to you during their tomato seedling babyhood to decide whether or not to feed them, and if so, how much.

    A large number of successful home gardeners recommend waiting to fertilize until you transplant your baby tomato seedlings into their next-size-up containers. Others say to feed them right away.

    Keep an eye out for yellowing leaves, which indicate the need for food. If possible, wait until your seedlings have at least 2-3 sets of leaves before feeding.

    If you decide to give your plants some additional nutrients now, then feed seedlings with a weak (1/4 strength) water-soluble fertilizer like Miracle Gro Tomatoes. Keep an eagle eye out for crystallized salts on soil surface. That will tell you you’re feeding your seedlings too much.

    How to plant tomato seeds?

    When you plant seeds indoors in early spring, you will be ready to grow tomatoes for yourself as soon as the danger of frost is past and the soil is warmed.

    And growing tomatoes for yourself is economical and fun!

    Make sure that:
    The gloves are off! It’s time to plant seeds.

    How to plant your tomato seeds

    • Fill containers with moistened starter mix. (Reminder: seed cell trays work well for seed starting.) Make sure container bottoms have holes for drainage.
    • Tamp soil down to remove air pockets.
    • Use a pencil to poke a small hole in each cell or container.
    • Plant seeds with a tweezers or pinch seeds between your fingers.
    • Cover holes with pinches of extra moistened soil.
    • Label planted seeds.
    • Mist your planted seeds with a spray bottle filled with water.
    • Keep records on planting dates and sprouting dates for different varieties.

    Seed Starting FAQs (Frequenty Asked Questions)


    Q. How deep should I plant seeds?
    A. Some gardeners say 1/4". Some say 1/8”. A good rule of thumb for any seed is to plant it 4 times its diameter.

    Q. How many seeds should I place in a hole?
    A. Two, maybe three if you’re worried about germination rates. You can thin them out after germination.

    Q. How many seeds should I plant?

    A. Twice as many as the number of plants you think you’ll need to allow for thinning and non-germination. (And to have a few to give away to friends.)

    Q. What kind of germination rate is normal?
    A. Less than 100%. Federal standards require 75% germination rate for commercially-produced seeds. Most gardeners expect 80-90%. You can improve your germination rate when you pre-sprout seeds.

    Q. When will my seeds sprout?

    A. In 4-10 days, depending on variables like moisture, heat, and light.

    Q. How can I improve germination?
    A. Moisture and warmth work together. Don’t let the soil dry out! But don’t let it get soggy, either. Seeds need moisture to germinate. Keep containers covered to preserve moisture. Place containers in a loose clear plastic bag or under a clear plastic cover. Mist your seedlings when needed. Also, keep room temperature between 70-80° F. If it’s cooler, your seeds can germinate, but it may take a little longer.

    Q. Should I fertilize my seeds or newly-sprouted seedlings?

    A. Not yet. They feed on the food stored in the seed.

    Q. When should I place my planted seeds under lights?
    A. When they sprout.