Kamis, 29 Oktober 2015

Growing Cherry Tomatoes with Less Watering and Less Work

No suburban garden is complete without tomatoes.  Tomatoes are a great joy to grow, especially with a raised bed garden.  However, we have had the problem of tomato splitting and frequent watering needed by tomatoes in the past.  We were hoping we could overcome that with the Groasis Waterboxx

We planted a roma and cherry tomato in our raised bed garden on May 2, 2015.  These tomatoes had been grown from seed inside prior to that.  We then placed the white evaporation cover which comes with the Waterboxx around the base of these and carefully placed the Waterboxx over the tomatoes, with the tomatoes poking out of the "Figure 8" central opening.
Here you see a roma (left) and cherry (right) tomato planted in a raised bed on 5/2/15.  The  Groasis Waterboxx was placed over these and filled with 15 liters (~4 gallons) of water.

This Waterboxx has had 2 wicks inserted in it.  We filled the Waterboxx with ~15 liters of water, and capped them.  We will not fill the Waterboxx again unless it is needed.  If the Waterboxx only has one wick, no refilling is needed.  The tomatoes grew very well with the Waterboxx and had no transplant shock due to the blanketing effect of the Waterboxx.

The roma (left) and cherry (right) tomatoes on 5/19/15.  These have not gotten any watering except that provided by the Waterboxx.  Because the Waterboxx refills itself with dew and rainwater, it will likely be able to go the whole summer without needing to be manually refilled, even with one extra wick. 

Seventeen days passed between initial planting and the photograph above with a great deal of growth.  We are already well ahead of where we have been in previous years and hope to have tomatoes within the next 3-4 weeks.  As you can see, we have previously hung a string trellis behind the tomato plant and the raised bed.  You will want to make sure any string trellis you hang is to the north of your garden beds to prevent blocking sunlight from reaching your plants (assuming you are in the Northern Hemisphere).

On the evening of May 24, we checked the water level in our Waterboxx.  It was going dry after 3 weeks without any significant rainfall.  We received a very small amount of rain (less than 1/8 inch) the next morning, but this was enough to add over once inch of water to the Waterboxx reservoir.  We do not plan to refill the Waterboxxes manually with water but will note here if we do.  If the Waterboxx only has one wick, it generally will not need refilled during an entire growing season, but these Waterboxxes have 2 wicks.

Over the next few days, we received about 1 inch of rain.  This has kept the Waterboxx from drying out.  We did not add any water to the Waterboxx reservoir.

The Roma (right) and Cherry (left) tomatoes are now so large that you can hardly see the Waterboxx.  No water has been added to the Waterboxx manually since planting, but it maintains water in its reservoir.  If we didn't use the Waterboxx when planting these tomatoes, we would have needed to water every 2-3 days and mulch them to keep soil moisture consistent - but the Waterboxx does both of these functions with no effort from us.
The Waterboxx holding these tomatoes has still never been refilled with water.  So, these tomatoes have grown for 6 weeks so far with no human watering.


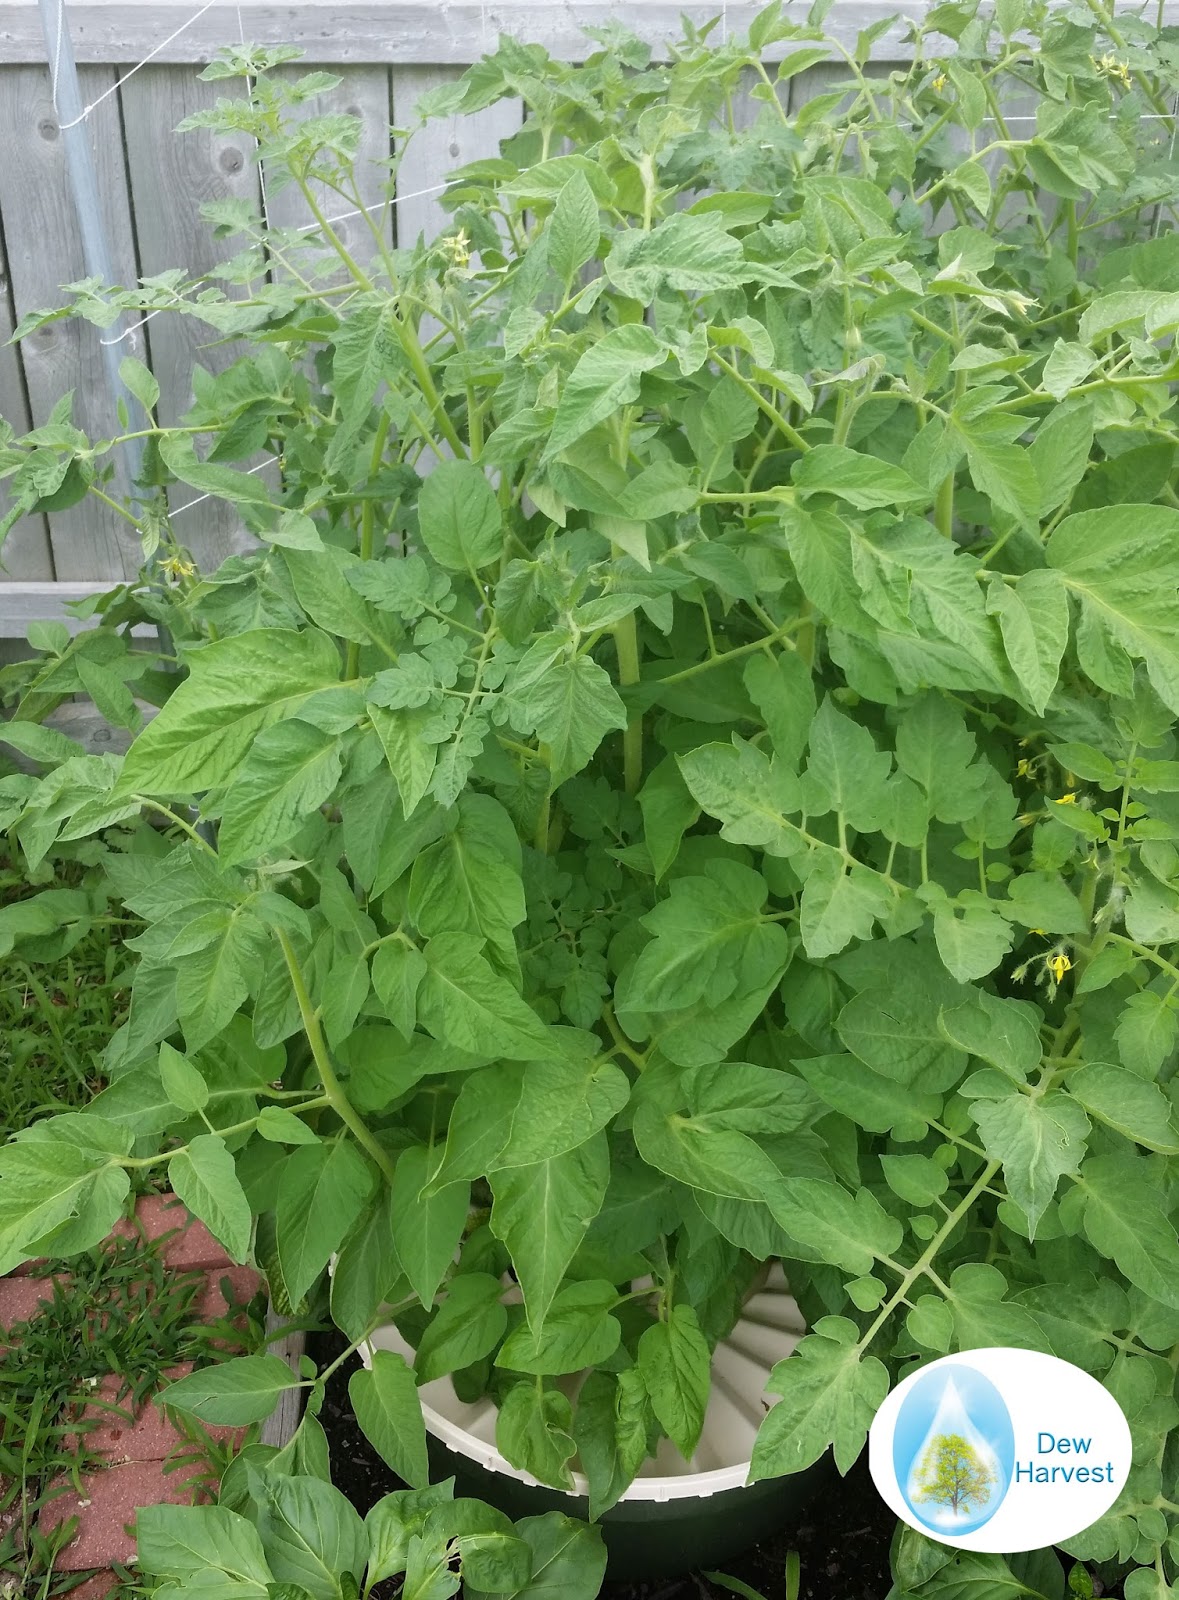
The Roma (left) and Super Sweet 100 (right) tomato plants, completely covering the Waterboxx at their base on June 18, 2015.  No water has been given these plants since early May when the Waterboxx was placed. 
We have begun seeing large numbers of tomatoes for the first time over the past two weeks.

Roma tomatoes on June 30, with no Water added after planting with the Groasis Waterboxx PlantCocoon®
Now you can see why the Waterboxx makes it so much easier to plant tomatoes.  These tomatoes have not needed any work except attaching to a trellis - no weeding or watering - since planting.

The Sweet 100 Tomatoes on June 30 - no water added after planting with the Waterboxx Plantcocoon®
We did add 4 small Jobe's organic fertilizer spikes to the soil around the Waterboxx sheltering the plants on July 1.

In early July we had a series of severe storms here in Indiana which did damage our tomato plants somewhat even though they were in a protected location.  This storm did destroy our roma tomato plant, but less than 5% of our cherry tomato (Sweet 100) plant.

We have harvested 1544 cherry tomatoes in total this year  Although this variety of cherry tomatoes is renowned for splitting if not picked in time, we had less than 1% of our cherry tomatoes split because the Waterboxx provides such consistent moisture.

Our final harvest of cherry tomatoes grown with the Waterboxx.  We harvested 1544 cherry tomatoes this year from one plant, which was never watered after Waterboxx set up (and initial filling with 4 gallons of water).
You can buy the Groasis Waterboxx here.  We are growing several other plants with the Waterboxx, a complete list is available here

We would love to hear your comments below - to leave one, please click on "Comments".

Fighting Gardener Fatigue

Every spring, we feel a great surge of excitement contemplating our garden that year.  We buy too many seeds, make too many raised beds, and get too little sleep.  However, by mid summer, we find ourselves dreading going out to water our garden in 95 degree heat, fighting mosquitoes and gnats.  Gardener fatigue happens to everyone.   After the initial thrill of planting, there comes a period of up to several months during which you don't yet have any produce but do have the constant chore of weeding and watering.

There are a few ways to combat this.  First, some garden plants mature much faster than others.  We recommend planting greens in your garden (lettuce, kale, mesclun, Swiss Chard), as these can be planted well before frost date and can be harvested much sooner than everything else.  These can also be harvested after last frost.

Second, try to visit your garden in the morning, time permitting. There is something very calming about being in a quiet, dew drenched garden before the stresses of the day.  This is also the ideal time to water plants that weren't planted with the Groasis Waterboxx as they won't scorch.

For those of you wanting to plant tomatoes, zucchini, squash, and peppers, we have another suggestion to decrease the work of early summer gardening.  Plant your garden with the Groasis Waterboxx.

A cross section view of the Groasis Waterboxx, showing how the garden plant inside is slowly fed water from the reservoir through a wick.  The tan lid collects dew and rainwater and channels it to the reservoir below for storage.  From Groasis.com

Plants need a steady supply of water as well as a constant temperature.  In fact, some plants like bell peppers will stop producing in extreme heat.  The Groasis Waterboxx supplies both of those.  It stores approximately 4 gallons of water and slowly releases this via a wick to your growing plant.  Since the water in the Waterboxx reservoir resists swings in temperature, it gives the base and roots of the plant a cradled environment in which to grow.
The infrared (heat showing) images show how the Waterboxx keeps the base and roots of the plant a cool purple, even when everywhere else is a hot red or yellow.  From Groasis.com

The Waterboxx also surrounds the base of the plant, preventing weeds from growing in a ten inch radius around the plant by blocking them.  As this is the area which would need to be weeded to allow your garden plant optimal growth, you can forget weeding as soon as you set up the Waterboxx.

Will the Waterboxx need to be refilled?  Possibly, but only if you never get  rain or insert several extra wicks.  The Waterboxx comes with one wick, which keeps the reservoir water in balance and will keep it from being depleted. If planting water loving plants, you can insert extra wicks, and this may drain the Waterboxx faster.  However, it only takes 4 inches of rain to completely refill the Waterboxx, and dew being deposited most mornings on the Waterboxx lid can help prevent depletion.

If you wish to combat gardener fatigue by growing your garden with the Groasis Waterboxx, please visit our website, Dew Harvest. We would love to hear your comments below - to leave one, please click on "Comments".


Growing Heirloom Tomatoes With Less Water and Less Work

Growing heirloom tomatoes is something most every gardener should do.  While we have previously had great luck growing hybrid Roma and Cherry tomatoes, we have found growing heirloom tomatoes to be more than a little frustrating (note to the new gardener - an heirloom tomato is a variety that has been present for many decades with no recent change in its genetics, and is generally considered to be better tasting but more disease prone and slower growing than newer hybrid varieties).

The problem with heirloom tomatoes is watering.  These tomatoes demand consistent water to their roots and generally need the same amount of water every day.  Too little water and the tomato will not grow.  If the tomato gets too much water at any one time (including from rain) the inside of the tomato fruit can grow faster than the skin and the tomato can split.  Also, water from above can cause many diseases leaves or fruit itself - and it can be very difficult to only water the base once the tomato has grown large.  We wanted to find a way to give the tomatoes consistent water while reducing the work of watering, as well as keep water off the leaves and fruits.  We planned to do this by using the Groasis Waterboxx - as explained below.

We started our two Brandywine heirloom tomatoes inside and transplanted them outside into our raised bed on May 2 as seen below.  We gave these tomatoes 4 square feet (2x2'), and planted two in this area.  We used the evaporation cover that comes with the Waterboxx and prevents evaporation and weed growth to space the tomatoes.  We then watered them well (with liquid fertilizer containing water), before finally placing the evaporation cover at the base of the plants.  We then carefully set a Groasis Waterboxx over the top of the plants, being very careful not to damage the stems.  We then filled the Waterboxx full of water with a hose (with approximately 4 gallons or 15 liters of non-fertilized water).

The planting of two Brandywine tomatoes on May 2, 2015.  The tomatoes were started from seed indoors and then transplanted after the last frost date.  They were watered for ~15 seconds, and then the white evaporation cover was put around them.  The final picture on the right shows the Groasis Waterboxx placed around the two tomato plants.  The Waterboxx was filled with 15 liters (around 4 gallons) of water and will supply the tomatoes with all their water.
The Groasis Waterboxx comes with one wick inserted which slowly drips water to the roots of the plant.  With one wick, the Waterboxx doesn't need manually refilling, but since we were growing two water hungry plants, we decided to place 3 extra wicks for a total of 4 total wicks.  With this many wicks, periodic manual refilling of the Waterboxx will be needed which we will document on this post.


The two heirloom tomatoes on May 19, 2015, 17 days after transplanting.  These have not had any external water beside what is provided to them by the Waterboxx but continue to grow very well.  

On May 26, the water level was low enough in the Waterboxx due to the three extra wicks that we needed to manually refill it.  The Waterboxx completely fills with 4 inches of rainfall, but May has been a dry month since planting.  In previous years (before planting with the Waterboxx), we would have needed to water these tomatoes every other day to ensure the same level of growth.

The heirloom tomatoes on 6/3/15.  The amount of growth in the last 2 weeks has been astounding.  We just now see our first blooms the the plant, especially impressive since these are such slow growing plants normally.  The Waterboxx is providing all water needs for the tomatoes.  
We have not had to refill the Waterboxx again since the three weeks without rain.  Since this Waterboxx has four wicks, it would need refilled during periods of no rain and rapid growth.

The two heirloom tomatoes on June 18,2015.  No fruits yet but some flowers are just now beginning.  
Our weather here has went from very dry in May to very wet in June.  Without the Waterboxx, our tomatoes almost certainly would have split from this.  However, the Waterboxx regulates how much water the central roots of the tomato get - and we don't have a single splitting tomato!

An heirloom Brandywine Tomato on June 30.  This tomato hasn't had any water added manually in over a month, and yet it grows perfectly.
All of our Waterboxx tomatoes are covered with fruit.  Our neighbor was over visiting and he commented that he wished he could get his tomatoes to produce like ours.  We will have to give him a Waterboxx.

We did add 4 small Jobe's organic fertilizer spikes to the soil around the Waterboxx sheltering the plants on July 1.

A nice ripe Waterboxx tomato on 7/27/2015- excellent for BLTs, salads, and pasta sauce.

We had significant store damage earlier in the year to our tomato plants, but still managed to harvest 17 heirloom tomatoes from the Waterboxxes - all without any watering after May.  Most of our neighbors never got even one tomato from their plants in this overly wet and overcast summer!

The Waterboxx eliminates the need for watering, prevents tomato splitting, and dramatically decreases work in the garden.  You can buy the Groasis Waterboxx here.  We are growing several other plants with the Waterboxx.

We would love to hear your comments below - to leave one, please click on "Comments".

Decreasing Wasted Food By Composting

"What we obtain too cheap, we esteem too lightly: it is dearness only that gives every thing its value" according to Thomas Paine.  The revolutionary era author was referring to freedom - but we think that Paine's statement may apply equally well to food.

As Americans, we waste about 35% of our total food - 240 pounds per person every year.  That's right - we throw away more than our body weight every year in wasted food.  Discarded food is the second leading use of landfill space.  Worse, decaying food in the anaerobic (oxygen lacking) environment of a landfill produces methane, which scientists believe is a potent greenhouse gas.  Why are we so wasteful, and what can be done about it?

First off, much food is already discarded before it gets to store shelves.  Few stores want to sully their image by having bruised fruit or limp vegetables in their displays, so they and their suppliers will discard these edible but unsightly items.  Also, since large scale produce is picked when ready regardless of whether there is a buyer - much is discarded when no buyer is found.  

Secondly, we tend to forget about produce hidden in the fridge.  We cannot count how many oranges we have had go bad while we complained about the lack of fresh fruit in the house.

So, how do we decrease the waste inherent in transport and storage?  Simple - grow it yourself.  While we cannot grow all of the produce we desire (I will never be able to grow my own bananas), we can grow a great deal in our own gardens.  When you grow your own food, you are much less likely to let it go to waste.  With each leaf of lettuce and each tomato, a gardener remembers the effort they took in planting, nurturing, and growing that plant (notice we didn't say watering or mulching- which can be accomplished with the Groasis Waterboxx).  For this reason alone, obtaining our food not "too cheap", we are much less likely to waste.

Also, no produce lasts indefinitely in the refrigerator - and the longer it is in the refrigerator the less appetizing it becomes.  Luckily, food still on the vine doesn't decay - so our garden offers us nature's storage cabinet.  We can simply go into the garden each day and pick what we want to eat.  If you plant the right things - you may find that you eat much of the food before it gets inside (this is an especially common problem with sugar snap peas).

Isn't gardening more work than going to the grocery store?  This depends on many factors.  Certainly there are methods of gardening (the old fashioned till the soil, plant in rows, water manually) method is more time consuming than stopping by the grocery store.  But here at Farm the Suburbs and Dew Harvest we want to make gardening as easy and enjoyable as possible.  To this end, we recommend most plants be planted in raised beds which don't require tilling.  We can also dramatically decrease (and perhaps eliminate) the watering plants need by using the Groasis Waterboxx.  Also, the Waterboxx prevents weed growth around your plant, allowing you to sit back and wait for the harvest.


Composting 
Some food waste in inevitable - skins, pits, coffee grounds after use and the like.  For this we suggest composting.  We have a small, filtered compost pail we keep in the garage which we fill with our daily food waste.  All non-animal based food waste can go into regular compost (also egg shells).  Once a week we carry the contents of our compost pail out to our larger compost tumbler.   A tumbler allows oxygen to reach all parts of the compost pile, and prevent anaerobic (and methane producing) digestion.  After at least one summer (heat speeds composting and can kill weed seeds), you can add the compost to the soil in your garden - ensuring nothing is wasted.

A compost pail - a great place to store scraps until going out to throw them on the larger pile or in the tumbler.  


For animal scraps there is a method of composting called Bokashi which allows you to compost essentially all kitchen scraps (including meat and dairy).  This method produces no smell and can be done in a sealed bucket.  Kits are available for purchase online.

So, by growing your own, appreciating what you grow, picking only when ready to eat, and recycling scraps, you can greatly decrease wasted food.  And raised bed gardening and the Groasis Waterboxx will allow you to garden with less work than you thought possible.  Find out more at Dew Harvest. We would love to hear your comments below - to leave one, please click on "Comments".

www.dewharvest.com

Starting and Situating Your Garden

On the gardening portion of this blog, we fill focus mostly on raised bed gardening.  This technique has become very popular recently for good reason - it is dramatically less work and more suited to smaller garden plots.  An excellent book on this subject is Square Foot Gardening by Mel Bartholomew.

You really don't need many tools in raised bed gardening.  We would recommend a hand spade or just a good quality soil knife (which you will find to be the most useful tool in the garden).  You will need a drill if you plan to build the raised bed yourself.

As suburbs where many live usually do come from converted farmland, they usually lack trees initally.  This can be an eyesore, but also a blessing in disguise.  Trees can raise property value a great deal, so we do recommend planting trees in your front yard.  However, if you plan to garden in you back yard (as most do), we strongly recommend keeping an area without tree or shade cover.  This will be the setting for our garden.

If not using raised beds (meaning if you dig into the soil already there), we strongly encourage you to not place your new garden near any older, treated wood fences.  Before 2004, most treated wood was pressure treated with arsenic, which leaked into the surrounding soil.  Also, if on an older industrial site, you may want to have your soil tested for lead by the local authorities.  Frequently this will be done for free if you contact the county health department.

It is for these reasons that we recommend a raised bed.  A raised bed for most plants only needs about 6 inches of soil.  We recommend 4x4' raised beds.  These can be bought in stores (for around ~$40) or assembled out of (non-treated) 2x6' lumber.  You can usually have the lumber cut in store to 4 feet long each (and have one end overlap in each corner when screwing them together).  You will probably want to put weed cloth (black fabric availble at the home improvement store) over the base of the raised bed.

Locate your raised bed in an area with good exposure (no shade) to the east, west and south.  As on sunlight will come from the north here in the U.S., you can have trees or fences to the north.  If the ground is level (you can eyeball it or use a bubble leveling tool), you can just set the raised bed directly on the ground.  If not, dig out the higher elevation and set this dirt on the lower part to make a flat bed.

You will also want to shield your garden from pests.  These can include rabbits and deer.  If you have a full height (6 foot) fence, I would encourage you to place your garden within it.  This will almost always keep away the deer.  Rabbits are more difficult, and the author only got rid of them after getting a dog.  If you go this route, we strongly encourage you to get a rescue dog after a careful search online.
The raised bed up against the south side of a fence (the fence is to the north) with the soil mixture listed below

For soil, Square Foot Gardening recommends 1/3 compost, 1/3 vermiculite, and 1/3 peat moss.  This is likely the best combination for optimal water retention, but all potting soil should work nearly as well.  Vermiculite especially is quite expensive.  We recommend you go to the warehouse clubs (Sam's Club, Costco) to get potting soil as it is usually 50% cheaper there than anywhere else.

A completed Square Foot (raised bed) garden with a grid pattern on top, ready for planting
Some plants do grow better on trellises.  If you do plan to grow plants on a trellis, you have a few options.  The more aesthetically pleasing is to build a wood trellis (again - non treated wood).  The more efficient way is to follow Mel Bartholomew's advice and suspend a string trellis from bend 1/2 aluminum electrical conduit.  This conduit is held up by rebar (reinforcing steel bars) hammered into the ground.  Trellises should always go to the north of your garden here in the U.S. to prevent blocking needed sunlight.

True Square Foot Gardening has a grid pattern, but this is entirely optional.  For our purposes, I would suggest not using it as it will interfere with placement of the Groasis Waterboxx, which itself decreases garden work and watering.

You now will have a fully functional garden bed ready to use.  In our next post, we will discuss planting. We would love to hear your comments below - to leave one, please click on "Comments".

Visit our parent site: Dew Harvest

Selasa, 22 September 2015

Gardening During Flood and Drought in Austin, Texas

The citizens of the Austin area are well known for their love of Mother Nature.  Mother Nature doesn't always return the favor though, with erratic and often harsh conditions that can make it very difficult to garden in Austin.  Just this past year of 2015, the month of May brought far too much rainfall (13.44 inches), damaging many local garden vegetables and causing split tomatoes and melons.  This was followed just two months later by a July with essentially no appreciable rainfall.  Add to this that the average high during June, July, August, and September in Austin is over 90 degrees, and you see the extreme conditions that confront gardeners in the Austin area.

So, the Austin area has variable rain, sometimes with not enough rain and sometimes with flooding.  Also, the time when trees and garden plants could benefit most from water (June through September) due to the increased sun and heat, the little rainfall can be available.  In scientific terms, water becomes the limiting factor in the height of the growing season.  

Is there anything that can help prevent flooding of plants during heavy rains, but also supply water to plants during droughts?  Could this device or system be automatic, rather than relying on gardeners to take time out of their busy schedules to water plants during droughts and cover the soil during heavy rains?  Finally, could this device collect and save water during rainy periods for use during dry periods?  The answer to all three of these questions is yes - and the device is the Groasis Waterboxx PlantCocoon®, or Waterboxx for short. 

The Waterboxx has been used for planting trees for several years in the Austin area by a local community group, but it can also be used for gardening.  What is the Waterboxx exactly and how does it work?  Well, the Waterboxx is a self-refilling water battery for plants.  It is placed around a smaller plant (at least 6 inches tall and with a stalk less than 2 inches in diameter) right after planting.  The Waterboxx is then filled with 4 gallons of water.  This water slowly trickles out, about 50 mL or 10 teaspoons a day, to the roots of a growing plant, via a small wick.  The Waterboxx has a special lotus leaf inspired lid, which allows it to catch dew, transpiration moisture from the plant, as well as rainfall, and store it for later use.  The Waterboxx, although 10 inches tall, is filled with less than 4 inches of rain and has enough water stored (with average water outflow of 50 mL/day) for 300 days without any precipitation. 

The Waterboxx also prevents plant over-watering by directing heavy rains away from the roots of the plant.  Once full, the Waterboxx funnels all excess water off to the side of the plant (10 inches away from the stalk).  This channeling away of excess water prevents root washout and also prevents the splitting of tomatoes and melons. 

From Groasis - A cross section view of the Waterboxx - water is collected by the tan lid, funneled down the siphons (shown in red here), stored in the green reservoir (which holds 4 liters), and slowly released through the white wick to the roots below. 


The Waterboxx can easily accommodate two tomato plants, two to four pepper plants. two zucchini plants, or one melon or winter squash.  You can see Waterboxx gardening results here.  With more than one plant, an extra wick can be inserted to give more water (which will decrease the length of time the Waterboxx has reserve water, halving it roughly for every doubling of the number of wicks).  
Has the Waterboxx been used in drought conditions before?  Yes.  The Waterboxx was used to grow tomatoes in the height of the California drought in 2015.  Tomatoes planted in Sacramento County, California received no water after planting, and got less than a quarter inch of rain for three months of summer, but still managed to produce over 40 fruits from one plant.  You can see the results of this below.

16 weeks' growth of a tomato plant in Sacramento County California - all with no water after planting.  

What about flood conditions?  How well does the Waterboxx work in flood conditions?  Well, in the same year (2015) that the Waterboxx was growing full sized tomatoes in California, it was growing Roma and cherry tomatoes in Indiana, which had one of the wettest springs and the wettest July on record.  Over 13 inches of rain fell around Indianapolis in July, which would have both washed out most tomato roots and caused most fruits to split.  With the Waterboxx, however, this did not happen. We see no tomatoes splitting and a bountiful harvest just beginning in the photo below. 

Roma (left) and cherry (right) tomatoes growing with the Waterboxx during an extremely wet July, with over 13 inches of rain.  This photo, taken July 21, shows no split tomatoes and an excellent crop - all because the Waterboxx prevents overwatering even in heavy rains.
The Waterboxx works great in a standard 4'x4' raised bed, but also works in traditional garden rows. The consistent water the Waterboxx provides allows the plant to reach their maximum height, while also sparing gardeners hot evenings of watering the garden.   The Waterboxx can also be used to grow trees without any watering after planting in difficult areas like Austin.  

The Waterboxx can help residents of the Austin area to stop spending hours in the hot summer sun watering their garden plants and just enjoy the fruits of their labor.  The Waterboxx was designed with insights garnered from nature, and can help you better co-exist with nature.   If you want to try gardening with the Waterboxx and stop worrying about too much or too little rain, you can find out more here or buy the Waterboxx here.  


We would love to read your comments below.

Minggu, 20 September 2015

Using San Francisco Fog To Grow Plants

The San Francisco area has a unique and many would say ideal climate.  It has wet winters (fitting in with more of a Mediterranean Climate) and very dry summers.  In fact, the average direct precipitation for the months of May, June, July, and August combined is less than one inch.  This is unfortunate for would be gardeners or tree planters, as almost all growth for most gardens and deciduous trees takes place during those four months.  This has meant that gardens and newly planted trees have needed irrigation or hand watering by homeowners in the San Francisco area.  This has become increasingly difficult to do with the drought that most of California is experiencing.

San Francisco, however, has a unique form of precipitation that is widely known but rarely recognized - fog.  San Francisco averages 108 foggy days every year, on average, or almost a third of the year.  This fog usually is deposited in such a thin layer on the soil that it quickly evaporates after sunrise.  However, a new device is changing that.

The great Golden Gate Bridge enveloped in fog, an important source of precipitation in coastal California (Photo from NPS, public domain)

A device called the Groasis Waterboxx Plantcocoon®, or Waterboxx for short, is able to collect and store this fog.  The Waterboxx was designed to grow trees in deserts or in areas bordering deserts, and to accomplish this goal it takes advantage of many techniques first developed by nature.  One of these techniques is the Lotus Effect.  The lotus leaf, in nature, exhibits a property called superhydrophobicity, roughly translated as extreme resistance to water sticking.  The lotus leaf has this property because of tiny pyramids on its surface that prevent water molecules from attaching to each other.  The lotus leaf  does this to keep dirt, bacteria, and fungi from sticking to its leaves.  You can see this illustrated below.

Graphic by William Thielicke showing pyramidal structure of the surface of the Lotus leaf.  This surface guarantees that water won't stick to the surface of the lotus leaf, or the Groasis Waterboxx lid that has similar microscopic pyramids on its surface.  
When we zoom out again to see a lotus leaf on the visible level, you can see how well it repels water, as below.

Water sticks to most surfaces, but not the lotus leaf - From Ralf Pfeifer via Wikipedia 
How does the Waterboxx uses this lotus leaf property, and how can this help people garden and plant trees?  The Waterboxx has a lid that is inspired by the lotus leaf, with microscopic pyramids preventing the water from clumping together and then evaporating.  It is also sloped and corrugated, which directs all water deposited on it down to a siphon and into a reservoir for later use.  In this way, dew and fog can be harvested every morning and stored for use by the plant.  This allows trees and garden plants grown with the Waterboxx to go very long periods (and perhaps indefinitely) without manual watering.

A close up view of the Waterboxx growing tomatoes.   You can see how no water sticks to the corrugated, lotus leaf inspired white lid of the Waterboxx (except the rim). Dew and occasional rainfall kept this Waterboxx full from May planting until September, with no manual watering.  


The Waterboxx was designed to plant trees in the desert, and as designed can provide all the water a tree needs for over a year with no human intervention (watering) after set up.  It allows you to plant bare root trees (available here), in the Spring, Summer, Fall and the San Francisco area Winter.  These trees won't need any watering or work until they have almost outgrown the Waterboxx, at which point you lift the Waterboxx up and reuse it for up to ten years.
A schematic, cutaway view of the Waterboxx.  Dew, fog, and occasional rain is caught by the tan colored lid, funneled down siphons (seen in red here) into the green reservoir, which holds 15 liters or almost 4 gallons.  This water is slowly released by a wick to the roots of the Waterboxx, and induces the roots of the tree to grow deep, accessing capillary water deeper in the soil.  Image from Groasis.com

The Waterboxx isn't just used to grow trees, but also can be used for any garden plant with a compact central stalk, like tomatoes, peppers, melons, and zucchini.  You can buy the Waterboxx or see it used to grow many plants on the Dew Harvest website here.