Minggu, 30 Maret 2014

Manganese deficiency in tomato plants

Manganese is important for allowing plants to harness the energy of the sun (photosynthesis). Soil shortages are rare, but manganese can be unavailable to plant roots in alkaline conditions. Ericaceous (acid-loving) plants are particularly vulnerable when growing in alkaline soils or potting composts.

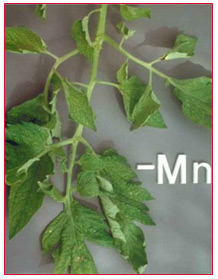
Tomatoes are very susceptible to manganese deficiency. Interveinal areas develop yellowish gold spots giving the leaf a speckled appearance. All veins, including the very small ones, and a small frame around the veins, remain green. Petioles and the stems can develop similar Symptoms. Few flowers or fruit will develop if the deficiency is severe.

Role of manganese in tomato plants


Manganese is required for chlorophyll formation and oxide-reduction reactions in cells. It is also involved in the synthesis of ascorbic acid (Vitamin C).

Establishment - Ensure good shoot growth
Vegetative Growth - Ensure growth is not limiting

While considered a micronutrient, manganese is essential to the growth and vitality of African Violets. It plays an important role in the function of photosynthesis, thus contributing to those processes which give African Violets their deep, green leaves.

Cause of manganese deficiency


The most common cause of Manganese Deficiency is either a lack of available manganese in the soil or a pH imbalance in the soil which is inhibiting the absorption of manganese and other nutrients. However, it may also be caused by an excess of potassium or phosphorus.

Symptoms


The leaves show a light interveinal chlorosis developed under a limited supply of Mn. The early stages of the chlorosis induced by manganese deficiency are somewhat similar to iron deficiency. They begin with a light chlorosis of the young leaves and netted veins of the mature leaves especially when they are viewed through transmitted light. As the stress increases, the leaves take on a gray metallic sheen and develop dark freckled and necrotic areas along the veins. A purplish luster may also develop on the upper surface of the leaves.

While rarely seen, transient deficiencies can occur during wet seasons or in sandy or peaty soils of a high pH. Manganese is not very mobile in the plant and deficiencies are best prevented by using foliar sprays. Temporary Mn deficiency is known as ‘growth mottle’ and is seen during flushes of rapid plant growth.

Prevention and control


Prevention can be achieved by improving soil structure. Do not over-lime. Apply chelated iron and manganese treatments, such as Sequestrene, to the soil around the plant roots.

Sabtu, 29 Maret 2014

Sulfur deficiency in tomato plants

This leaf shows a general overall chlorosis while still retaining some green color. The veins and petioles exhibit a very distinct reddish color. The visual symptoms of sulfur deficiency are very similar to the chlorosis found in nitrogen deficiency. However, in sulfur deficiency the yellowing is much more uniform over the entire plant including young leaves. The reddish color often found on the underside of the leaves and the petioles has a more pinkish tone and is much less vivid than that found in nitrogen deficiency. With advanced sulfur deficiency brown lesions and/or necrotic spots often develop along the petiole, and the leaves tend to become more erect and often twisted and brittle.
Whenever the S status of growing plants drops below the critical level required, visual symptoms of S deficiency start appearing on the plant. The appearance of such symptoms indicates a serious condition because crop yields can decrease even without the appearance of such symptoms.

Role of sulphur in tomato plants


Sulfur is important for tomato yield. Uptake of sulfur is around 1.2lb/t of fruit. It is required throughout the season, and should be timed similar to nitrogen supplies. It maintains plant's vigorous growth..

Sulfur is a key component in the formation of several organic compounds that help give vegetables, like tomatoes, their flavor. Sulfur is essential for protein synthesis and is a component of the amino acids methionine, cysteine and cystine. Sulfur deficiency symptoms are slow to develop in the plant and often resemble symptoms of nitrogen defi- ciency. Evidence of a sulfur deficiency could include: hard and woody stems, elongated stems, and yellowish green lower leaves. Plants grown in sulfur deficient soils tend to be high in carbohydrates and nitrogen.

Symptoms of sulphur deficiency


Deficiencies are very rare in greenhouses, though can be found in crops grown in peat substrates where no sulfur fertilizer is used. Tomato plants lacking sulfur are shorter in height. The leaves are stiff and curled downward. They develop an interveinal chlorosis turning a yellowish green to yellow. Stems, veins and petioles turn purple. Necrotic spots can appear at the margins and tips of older leaves, and on the stems. Sulfur deficiency is similar in appearance to nitrogen deficiency, however it begins in the younger leaves because sulfur is not as mobile as nitrogen within the plant.

Sulphur deficiency symptoms in many ways resemble those of N - that is, the leaves become pale-yellow or light-green. Unlike N, S-deficiency symptoms appear first on the younger leaves, and persist even after N application. In cotton, tobacco and citrus, some of the older leaves are affected first.

Plants deficient in S are small and spindly with short and slender stalks, their growth is retarded, maturity in cereals is delayed, nodulation in legumes may be poor and N-fixation reduced, fruits often do not mature fully and remain light-green in color, forages contain undesirably wide N:S ratio and thus have lower nutritive value.

Treatment


It is important to soil test for sulfur and adjust levels and pH before planting a tomato crop or any crop. When S deficiency symptoms have been confirmed, soil application through a material containing readily available S such as one in the sulphate form should be applied.

Compost and gypsum are both reliable sources of sulfur. Super-phos- phate, potassium sulfate, and potassium magnesium sulfate are also options, but would require a soil test analysis to determine the major nutrients needed in addition to sulfur. In general, about 20 lbs of sulfur per acre is enough to ensure that the appropriate amount of sulfur for vegetable production. Vari- ous forms of sulfur are also used to reduce soil pH in alkaline soils.

Rabu, 26 Maret 2014

Magnesium deficiency in tomato plants

Magnesium-deficient tomato leaves show advanced interveinal chlorosis, with necrosis developing in the highly chlorotic tissue. In its advanced form, magnesium deficiency may superficially resemble potassium deficiency. In the case of magnesium deficiency the symptoms generally start with mottled chlorotic areas developing in the interveinal tissue. The interveinal laminae tissue tends to expand proportionately more than the other leaf tissues, producing a raised puckered surface, with the top of the puckers progressively going from chlorotic to necrotic tissue.

Role of magnesium in tomato plants


Magnesium is required for many processes including transfer of energy and protein synthesis. With 20-25 % of the plant’s total magnesium localized in the chloroplasts, it is particularly important for chlorophyll production.

Magnesium is particularly important in ensuring even ripening of well-formed fruit.

Vegetative Growth
- Maximize concentrations in leaf tissue prior to flowering
Flowering - Fruit Set Improve flowering and crop production – maximum requirements are at this stage
Fruit Ripening - Maturity Maximum requirements are at this stage for quality fruit production

A regular supply is needed throughout the life of the crop. Up to 54lb/ac of magnesium is used by a tomato crop. Magnesium uptake can be depressed by an excess of other cations, so it is important to maintain a correct balance. Particular care is needed in fertigation systems.

Symptoms of magnesium deficiency


Symptoms of magnesium deficiency start at the bottom of the plant on older leaves and then works their way upward. Fruits appear to ripen evenly but maturity is often delayed. Deficiencies may also occur in the middle of the plant during heavy fruit load, but this is usually transient. Where deficiencies are less severe, older leaves look brittle and their interveinal tissue is curled up. Where deficiencies are severe, chlorosis between the veins progresses from the margins to the middle of the leaflets. The small veins also become chlorotic, but the bigger veins remain dark green. With ongoing magnesium starvation, the interveinal chlorosis becomes more intensive, the color turns to bright yelloworange and necrotic spots may appear, which can grow together into brown bands. Finally, the older leaves die and the whole plant turns yellow and fruit yield is severely reduced.

Remedy


In the short term, apply Epsom salts as a foliar feed in summer. Dilute the salts at a rate of 20g of Epsom salts per litre of water (1/3oz per pint) plus a few drops of liquid detergent. Apply two or three times at fortnightly intervals, spraying in dull weather to avoid leaf scorch. In the long term apply to the soil around the roots either Dolomite limestone (calcium-magnesium carbonate) at 100g per sq m (4oz per sq yd) or Epsom salts (magnesium sulphate) at 30g per sq m (1oz per sq yd). Dolomite limestone will make the soil more alkaline, so should not be used around ericaceous (acid-loving) plants such as rhododendrons or camellias, or where the soil is already alkaline.

A gardener's voice


Read this article to know more about magnesium deficiency-
About four days ago I noticed my tomato plant's leaves were turning yellow, but the veins were still green. This is a sure sign of a magnesium deficiency and can kill plants if not treated. But, luckily, its easy and cheap to cure. 
Potted plants and seedlings in trays can experience soil depletion. Meaning, the plants soak up all the nutrients in the soil and will start to show signs of stress and nutrient deficiency. It's important to keep those plants "fed" with fertilizers, and there are lots of organic options to help keep plants healthy. Tomatoes are especially "hungry" plants, during their growing and fruit producing stages they are what I call "nutrient supersoakers". Tomatoes like plenty of nitrogen, and magnesium. Before transplanting your tomatoes outside dump wood ashes on your soil and mix in with the soil to prevent a strong wind from carrying away your ashes. Ideally, you want to let the ashes "soak" into the soil for a few months, but if you are pressed on time, some ashes are better than none. We have a wood stove that we use for heat over the winter and we have been dumping wood ashes on our garden beds all winter, the snow was excellent for packing the ashes down into the soil for deep soaking. Giving your plants magnesium is as easy as buying Epsom Salt. Epsom Salt is actually Magnesium Sulfate, not salt, so it is an excellent organic source of magnesium for your plants. 
Once I noticed the deficiency in my tomato plants, I went out and bought some Epsom Salt. If a magnesium deficiency is left untreated, the leaves will eventually turn yellow, and the veins, and the leaves will die and fall off. I mixed one to one and a half tablespoons with warm (not hot) water in a gallon jug and shook the jug until most of the "salt" had dissolved. The nice thing about Epsom Salts is that it dissolves quickly. I poured the water into one of the empty cells in my seed trays (I like to leave an empty cell to check water levels). Once the water level in my tray reached a little less than half, I poured the remaining water into a spray bottle and gently sprayed the tomato leaves with the water/salt mixture. By filling the seed tray and spraying the leaves, I am helping ensure that both the roots and the leaves receive the magnesium immediately. 
For the past four days, I have gently sprayed the water/salt mixture on the leaves. Water levels in my seed tray show the plants still have plenty of water. After four days, I saw significant improvement in the health of my plants. The leaves are still slightly yellow, so I will continue my treatment until the yellowing has disappeared.

Healthy plants = successful transplanting. I am planning (weather permitting) to transplant my tomato plants outside in my garden beds in three to four weeks. If my plants are to survive the stress of transplanting, they need to be as healthy as they can be. Good luck on your spring gardening!
 Now you may have known what to do with the plants with magnesium deficiency. So enjoy!

Calcium deficiency in tomato plants - blossom end rot

If you see a dark, rotting spot on the bottom of your tomatoes, it’s blossom-end rot. This problem, caused by a calcium deficiency, can be solved a few ways.
These calcium-deficient leaves show necrosis around the base of the leaves. The very low mobility of calcium is a major factor determining the expression of calcium deficiency symptoms in plants. Classic symptoms of calcium deficiency include blossom-end rot (BER) burning of the end part of tomato fruits (Fig. 17). The blossom-end area darkens and flattens out, then appearing leathery and dark brown, and finally it collapses and secondary pathogens take over the fruit.

All these symptoms show soft dead necrotic tissue at rapidly growing areas, which is generally related to poor translocation of calcium to the tissue rather than a low external supply of calcium. Plants under chronic calcium deficiency have a much greater tendency to wilt than non-stressed plants.

When tomatoes develop a sunken, rotten spot on the end of the fruit, the cause came long before you found the problem. It’s called blossom end rot, and here is why it happens.

Required calcium in tomato plants


Calcium is required in relatively large amounts. In total around 152lb/ac of calcium is taken up by a filed tomato crop yielding around 44.6t/ac. As calcium is needed during the whole growth period and its transport into the fruits is slowly, it is common practice to use applications throughout the season to build up levels in the crop tissue and again during fruit maturation, maximizing quality potential and storability.

Role of calcium in tomato plants


Calcium is a key component of cells holding the structure of cell walls and stabilizing cell membranes. It also has a direct influence on the salt balance within plant cells and activates potassium to regulate the opening and closing of stomata to allow water movement from the plant. 

Calcium enhances pollen germination; regulates some enzyme systems; and influences the growth and health of cells and conductive tissues. It has a key specific influence on tomato fruit quality especially Blossom End Rot (BER).

Calcium is required for growth and yield and promotes the earliness of fruit development.

Establishment - Boost root and leaf growth
Vegetative Growth - Maintain vigorous plant growth
Flowering – Fruit Set Maximize crop reproductive development
Fruit Ripening - Maturity Maintain good fruit firmness and quality and reduce BER risks

Causes of calcium deficiency (blossom-end-rot)


Vegetables need calcium for healthy development. When tomatoes can’t get enough from the soil, the tissues on the blossom end of the fruit break down. The calcium shortage may be because the soil lacks calcium, or calcium is present but is tied up in the soil chemistry because the pH is too low. Also, drought stress or moisture fluctuations can reduce its uptake into the plant. Another reason is that too much fertilizer causes the plant to grow so fast that the calcium can’t move into the plant quickly enough.

While blossom end rot is caused by a lack of calcium to the developing fruits, it doesn't mean there isn't enough calcium in the soil. It is most often related to an inconsistent amount of water in the soil or being taken up by the plant. Calcium is brought to the fruit in the water the plant takes up from the soil so allowing the soil to dry out too much between waterings can cause blossom end rot. Pot-grown tomatoes are especially susceptible.

Symptoms


A water-soaked spot at the blossom end of tomato fruits is the classic symptom of blossom-end rot. This relatively common garden problem is not a disease, but rather a physiological disorder caused by a calcium imbalance within the plant. It can occur in pepper, squash, cucumber, and melon fruits as well as tomatoes.

Blossom-end rot is most common when the growing season starts out wet and then becomes dry when fruit is setting. Damage first appears when fruits are approximately half their full size. The water-soaked areas enlarge and turn dark brown and leathery. These areas will eventually begin to rot, so the fruit should be picked and discarded.

Several factors can limit a plant’s ability to absorb enough calcium for proper development. These include: fluctuations in soil moisture (too wet or too dry), an excess of nitrogen in the soil, root damage due to cultivation, soil pH that’s either too high or too low, cold soil and soil high in salts.

The most obvious deficiency symptom is BER. However, deficiency results in scorching of the new growth and death of the growing point in both the roots and shoots. The leaves of seedlings become distorted and develop yellow, brown or purple necrotic areas starting at the leaf margin and moving into the interveinal areas. The growing point soon dies. In mature plants, the edges of the youngest leaves become brown, and some interveinal areas turn yellow. The growing point dies and the flower buds fail to develop. In the field, BER is more frequent on acid soils and those with a high salt content and can also cause vascular breakdown at the base of the plant, leading to wilting. It is prevalent under low soil moisture conditions. Crops grown on calcareous soils will also need calcium, as the element is not necessarily plant available due to its low solubility. Where calcium is supplied in excess, magnesium and potassium deficiencies may arise as a result of nutrient imbalance.

Prevention and control


Once fruits begin to form, water to supply 1-2" per week from rain and irrigation combined. Water deeply 1-2 times per week rather than frequent shallow waterings to promote good root growth. Water is drawn into the plant partly in relation to the amount of water lost from the leaves via transpiration. Transpiration slows down when there is high humidity, resulting in less water being needed from the soil. Less water from the soil = less calcium coming into the plant so extended periods of high humidity can also result in blossom end rot.

The best way to see if there is a pH problem or calcium deficiency in the soil is to get a soil test done. The best pH for tomato is 6.0-7.0 and if it's already there, you don't want to add lime which will raise the pH. A mulch can help the soil retain moisture. Other tips include not planting the tomatoes when the soil is too cool (affects early fruits), don't overfertilize with nitrogen, and be careful not to injure the roots if cultivation is needed near the plants. Some sources recommend calcium chloride sprays on the foliage but use caution with these. They can cause plant injury and some reliable sources say they don't really help.

Start now by testing the soil
Although most vegetables do well with a soil pH of 6.2 to 6.8, for those with blossom-end the pH should be 6.5 to 6.8 to free more calcium in the soil chemistry. Test results will indicate the amount of lime to add. Even better, lime also contains calcium. Work the lime into the top 12 inches of soil. Use a lime labeled “fast-acting,” which is better than ground limestone unless you have weeks to wait for the lime to react in the soil. If the pH is already correct, the soil test will recommend a different calcium source, such as gypsum. Also, add crumbled egg shells to your compost or bury them in your garden over time to help maintain the calcium levels.

Don’t over-fertilize
Too much nitrogen during early fruiting, especially with nitrogen made from ammonia, ties up calcium in the soil chemistry.

Avoid moisture stress
Use mulch to keep the soil evenly moist. Vegetables need about 1 to 1 1/2 inches of water a week while fruiting. The best way to water tomatoes planted in the ground is with a soaker hose. In hot climates it is especially tricky to keep big tomato plants in pots watered well during the summer. Make sure to water them daily or set them up on a drip system with a timer.

As a stop-gap measure, spray tomato plants with a calcium solution made for blossom-end rot
Follow label directions. Apply two to three times a week, beginning when the first blooms appear. This is not a long-term fix, but it may salvage your crop until you can take the steps mentioned above. The spray seems to work better on tomatoes than other vegetables.

Potassium deficiency in tomato plants

The leaves on the right-hand photo (below) show marginal necrosis (tip burn). The leaves on the left-hand photo show more advanced deficiency status, with necrosis in the interveinal spaces between the main veins along with interveinal chlorosis. This group of symptoms is very characteristic of K deficiency symptoms.
The onset of potassium deficiency is generally characterized by a marginal chlorosis, progressing into a dry leathery tan scorch on recently matured leaves. This is followed by increasing interveinal scorching and/or necrosis progressing from the leaf edge to the midrib as the stress increases. As the deficiency progresses, most of the interveinal area becomes necrotic, the veins remain green and the leaves tend to curl and crinkle. In contrast to nitrogen deficiency, chlorosis is irreversible in potassium deficiency. Because potassium is very mobile within the plant, symptoms only develop on young leaves in the case of extreme deficiency.

Role of potassium in tomato plants


High levels of potassium provide high yields in tomato crops. Tomatoes have a relatively high potassium requirement. There is usually 5.2 to 7.2 lb (approx. 2.36 to 3.27 kg) of K taken into the plant for every tonne (1000 kg) of tomato harvested.

Establishment - Promote strong early growth
Vegetative Growth - Maximize concentrations in leaf tissue prior to flowering
Flowering - Fruit Set Maintain plant growth and maximize flower numbers
Fruit Ripening - Maturity Maximize high potassium levels in the fruit and minimize disorders

Tomato plants need potassium because:
  • It is essential for protein synthesis.
  • It is important for breakdown of carbohydrates, a process which pro- vides energy for plant growth.
  • It helps control ionic balance.
  • It is important for the movement of heavy metals such as iron.
  • It helps the plant to overcome and ward off plant diseases.
  • It is important for fruit formation.
  • It improves hardiness to overcome adverse weather conditions.
  • It is involved in the activation of more than 60 plant enzyme systems that regulate grow rates.
  • It assists in controlling guard cells that open and close stomata on the under- sides of leaves that can reduce stress during drought.
Therefore, potassium deficiency can cause poor plant growth and reduce overall yield. It is important to soil test for potassium and adjust levels and pH before planting a tomato crop or any crop. Tissue testing tomato leaves is also a way to monitor potassium levels during the season to ensure proper fertilization through the drip system or as a side-dress application.

Tomatoes have a relatively high potassium requirement compared to nitrogen with over 267 lb/ac of potassium typically being utilized. Potassium is needed throughout the season and is a major component of the fruit at around 250mg K per 100g of fruit. It is essencial to maintain a good balance of potassium with magnesium and calcium. Too much potassium restricts the uptake of these other cations. Use of high levels of potassium is particularly important under saline conditions to maintain plant growth. Excess sodium reduces the uptake and transfer of potassium through the plant and thus potassium levels need to be increased in order to maintain plant growth.

Symptoms


The leaves become dark green and yellowish to white necrotic dots develop near the leaf margins of the older leaves. These merge into brown necrotic areas around the leaf margins. Greenhouse grown tomatoes will often express K deficiency as ‘blotchy’ ripening. The fruit also lacks firmness and has low brix levels.

Deficient plants may be more prone to frost damage and disease, and their symptoms can often be confused with wind scorch or drought.

In tomatoes, the stems are woody and growth is slow. Leaves are blue-green in color, and the intervenal area often fades to a pale gray color. Leaves may also have a bronzed appearance and yellow and orange patches may develop on some of the leaflets. Fruits often ripen unevenly and sometimes have green patches near the stalks.

As potassium is mobile in the plant, it moves to the younger leaves when supplies are short. Although the growth of deficient plants may not be seriously impaired, the yield and quality of fruit are often greatly reduced. Deficient crops are prone to wilting.

Potassium deficiency causes yellowing and scorching of older leaves. These symptoms begin at the margins of the leaf and spread between the veins towards its centre. Large areas of tissue around the major veins remain green until the disorder is well advanced. A brown scorch develops in the yellow areas and spreads until the leaf is dry and papery. As each leaf dies, others further up the plant develop the same symptoms. These symptoms can develop rapidly in hot weather. Fruit may not expand fully at the stem end, although they look swollen at the tip end, a symptom that is also caused by water stress.

Prevention and treatment


Prevention and cure can be achieved in the shorter term by feeding with home-made comfrey liquid, adding seaweed meal, composted bracken or other organic potassium-rich fertilizers. In the longer term the soil structure should be improved by adding plenty of well rotted compost or manure. Wood ash has high potassium content, but should be composted first as it is in a highly soluble form. Common forms of inorganic fertilizers include: Potassium Nitrate, Potassium Sulfate, and Monopotassium Phosphate.

Potassium from a fertiliser side-dressing will move from the soil surface to the roots only if the soil is very sandy. A soil test can be used to determine the rate needed. Fertigation or drip feeding can also be used to treat a deficient crop. Foliar sprays are less effective and can burn leaves.

Selasa, 25 Maret 2014

Phosphorus deficiency in tomato plants

A phosphorus deficiency in your plants will cause stunted growth and prevent them from producing fruit as expected, yet is is often overlooked or misdiagnosed as a nitrogen deficiency or simply as poor soil. Although it is a bit difficult to determine for the untrained eye, with a little effort you can lean to recognize signs that your plants are suffering from a phosphorus deficiency. Correcting the problem early will resolve the issue and your plants will thrive.
Left - Normal plant
Right - Phosphorus deficiency
The necrotic spots on the leaves on the figure are a typical symptom of phosphorus (P) deficiency. As a rule, P deficiency symptoms are not very distinct and thus difficult to identify. A major visual symptom is that the plants are dwarfed or stunted. Phosphorus deficient plants develop very slowly in relation to other plants growing under similar environmental conditions but with ample phosphorus supply.

Phosphorus deficient plants are often mistaken for unstressed but much younger plants.

Developing a distinct purpling of the stem, petiole and the lower sides of the leaves. Under severe deficiency conditions there is also a tendency for leaves to develop a blue-gray luster. In older leaves under very severe deficiency conditions a brown netted veining of the leaves may develop.

Need of phosphorus


Phosphorus is not needed in large quantities. Around 44.6lb/ac is all that is required during the season for field grown crops. Phosphorus is used during early growth ensuring a good start for the crop and again at flowering and fruit set.

Establishment - Maximize root development
Vegetative Growth - Ensure continued growth
Flowering - Fruit Set - Fruit development
Fruit Ripening - Maturity - Boost tomato nutritional quality

Symptoms of phosphorus deficiency


When deficient in phosphorus, tomatoes have rigidly erect leaves which are dark green to bluish green in color. The stems are thin and fibrous with a dull purple discoloration. Flowering and fruiting is poor, fruit are small and firm and yellow prematurely. In some cultivars, phosphorus deficiency can also appear as small brown areas which develop interveinally on the lower leaves.

These are the five symptoms of phosphorus deficiency:
  1. Small thin stalks. Plants that do not receive enough phosphorus develop weak thin stalks that appear spindly. Healthy plants need strong stems to support the weight of fruit. Thin stocks not only are not able to support the fruit of the plant, they break easily in the wind and may not survive the season. If your plants fail to develop stocky stems, phosphorus may be the culprit.
  2. Stunted growth. Plants suffering from a phosphorus deficiency may be stunted and short in stature. In initial stages they may appear healthy and look like much younger plants. If your plants are smaller than expected or smaller than other plants of the same age, they may need addition phosphorus.
  3. Purple veins may appear on the leaves or the leaves may take on a purplish color. Check both the top and bottom of the leaf for purple veins. This is evident on new growth as well as older leaves. In severe cases the entire leaf may take on a purple hue.
  4. Older leaves may appear bluish-green instead of the characteristic rich green of new growth. Unless the plant normally has a bluish tint, blue-green leaves signal a need for phosphorus.
  5. Reduced blooms and/or onset of fruit. Phosphorus promotes blooming and fruit production. A deficiency may cause the plant to stop producing blooms or the blooms and fruits to be small and lack their usual color. For good fruit production plants require phosphorus.

Treatment


    A phosphorus deficiency can be caused by inadequate amounts of phosphorus in the soil, but due to the nature of phosphorus absorption it can also be caused by low soil temperatures. This is particularly tree of tomatoes. Adding plastic mulch to increase soil temperatures may solve the problem. To increase the level of phosphorus in the soil apply high phosphorus fertilizer usually labeled as fertilizer for blooming plants. Water soluble fertilizer works the fastest and may bring results in a short period of time.

    Nitrogen deficiency in tomato plants

    Tomatoes (Lycopersicon esculentum), a summer staple in nearly every garden, are usually fairly easy to grow, even for the novice gardener. However, they can exhibit mysterious symptoms that challenge even the most experienced gardeners. Fruits, leaves or stems may become distorted or discolored, and the reasons behind the maladies can be diseases, irregular irrigation, pests or nutrient deficiencies. Tomatoes are hardy in U.S. Department of Agriculture plant hardiness zone 9 and above, but they can be grown almost anywhere during the summer months after the danger of frost has passed.
    Magnesium deficiency on a tomato. Credit:RHS/The Garden.
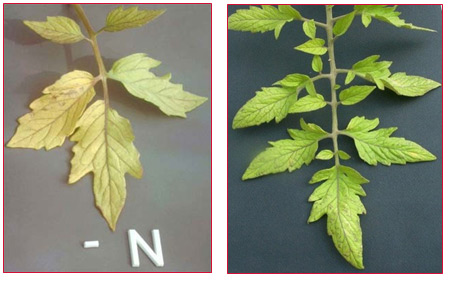
    Nitrogen deficiency may cause yellow leaves on tomato plants. The first symptoms usually affect older, more mature leaves, and gradually the yellow color progresses to more and more leaves. Young leaves tend to stay green but may be smaller in size. In some cases, a red or purple cast can be seen on the veins. Usually, applying nitrogen fertilizer helps the new growth grow normally, but already yellowed leaves will not become green.

    Role of nitrogen in tomato plants


    Establishment - Promote strong early growth
    Vegetative Growth - Ensure continued growth
    Flowering - Fruit Set Maintain plant growth and maximize flower numbers
    Fruit Ripening - Maturity In reduced amounts to maintain fruit fill

    Damage and symptoms


    Tomato leaves turn from their normal deep green to a pale green in the early stages of nitrogen deficiency. Then, the leaves gradually turn yellow. As this happens, the veins in the leaves stay green for a while before also turning yellow. The undersides of the leaves on some plants might get red or purple. If you do not correct the situation, then the older leaves will show signs of stress quite quickly when the plant does not get enough water. Tomato plants recover quickly when you apply some nitrogen in a foliar feeding. Follow up by adding nitrogen to the soil.

    Nitrogen deficiency causes plants to grow slowly and thinly. Leaf production will be sparse and what leaves there are will be stunted. A purplish tint may be present. Older leaves will yellow. Note that some tomato varieties exhibit purplish tints naturally in healthy plants. This deficiency is easily treated with fertilizer with a nitrogen component.

    Cause


    Nitrogen promotes green, leafy growth and deficiency results in yellowing and stunted growth. Nitrogen is very soluble, so is easily washed out of the soil in winter rains, leaving the soil deficient in spring, just when plants are putting on new growth. Nitrogen deficiency is a common cause of yellow leaves in spring.

    Remedy


    In the long term, mulching with organic matter (such as well rotted garden compost or manure) provides a steady trickle of nitrogen to stabilise levels. In the short term, applying high nitrogen fertilisers such as sulphate of ammonia or poultry manure pellets will remedy the problem.

    Follow these steps to treat nitrogen deficiency in tomato plants:
    1. Test the soil components. Having your soil tested is important to confirm nitrogen and other nutrient deficiencies as well. You can get a soil test kit at your local garden center.
    2. Determine what type of plants have nitrogen deficiency because this will determine the course of treatment. Be sure to follow the treatment plan for the type of plants affected.
    3. Apply nitrogenous fertilizer to your vegetable plants as a side dressing. This may help increase your yield and avoid fertilizer burn.
    4. Integrate nitrogen-rich fertilizer into the soil where you'll plant your vegetables the following spring as well. Choose a well-balanced fertilizer such as "Tomatoes Alive" by Gardens Alive, which has the added benefit of being an organic fertilizer.
    5. Try applying well-rotted manure to your garden bed as well, which tends to be nitrogen rich. You may also use any fertilizer that has nitrate, ammonium or urea in the formulation.

    Potato virus Y on tomato plants

    Potato virus Y (PVY) occurs worldwide but has a narrow host range, affecting plants in the Solanaceae family (that is, tomatoes, potatoes, and peppers). It is transmitted by aphids. Near total crop failures have been reported when PVY was detected early in the season and high aphid populations were present.
    PVY is transmitted in the nonpersistent manner by many aphid species. Aphids can acquire the virus in less than 60 seconds from an infected plant and transmit it to a healthy plant in less than 60 seconds. The virus may be retained by the aphid for longer than 24 hours if feeding does not occur. PVY can also be transmitted mechanically. Potato is an important source of the virus for tomato and other solanaceous crops. The virus does not appear to be seed-transmitted.

    Symptoms


    Symptoms on tomato vary according to PVY strain, plant age, varieties infected, and environmental conditions. General symptoms on tomato are faint mottling and slight distortion of the leaves. Severe symptoms include dark brown, dead areas in the blade of nearly mature leaflets. Leaflets at the terminal end of a leaf usually are most adversely affected, often showing severe necrosis. In many cases, all leaflets are affected. Leaves formed after the onset of PVY exhibit mild wrinkling, slight distortion, and mild mottling. Leaflets of plants infected for some time are rolled downward with curved petioles, giving the plant a drooping appearance. Stems often show a purplish streaking but no symptoms are produced on the fruit. Mature plants are stunted and unthrifty and yield is reduced.

    Control strategies


    There are no good sources of resistance in tomato for PVY, so other control strategies must be used. These include the following:
    • Eradicate all biennial and perennial weeds and wild reservoir hosts in and around fields. Maintain a distance of at least 30 feet between susceptible crops, weeds, or other susceptible plants, including those in ditch banks, hedge or fence rows, and other locations.
    • Plant earlier to avoid high aphid populations that occur later in the season.
    • Plant late settings as far as possible from fields used to produce early tomatoes and peppers. These areas can act as sources of viruses and aphids for subsequent crops.
    • Scout fields for the first occurrence of virus disease. Where feasible, pull up and destroy infected plants, but only after spraying them thoroughly with an insecticide to kill any insects they may be harboring.
    • Use reflective mulches to repel aphids, thereby reducing the rate of spread of aphid-borne viruses.
    • Monitor aphid populations early in the season and apply insecticide treatments when needed.
    • Minimize plant handling to reduce the amount of virus spread mechanically.
    • Avoid planting tomatoes near potato fields to control PVY.

    Senin, 24 Maret 2014

    Tomato curly top disease

    Tomato curly top disease is caused by the Beet Curly Top Virus (BCTV). Curly top disease, caused by viruses in the genus, Curtovirus, has impacted western US agriculture for over a century, and is a significant threat to tomato production. The two most abundant curtovirus species today are Beet curly top virus (BCTV) and Beet mild curly top virus (BMCTV) but other species exist as well. This post discusses the viruses that cause curly top disease.
    Beet curly top virus is only spread from plant-to-plant by the beet leafhopper, Circulifer tenellus. The virus and the beet leafhopper have very wide host ranges. Once acquired by the leafhopper, beet curly top virus is carried for the rest of the leafhopper's life, and thus long distance spread is common. Infected plants are often widely scattered in a field; field margins are especially vulnerable because leafhoppers like to feed on plants that border bare soil areas. Beet curly top virus is limited to the phloem, the food-conducting tissues of the plant, and the leafhopper must feed on the phloem in order to acquire and/or inoculate the virus to plants. Only brief feeding periods (minutes) are required for the leafhopper to acquire the virus and transmit it to new plants. Plants begin to show symptoms about 7 to 14 days after they are first infected by a leafhopper. Tomato is not a preferred host for the beet leafhopper; however the leafhoppers transmit the virus to tomato while sampling it.

    Symptoms


    Leaves of infested plants are dwarfed, crinkled, rolled inward, and cupped upward. Veins on the underside of leaves usually have a purple discoloration, may be roughened, and often produce swellings or spine-like outgrowths. Roots are stunted and may exhibit a proliferation of secondary rootlets. Phloem tissues become necrotic and appear as dark rings when viewed in cross section.

    Affected plants do not recover and die or remain stunted without setting additional fruit. For some time now, the problem has been attributed to feeding by the potato (or tomato) psyllid which causes psyllid yellows. In psyllid yellows, damage is caused by a toxin that the immature psyllids (nymphs) produce as they feed. Reported symptoms of psyllid yellows are very similar to those observed on the affected tomato plants.

    Control


    Management of curly top disease is difficult. Efforts to breed resistance to curly top into tomatoes have been largely unsuccessful. All currently available tomato varieties are susceptible. Spraying tomatoes with insecticides does not control the disease because leafhoppers migrate from distant places and do not reproduce or remain in tomato fields. By the time migrating leafhoppers succumb to an insecticide, they have already transmitted the virus to the tomatoes. When symptoms of curly top become evident in tomatoes, the leafhoppers have long since moved away to other crops or weeds which they prefer. Removing symptomatic plants is probably a good idea, but since the vector does not remain in tomato fields, there probably is little secondary, or plant to plant spread within a field. Other management strategies have focused on using cultural practices that reduce the attractiveness of tomato to the leafhoppers. The beet leafhopper (and most other insect vectors) is attracted to widely spaced, vigorous plants grown in open areas where the plants sharply contrast with the surrounding soil. In areas where curly top is chronic, dense plant spacing, shading, row covers, and intercropping have been reported to reduce levels of curly top.

    Minggu, 23 Maret 2014

    Tobacco mosaic virus on tomato

    Tobacco mosaic virus ( ToMV ) is the most prolific fungal disease that attacks tomato plants. ToMV does not limit itself to tomato plants only, but also attacks a variety of other garden plants and flowers, but garden tomatoes are the number one host plant for the disease. The virus does not pose any health threat to humans or animals, but ToMV will destroy an entire crop of tomatoes if left unchecked.

    The plant disease caused by tobacco mosaic virus is found worldwide. The virus is known to infect more than 150 types of herbaceous, dicotyledonous plants including tomatoes, other vegetables, flowers, and weeds. Infection by tobacco mosaic virus causes serious losses on several crops including tomatoes, peppers, and many ornamentals. Tobacco mosaic virus is one of the most common causes of virus diseases of tomato plants worldwide.

    Symptoms


    In tomatoes, the foliage shows mosaic (mottled) areas with alternating yellowish and dark green areas. Leaves are sometimes fern-like in appearance and sharply pointed. Infections of young plants reduce fruit set and occasionally cause blemishes and distortions of the fruit. The dark green areas of the mottle often appear thicker and somewhat elevated giving the leaves a blister-like appearance. Many times the entire plant is dwarfed and flowers are discolored. Symptoms can be influenced by temperature, light conditions, nutritional factors, and water stress.

    The leaves of tomato plants will begin to have yellow mottling. The newest plant foliage will be the first to show signs of yellow mottling as the young, tender growth of the tomato plant is the most susceptible. Plant leaves may have blister like lesions and/or become fern-like in appearance , and as the tobacco mosaic virus continues to spread, the edges of the plant leaves will begin to crinkle. As ToMV continues to advance in the plant, the blossoms will become discolored, fruit production will be stunted and the few tomatoes produced by the diseased plant will be misshapen and blemished.

    Cause


    ToMV enters a tomato plant (or any other plant) by physical contact, which can come from a human or an insect . When a tomato plant is handled (normal planting, transplanting or harvesting type handling) or an insect makes a meal from the tomato plant, an open wound occurs on the plant's leaves or stem. If the person coming into contact with a wounded plant has used tobacco in any form (chewed, dipped or smoked) and not washed their hands prior to plant contact, the residual tobacco on the hands will enter into the plant's wound and cause the tobacco mosaic virus. Insects which have recently visited a tobacco patch or discarded cigarette will also pass the ToMV disease into the plant when it bites into the plant.

    ToMV can also be transmitted to tomato plants via soil absorption. If discarded cigarettes, cigars, pipe tobacco, chewing tobacco or any other form of tobacco are in the garden soil where tomatoes are planted, the plants will absorb the tobacco and become infected with ToMV.

    Prevention


    If you use tobacco, wash hands thoroughly before touching tomato plants and never smoke or chew around the plants.

    Don't place diseased tomato plants on compost pile or lay them anywhere near other tomato plants. ToMV has been shown to remain in dead plants for fifty years and could easily be spread through insects.

    Rake soil to remove all diseased debris and discard carefully. Place plastic on top of the soil and allow soil to lie fallow and 'cook' under the sun for several months to kill the tobacco mosaic virus which may be lurking in the soil. 

    Control


    Unlike fungicidal chemicals used to control fungal diseases, to date there are no efficient chemical treatments that protect plant parts from virus infection. Additionally, there are no known chemical treatments used under field conditions that eliminate viral infections from plant tissues once they do occur. Practically speaking, plants infected by viruses remain so. Thus, control of tobacco mosaic virus is primarily focused on reducing and eliminating sources of the virus and limiting the spread by insects. Tobacco mosaic virus is the most persistent plant virus known. It has been known to survive up to 50 years in dried plant parts. Therefore, sanitation is the single most important practice in controlling tobacco mosaic virus.

    Control for seedling growers and gardeners
    The most common method of transferring the virus from plant to plant is on contaminated hands and tools. Workers who transplant seedlings should refrain from smoking during transplanting and wash their hands frequently and thoroughly with soap and water. Tools used in transplanting can be placed in boiling water for 5 minutes and then washed with a strong soap or detergent solution. Dipping tools in household bleach is not effective for virus decontamination. Any seedlings that appear to have mosaic symptoms or are stunted and distorted should be removed and destroyed. After removing diseased plants, never handle healthy plants without washing hands and decontaminating tools used to remove diseased plants.

    Persons purchasing small tomato plants for transplanting should beware of any plants showing mottling, dwarfing, or stunting. Avoid the purchase of any affected plant. Gardeners are advised to follow the same procedures recommended for greenhouse workers when handling tomato transplants. Other control methods for home gardeners include roguing (removal of diseased plants), destruction of diseased and infected plants, and control of weeds and chewing insects. When roguing and destroying mature diseased plants from the home garden, be sure to wash hands and decontaminate any tools used in the process before contacting healthy plants.

    Control for commercial producers
    Commercial greenhouse producers of tomatoes should follow control practices for seedling production as stated above. It is essential for commercial growers to constantly inspect and rogue diseased production plants while the plants are in the seedling stage. An experienced individual, who is familiar with the tobacco mosaic virus symptoms, should do the initial inspection.

    Roguing of young production plants is recommended and should take place before workers are allowed to prune or tie up production plants. When removing diseased plants, also remove one plant on either side of the diseased one. The reason for this is that it is almost impossible to remove a diseased plant and not contaminate the healthy adjacent plants. Never attempt to transplant a healthy tomato into the soil from which a diseased plant was removed. Roots from diseased plants will remain in the soil and provide the virus inoculum for the new transplant.

    As a matter of routine, soils from which production plants have been removed, following harvest, should be steam sterilized before the introduction of new seedlings. Steam sterilization can be accomplished by steam or air-steam mixtures. In the preparation of soil for steam sterilization, sift it to remove clumps and large pieces of organic matter. The total soil mixture will have to be heated to a temperature of 200° F for 40 minutes. Since high temperatures are required, steam sterilization must be done in an enclosed system. Temperatures within the steam sterilization system should be monitored by high temperature thermometers to make sure the desired temperature has been reached. Steam sterilization of soil also will eliminate fungi, insects, nematodes, and weeds from the soil. Steam sterilization also is recommended for gravel mixtures used in hydroponic operations following the same procedure described above.

    Grow individual production plants in separate containers so that the soil or growing media can be removed when roguing infected production plants. Remember that the soil harbors old root tissues that may serve as inoculum when new roots are introduced. Growing production plants in separate containers is also useful for the control of root diseases caused by fungi and bacteria.

    Sabtu, 22 Maret 2014

    Stubby-root nematode on tomato plants

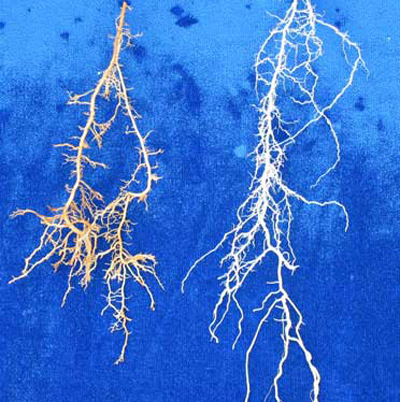
    Stubby-root nematodes feed on the roots of tomato plants and cause the roots to appear stunted and stubby. The curved stylet that stubby-root nematodes use to feed makes them unique, as other nematodes possess straight stylets. They feed primarily on root tips, causing elongation of roots to stop and making it more difficult for tomatoes to receive adequate water and nutrients. Symptoms of stubby-root nematodes are more severe in sandy soils and generally appear as odd-shaped patches.
    St. Augustinegrass roots grown in soil inoculated with Trichodorus obtusus (left), a stubby-root nematode, and in non-inoculated soil (right).
    Nematodes in the family Trichodoridae are commonly called "stubby-root" nematodes, because feeding by these nematodes can cause a stunted or "stubby" appearing root system. Paratrichodorus minor is the most common species of stubby-root nematode worldwide. Paratrichodorus minor is important because of the direct damage it causes to the plant roots, and also because it can transmit certain plant viruses.

    About


    Stubby-root nematodes are very small and can be seen only with the aid of a microscope. They are ectoparasitic nematodes, meaning that they feed on plants while their bodies remain in the soil. They feed primarily on meristem cells of root tips. Stubby-root nematodes are plant-parasitic nematodes in the Triplonchida, an order of nematodes characterized by having a six-layer cuticle (body covering). Stubby-root nematodes are unique among plant-parasitic nematodes because they have an onchiostyle, a curved, solid stylet or spear that is used in feeding. All other plant-parasitic nematodes have straight, hollow stylets.

    Stubby-root nematodes use their onchiostyle like a dagger to puncture holes in plant cells. The stubby root nematode then secretes from its mouth (stoma) salivary material into the punctured cell. The salivary material hardens into a feeding tube which functions as a "straw" enabling the nematode to withdraw and ingest the cell contents through the tube. After feeding on an individual cell, the stubby-root nematode will move on to feed on other cells, leaving old feeding tubes behind and forming new ones in each cell that it feeds from.

    Symptoms


    Damage caused by P. minor usually occurs in irregularly shaped patches within a given field. Symptoms are usually more severe in sandy than in heavier soils. Above ground symptoms include; stunting, poor stand, wilting, nutrient deficiency, and lodging. Roots may appear abbreviated or "stubby" looking. However, all these symptoms can be caused by other factors, so the only way to verify if P. minoris a problem is to have a nematode assay conducted by a credible nematode diagnostic lab.

    Management


    Paratrichodorus minor is known to occur deeper in the soil than many other plant-parasitic nematodes. In experiments, a large percentage of P. minor populations occurred between 8 to 16 inches deep, below the typical treatment zone of soil fumigants. This allows many P. minor to escape being killed by fumigant treatments. Population numbers of P. minor are known to rebound following soil fumigation to numbers higher than if no treatment were used. Therefore, soil fumigants, while effective treatments for other plant-parasitic nematodes, often are not recommended for management of P. minor.

    Sting nematode on tomatoes

    The sting nematode is a microscopic roundworm averaging about 1/12 inch in length. It is found almost exclusively in soils with a sand content of 80 percent or higher and thrives best in irrigated cropland where there is a constant supply of moisture. Sting nematodes do not enter plant roots'. All life stages remain in the soil, feeding at or near root tips. Even small populations can cause serious damage because of a powerful toxic chemical injected into the roots during feeding.

    Symptoms

    Primary damage from the sting nematode is to the roots of the plant. The degree of injury to the roots varies with the age of the plant when attacked. Symptoms are most severe when the feeding occurs during the first few weeks after planting.

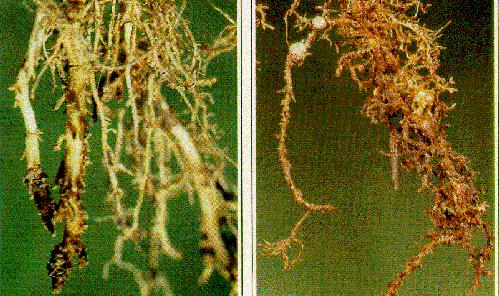
    In general, symptoms consist of greatly reduced root systems with short, stubby roots having dark, shrunken lesions, particularly at the tips. If the root tip is destroyed, new roots may be produced above the damaged area, resulting in a highly-branched appearance. Plants which are not severely damaged by the initial feeding may recover and produce near-normal yields under optimum growing conditions.

    Plant roots
    Sting nematodes typically feed on root tips. In response to this feeding, root tips cease to grow, causing an abbreviated or stubby-appearing root system. The roots may appear cropped-off just below the soil surface. With high population densities, complete root destruction can occur. Damaged roots have a greatly reduced ability to take up water and nutrients from the soil, and this leads to expression of aboveground symptoms and yield reductions.

    Above-ground
    With moderate initial population densities of sting nematodes, young plants may experience reduced vigor, slow growth, and stunting. With high initial population densities, young plants may stop growing completely following seed germination or transplanting and eventually die. The foliage of affected plants may turn yellow or red due to nutrient deficiencies in the foliage resulting from an impaired root system or to physiological responses in the plant in response to nematode feeding.

    Control


    Chemical control
    Sting nematodes can be effectively managed with nematicides. Unlike many of the endoparasitic nematodes that spend a majority of their life within roots, contact nematicides often work well on sting nematode. Both carbamate (aldicarb, carbofuran) and organophosphate (fenamiphos, ethoprop, turbufos) nematicides and fumigants (methyl bromide, 1,3-dichloropropene, metam sodium) are currently registered and can be effectively used to reduce sting nematode populations. On annual crops, nematicides applied either before or at planting usually provide acceptable levels of control by protecting newly developing root systems. On perennial crops such as turfgrasses, seasonal application of post-plant nematicides during times of root growth may be required.

    Cultural practices
    When possible, avoid use of infested planting material. Sting nematodes and other pathogens can be moved in the soil adhering to the sod. It is believed that this is the primary way that the sting nematode has become established in new areas, especially outside of its native geographical range.

    Relieving additional stresses by raising mowing height, increasing irrigation frequency, improving aeration to roots, and reducing traffic can improve tolerance to sting nematodes. The addition of organic, and some inorganic, amendments to soil also can improve tolerance to sting nematodes by improving the water and nutrient-holding capacity of the soil. Organic amendments have also been shown to reduce population densities of sting nematodes in some studies. This may be due to direct effects of these additives on the nematodes or due to stimulation of antagonistic microorganisms in the soil.

    Biological control
    Pasteuria usgae, an endospore-forming bacterium, is an obligate parasite of B. longicaudatus. Pasteuria usgae was successfully introduced into a previously non-infested putting green resulting in the suppression of sting nematodes. Presently, the only method for infesting a field site with P. usgae is by adding soil from a site that already has sting nematodes infected with the bacterium. Unfortunately, this method is not economically feasible for commercial use. However, in vitro production of P. usgae is being attempted at this time. If these efforts are successful, P. usgae may become a viable inoculative biological control agent for sting nematodes in the future.

    Root-knot nematode on tomato

    Root-knot nematodes (Meloidogyne spp.) are minute, worm-like animals that are very common in soil. They have a wide host range, and cause problems in many annual and perennial crops. Tomatoes are among the most seriously affected, with the nematodes causing problems in all growing areas. Although this information is specific to tomatoes, the principles can be applied to most other annual crops.

    Root-knot nematode juveniles are active, thread-like worms about 0.5 mm long. They are too small to be seen with the naked eye.
    Root-knot nematode juveniles are active, thread-like worms about 0.5 mm long. They are too small to be seen with the naked eye.

    Life cycle


    The juveniles hatch from eggs, move through the soil and invade roots near the root tip. Occasionally they develop into males, but usually become spherical-shaped females.

    The presence of developing nematodes in the root stimulates the surrounding tissues to enlarge and produce the galls typical of infection by this nematode. Mature female nematodes then lay hundreds of eggs on the root surface, which hatch in warm, moist soil to continue the life cycle.

    Continued infection of galled tissue by second and later generations of nematodes causes the massive galls sometimes seen on plants such as tomatoes at the end of the growing season. The length of the life cycle depends on temperature and varies from 4-6 weeks in summer to 10-15 weeks in winter. Consequently, nematode multiplication and the degree of damage are greatest on crops grown from September to May.

    Nematodes are basically aquatic animals and require a water film around soil particles before they can move. Also, nematode eggs will not hatch unless there is sufficient moisture in the soil. Thus, soil moisture conditions that are optimum for plant growth are also ideal for the development of root-knot nematode.

    Distribution


    There are more than 50 species of root-knot nematodes. M. javanica and M. incognita are widespread, while M. hapla is common only in areas of high elevation where it is cooler.

    Although root-knot nematodes are difficult to identify, it is not important, for most practical purposes, to know which of the species is present. Species identification becomes particularly important when resistant varieties and crop rotation are being used as control practices because most plants are resistant to a limited range of species. Therefore, the crops chosen must be resistant to the species (or populations) present in a particular field.

    Symptoms


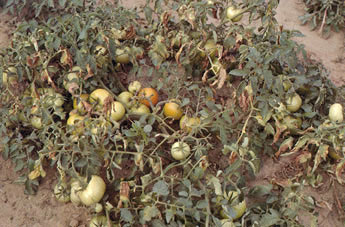
    Root-knot nematodes do not produce any specific above-ground symptoms. Affected plants have an unthrifty appearance and often show symptoms of stunting, wilting or chlorosis (yellowing). Symptoms are particularly severe when plants are infected soon after planting. However, more commonly, nematode populations do not build up until late in the season and plants grow normally until they reach maturity. Then they begin to wilt and die back with flowering, reducing fruit set and fruit development.

    Below ground, the symptoms of root-knot nematodes are quite distinctive. Lumps or galls ranging in size from 1 to 10 mm in diameter, develop all over the roots. In severe infestations, heavily galled roots may rot away, leaving a poor root system with a few large galls.

    Non-chemical control


    Crop rotation
    Root-knot problems increase and control becomes more difficult when tomatoes or other susceptible crops are grown without rotation.

    However, crop rotation will not eliminate infestations because root-knot nematodes can remain in the soil as eggs for at least a year between host crops and most species can feed on a wide range of weeds. Nonetheless, rotation can significantly reduce losses when a field is planted again to a susceptible crop.

    Winter cereals are useful because they are generally poor hosts and little nematode reproduction occurs during the cold winter months. It is more difficult to find summer crops with good resistance to root-knot nematode, though sorghum x Sudan grass hybrids (particularly cv. Jumbo) are useful against most populations of the nematode.

    Fallow and cultivation
    Repeated cultivation kills nematodes in the upper soil layers by exposing them to mechanical abrasion, and the heating and drying action of the sun. If the field is maintained weed free, nematodes also die of starvation. In warm, moist soils in Queensland, a 4-6 month fallow may reduce root-knot nematode populations by more that 95 per cent. Longer fallow periods are not normally economically feasible and they increase the risk of soil erosion.

    Sanitation
    As nematode populations have the capacity to increase rapidly, plough out plants as soon as the crop is harvested to prevent further multiplication. At this time, most of the nematode population is in the roots rather than the soil. Therefore, if these roots are removed from the field and destroyed (e.g. by burning), the nematode population immediately and substantially reduces.

    Resistant varieties
    Tomato varieties with nematode resistance are available but not always commercially acceptable because of poor agronomic characteristics. Experimental breeding lines with nematode resistance are being tested and may be more suitable. These varieties provide adequate but not absolute protection against common populations of M. incognita and M. javanica. M. hapla and some races of M. incognita are sometimes capable of attacking resistant varieties.

    Chemical control


    Seedbeds
    In crops established from seedlings, transplants must be free of root-knot nematodes. Before planting, fumigate all seedbeds with a registered chemical according to label directions.

    Potting mixes
    If peat, sand and other components are obtained from sources free of root-knot nematode and are not contaminated before use, the treatment of potting mixes for nematode control is unnecessary. Treatments for damping-off fungi (e.g. aerated steam at 60°C for 30 minutes) will also kill nematodes.

    Field
    If the management practices above are adopted, nematicides should only be needed in the field as a last resort (e.g. in sandy soils where tomatoes are particularly prone to nematode damage). Even in situations where root-knot nematode problems are usually severe, the use of good management practices reduces the nematode population pressure and gives nematicides a greater chance of providing effective control.
    Kamis, 20 Maret 2014

    Tomato walnut wilt

    Walnut wilt is a disorder caused by the uptake of the chemical, juglone, which is toxic to tomatoes. Juglone is produced by several tree species, including black walnut, English walnut, Persian walnut, butternut, hickory, and pecan. Black walnut trees, in particular, are infamous for affecting nearby plants – hence the disorder’s name.
    Juglone is formed in the leaves, fruit hulls, inner bark, and roots of the walnut tree and other members of the walnut family. With rain, it leaches from nuts, leaves, and bark and readily released into the soil. Uptake in tomatoes occurs when tomato roots make contact with the tree roots.

    Juglone’s toxicity to tomatoes directly depends on how close tomato plants are to walnut trees. Those within a tree’s root spread (two to three times the circumference of its branches) are more severely infected. They wilt and die quickly. Those further away wilt more slowly.

    Symptoms

    • Symptoms closely resemble those of fusarium wilt and verticillium wilt, including yellowing and browning leaves, leaf drop, and stunted growth.
    • Stems turn brown or streak.
    • Tomatoes growing next to a walnut tree abruptly wilt and die.
    • Tomato plants growing a short distance away may not die, but become flaccid and stunted.

    Prevention

    • Avoid planting tomatoes within the spread of a walnut tree’s root system (two to three times the circumference of its branches) or plant them at least 50 feet away.
    • Don’t plant tomatoes for at least two years in locations where these trees may have grown before. Juglone can remain in the soil several years after a tree has been cut down.
    • Or … remove walnut trees.

    Control

    • To date, there is no chemical treatment.
    • You may be able to save tomato plants if you act quickly. Transplant your plants to containers filled with sterile potting mix and move them to at least 50 feet away from walnut trees.
    • Clean up fallen leaves, nuts, and other black walnut tree debris regularly.
    • Incorporate compost, rotted manure, composted grass clippings, and cover crops to maintain a high level of organic matter in the soil. Microbes will help break down juglone.
    • Avoid using compost that contains black walnut debris.

    Tomato white mold

    White mold is a fungal disease that can infect more than a hundred different plant species, including field crops, garden vegetables, herbaceous ornamental plants, and a number of common weeds.

    White mold, caused by species of the fungus Sclerotinia, is a serious disease that often results in death of plants. Infection by the fungus is favored by cool, moist conditions. Diseased tissue initially shows a water-soaked appearance. As described by the common name of the disease, white mold can be seen on the infected plant tissue when conditions are humid, and is usually most evident on stem parts. Small black sclerotia, about the size of sunflower seeds, can be seen on or in the diseased tissue, often embedded in the cottony, white fungal strands of the fungus. The dying tissue tends to show a bleached, dried appearance.
    White mold on tomato
    White mold on tomato

    Symptoms


    White mold generally appears on tomato plants at flowering. Symptoms include water-soaked areas on flowers and at stem joints where senescent flower petals have fallen. The infection quickly kills stems, which eventually dry and take on a bleached appearance. Water-soaked stem lesions may also appear at the soil line if senescent plant debris is present around the plant. Affected areas generally show white, cottony mycelium that soon produces large, irregularly shaped, black sclerotia. Infected fruits turn gray and rot. Sclerotia on infected fruits are usually produced at the point of attachment with the plant.

    Control


    Sclerotia are the tough survival structures of the fungus, making it a challenge to control the disease. Because the white mold fungus produces survival structures and can infect so many plant species, rotation is often of limited usefulness. Since infection is favored by abundant moisture, practices that improve air circulation, such as wide spacing at planting, staking of plants, and preventing water splash on leaves and stems can help reduce conditions favorable for disease development. Resistant varieties are available with some plants, but not currently with tomato. Fungicides are labeled to help control the disease in certain crops, but are not usually practical for use in the home garden. Sanitation, the careful removal of infected plants, is the most important management practice for home gardeners. Since sclerotia can survive in the soil for several years, removal of infested soil may be feasible only if the area affected is small. Many weeds are susceptible to white mold, so control of weeds in and around the garden is helpful in managing the disease.

    Verticillium wilt on tomatoes

    The tomato plant, although sometimes perceived as a vegetable, is actually a fruit and originates from South America. Today there are all kinds of different varieties of tomatoes and they are grown all over the world. Most tomatoes are grown today in Southern Europe, Asia, and the United states but with the right set up you can grow this popular garden fruit just about anywhere. However as with any plant there are certain diseases you should know about when growing tomato plants. In this article we will talk about the tomato disease known as verticillium wilt and what you can to help prevent it from attacking your plants.
    Verticillium wilt is a disease caused by a fungus, Verticillium albo-atrum, which lives in the soil. It is often confused with fusarium wilt, bacterial canker, or early blight. Symptoms are similar in all these diseases.

    The fungus works its way up through the plant’s roots, clogging water-conducting tissue in the stem. It spreads a toxin that wilts and spots leaves and prevents water from reaching branches and leaves, starving the plant. Infected plants usually survive the season but are stunted. If they produce any fruit, it’s small and underdeveloped.

    About


    Verticillium wilt is a soil-borne fungal disease that results in the yellowing, and eventual browning and death of foliage, particularly in branches closest to the soil. The wilt starts as yellow, V-shaped areas that narrow at the leaf margins. These yellow areas grow over time, turn brown, and then the leaf dies. Often, entire branches are infected.

    It affects hundreds of different species of plants but some plants are immune such as ferns. Luckily the fungus is harmless to humans. The fungus lives in the soil and attacks plants with particularly stressed roots. The symptoms of verticillium wilt in tomato plants can be seen in the leaves. A tomato plant's leaves will wilt die, and fall off, and as the fungus progress the plant will become stunted and the tomato fruit will have yellow shoulders. The wilting and spotting of the tomato's leaves is caused by a toxin that the fungus produces. To diagnose if your tomato plant has verticillium wilt make a vertical slice on the main stem just above the soil. If you see a brown color tissue under the bark this discoloration can mean your plant has the fungus. Unlike other fungi that attack tomato plants the Verticillium wilt fungus is unique in the sense that it rarely extends more than a foot up from the soil.

    Symptoms


    Despite the sickly appearance of verticillium wilt-infected branches, often the upper part of the plant will continue growing, though growth will be stunted. Tomatoes that are growing on infected branches will often drop before reaching maturity, or they will be sunburned because of the lack of shade that the foliage would have provided. Even on branches that are not showing signs of wilt, the tomatoes will be smaller than normal, and often develop yellow shoulders.
    • Yellow spots appear on lower leaves, followed by brown veins. Leaves then turn brown and fall off. Infection pattern often resembles a V-shape. Symptoms progress up the stem.
    • Plants may wilt during the day and recover at night.
    • Interior of main stem (when split) shows discolored streaks about 10-12 inches above the soil line, the result of plugged water-conducting tissue.
    • If cool conditions persist, the plant may die.
    When does it attack?
    • The fungus thrives in cool temperatures and when soil is moist and not too warm (60-75ºF).
    • It can attack at any stage in a tomato plant’s growth, but is most common when plant is producing fruit.
    • Plants in poorly drained soil are more susceptible to infection than those in well-drained soil. Wet soil allows the fungus to multiply and move up through the tomato plant’s water-conducting tissue.
    How is it different from other diseases?
    When compared with fusarium wilt: Verticillium develops more slowly than fusarium wilt. Yellowing is less dramatic with verticillium and encircles the entire plant, while those infected with fusarium tend to show symptoms just on one side. Interior stem discoloration extends just 10-12 inches high in tomatoes infected with verticillium wilt, but all the way up the stem in those infected with fusarium wilt.

    When compared with early blight. Spots from early blight develop concentric circles; verticillium spots do not.

    When compared with bacterial canker. Verticillium symptoms encircle the entire plant. Those infected with bacterial canker tend to show symptoms on just one side.

    Prevention

    • Rotate crops. The verticillium fungus can survive indefinitely in the soil. Plant tomatoes no more than once every four years in the same spot. Avoid planting other Solanaceous crops (potato, pepper, and eggplant) in the same area, too – they are susceptible to the fungus.
    • A “V” listed after the variety name on its label indicates its resistance to the verticillium fungus.
    • Plant tomatoes in well-drained soil.
    • Remove and destroy affected plants at the end of the season.

    Control

    • To date, there is no chemical treatment available.
    • To slow the disease, use fertilizers lower in nitrogen and higher in potassium.
    • Destroy infected plants.

    Tomato target spot

    Target Spot is the name often used for vegetable diseases caused by the fungus Corynespora cassiicola. The name target spot derives from the ringed or bull's eye appearance sometimes seen in lesions caused by C. cassiicola. However, concentric rings are not always readily apparent in target spot lesions, and not all lesions with concentric ring are caused by C. cassiicola. It is often necessary to examine suspected target spot lesions for the characteristic spores of the causal fungus to ensure that a correct diagnosis is made. The pathogen can be induced to sporulate from diseased tissue after incubation in a high-humidity chamber for 24-48 hours. In some cases, growth of C. cassiicola from pieces of suspect tissue on agar media in the laboratory is needed to verify that target spot is, indeed, the problem.
    Target Spot Of Tomato

    Survival And Spread


    In addition to tomato, this fungus has a wide host range and may attack such diverse crops as papaya, passion-vine, pepper, cowpea, cantaloupe, squash, and snap beans, as well as a number of common ornamentals.

    The pathogen has several means for survival and spread in the field. It may survive up to two years in crop debris. The wide host range of this fungus also may contribute to survival of the fungus in Florida. The primary means of spread in the field is by airborne conidia.

    Optimum conditions for disease development include temperatures from 68°F to 82°F and long periods of free moisture.

    In trials, wounding was essential for reproduction of the fruit symptoms.

    Symptoms


    Target spot is frequently misdiagnosed in its early stages as symptoms are difficult to recognize and can be confused with bacterial spot and early blight. The name derives from the bull’s-eye appearance that is often displayed in lesions caused by the disease. Since concentric rings are not always visible and not all lesions with concentric rings are target spot, it is recommended a laboratory diagnosis be obtained to ensure that a correct diagnosis is made.

    On tomato leaves and stems, foliar symptoms of target spot consist of brown-black lesions with subtle concentric rings giving them a target-like appearance. These can sometimes be confused with early blight. On tomato fruit, lesions are more distinct. Small, brown, slightly sunken flecks are seen initially and may resemble abiotic injury such as sandblasting. As fruits mature, the lesions become larger and coalesce, resulting in large pitted areas. Advanced symptoms include large deeply sunken lesions, often with visible dark-gray to black fungal growth in the center. A zone of wrinkled looking tissue may surround the margins of lesions on mature fruit.

    Placing suspect fruit in a moist environment for 24 hours will often induce the growth of dark-gray mycelia providing telltale diagnostic evidence of target spot infection.

    Management


    Strategies for the management of this disease require an integrated approach for best results. Currently, target spot is controlled primarily by applications of protectant fungicides. It should be noted that tank-mix sprays of copper fungicides and maneb do not provide acceptable levels of target spot control. In recent trials at the University of Florida, fungicides were rated for efficacy as follows:
    1. Switch (cyprodinil and fludioxonil), Inspire Super (difenoconazole and cyprodinil) both from Syngenta Crop Protection
    2. Revus Top (mandipropamid and difenoconazole, Syngenta Crop Protection) and Scala (pyrimethanil, Bayer CropScience)
    3. Tanos (famoxadone and cymoxanil, DuPont Crop Protection), Endura (boscalid, BASF), Quadris (azoxystrobin, Syngenta Crop Protection) and other strobilurins, and Reason (fenamidone, Bayer CropScience)
    4. Bravo (chlorothalonil, Syngenta Crop Protection)
    5. Mancozeb, Copper.